Desert Online General Trading LLC
Dubai, United Arab Emirates
Desert Online General Trading LLC
Dubai, United Arab Emirates


🍰 Bake it till you make it! Perfect bites for every occasion.
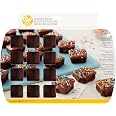
The Wilton Bite-Size Brownie Squares Silicone Mold features a 24-cavity design, allowing you to create mini brownie bites, candies, or gelatin treats. Made from durable silicone, it is safe for use in the oven, microwave, refrigerator, and dishwasher, withstanding temperatures up to 500°F. Measuring 13.25 x 8.25 inches, this mold is a must-have for busy cooks looking to impress at parties or satisfy little snackers.

| Material Type | Silicone |
| Item Weight | 0.47 Pounds |
| Item Dimensions | 0.73 x 13.2 x 8.41 inches |
| Color | Brown |
C**N
Specific Baking Instructions!!!
I bought this pan, but when I went to use it, like other reviewers, I found that Wilton basically only gave washing and heat temperature restrictions for this pan, but no baking instructions. If you are using a brownie mix, the box only gives instructions for normal pans, which don't work with the smallness of these individual brownies. So, I experimented and they turned out PERFECT the first time!! I never write reviews but wanted to share what I learned in hopes that it will help someone else. I used a box of Ghirardelli Double Chocolate Brownie Mix (I'm not promoting the brand, but just wanted to give exact information of what I did. BTW - they are the best boxed brownie mix I've ever used. TO DIE FOR). Anyway. I made the mix as instructed on the box, preheated the oven to 325. I used the Baker's Joy non-stick cooking spray with flour in it (didn't want to take any chances with brownies sticking to pan as some other reviewers reported). For easier filling, I poured the batter into a large ziploc storage bag and snipped off a small bit on one corner (make sure you snip off enough for the chocolate chips that are in this mix to squeeze through). I squeezed a little batter into each square, about 1/2 way full. I put the silicone brownie bite pan onto a metal non-stick cookie sheet for stability and baked one pan for 20 minutes. I removed from the oven after 20 minutes and cooled the brownie bite pan (without the cookie sheet) on a wire rack to cool for 20 minutes. I inverted the brownie pan onto the cookie sheet I had used to bake them on, tapped the brownie pan gently on each square, and then gently lifted the pan and softly squeezed out each little cooked brownie cube. PERFECT!!!! No sticking, no breaking, no crumbling, not even one!! Love this pan and I just ordered another one so I won't have to wait for it to cool in between batches. I was able to get 47 brownie bites out of the one box of 18 oz. mix I used. Hope this info helps someone else.
J**F
Worked like a dream!
I purchased this to make brownie pops (of sorts). As others noted, the directions are not only lacking, but plain not there! Several reviews mention they did some cool-sounding stuff with the pan, but I had a difficult time finding much info in these reviews or Wilton's blog.I washed the pan by hand and dried each corner with paper towel. I used a Misto with veg. oil to grease the pan and everything came out perfectly. The silicone must be placed on a cookie sheet to stay level- I'm not sure how others pulled it off without one. It doesn't take much to fill each cavity half way, maybe less than a TBS. I used a small cookie scoop to fill them and only about half a scoop worth in each cavity.My first batch was with cheep-o Great Value boxed mix. I followed the package directions (350) for the "2 egg/Fuggie" option & baked for 20-23 min. The few extra minutes helped when covering these in candy melts. I'd probably stick with 20 min. if I wasn't dipping them. I left them on the cookie sheet to cool for 15 minutes before turning the mold upside down. The outside rows slipped out, but it helped to let the middle two rows cool a bit more. Cleaning wasn't difficult. Most of my brownies slipped out and I just washed by hand with a sponge. I did pay extra attention to corners, but they're easy to get to with the silicone.If using a mix, I've found the cheaper ones work better. Some of the pricier specialty mixes turn out too airy to keep a shape. I used the same method for cake as well; also using boxed mix. After slowly baking one pan at a time, my homemade recipes weren't worth the extra effort.My primary complaint with the mold is that the squares are very small. Each measures 1.5W x 1.5L x 0.5D. I'd bet these are half the size of a standard ice cube tray or about the size of bite-sized candy bars. I'm probably just a pig, but I want at least two or three bites. I ended up stacking two squares (with frosting between them) before dipping them in chocolate. This is nice when doing small layered cake pops (that don't taste soggy!) but inconvenient when you want all brownie. I made a lemon & margarita cake pop that was a hit and could see trying different flavors. I plan on using the mold for baby food, but still might like it a bit larger.Despite my hesitance, I really like the mold. I've used it several times now and will be using it for two more projects today. It does take some getting used to, but I didn't experience any of the problems others reported. I would recommend this, but you might want to give yourself a test run to see how much to fill each cavity with your mix (each has turned out slightly differently). I'm glad I purchased mine and plan on ordering another one soon. Mostly I'm thrilled that I can make a Pop without all the extra frosting and mush!
G**E
Works exactly as it should but be prepared to experiment with your particular recipe and baking time
I bought this pan because I was asked to make a Tetris birthday cake for my grandson's birthday. I needed to make small square cakes that could be iced in different colors and arranged in a pattern to resemble a Tetris game in progress. I filled and baked 6 pans of these cakes. It took a little practice to know how much batter to put in each square (I found the best was around 2/3 full).I tried using Pam oil spray but the cakes stuck a bit so I switched to baking spray (the kind that has flour in it along with oil) and it worked perfectly. NOTE: Don't spray into each square separately. That made the cakes kind of oily. Instead hold the pan by the "lip" vertically over the sink (to catch any over-spray) and then spray across the whole pan in an even motion as you would with spray paint. This method deposited just enough spray in the squares without pooling and the cakes popped out with no sticking.I was surprised at how long the cakes took to cook through. They were so small I thought they'd be done in less than 10 minutes but they took 19-20. I was using a recipe that has bits of chocolate and fudge in the batter so that could have been the cause.I ended up stacking two of the little cakes with frosting in between for some height (each square is only an inch deep) to make cake "sandwiches" before frosting the tops in the Tetris colors. It's a great pan, washed up well, and the cake was a big hit!
L**A
Nice, but....
I like that it is silicone and you can basically pop the brownies out. It is easy to clean too.Definitely need to have 2 of these trays, about half of the brownie mix fit in the 1 tray. Also, no mention of how full to fill it, so mine did "poof" up a bit. Probably should only fill about 2/3 of the way.And lastly, it is best to let it cool down, then stick in the freezer to be able to pop the brownies out easier.So I do like it, I will be ordering a second one to be able to make a whole box of brownies at once.
Trustpilot
1 month ago
4 days ago