


1038 Clear 1.5 Gallon Kit Resin and Hardener


| Brand | colored epoxies |
| Color | Clear |
| Finish Type | Gloss |
| Size | 1.5 Gallon |
| Item Volume | 1.5 Gallons |
| Special Feature | UV Resistant |
| Unit Count | 1.0 Count |
| Item Form | Liquid |
| Included Components | 2 Quarts of Hardener and 1 Gallon of Resin |
| Age Range (Description) | Adult |
| Model Name | Clear 1.5 Gallon Kit |
| Package Information | Can |
| Full Cure Time | 24 Hours |
| Water Resistance Level | Not Water Resistant |
| Manufacturer | Colore Epoxies |
| Part Number | 1038 |
| Item Weight | 6 pounds |
| Product Dimensions | 23 x 9 x 11 inches |
| Item model number | 1038 |
| Style | 1.5 Gallon |
| Finish | Gloss |
| Material | Resin, Polymer |
| Item Package Quantity | 1 |
| Special Features | UV Resistant |
| Batteries Required? | No |
P**M
Professional grade product at a decent price
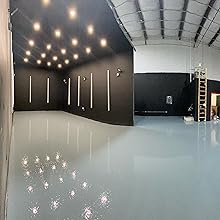
Extremely happy with the results. I’m a DIY’ing mom of 6 and my husband is not a handyman/construction type person so I do a lot of remodeling around our house myself. It was my first time doing epoxy but after watching the guys who laid our epoxy in our basement do it and asking them a lot of questions along the way, I decided I would try it myself. I did a lot of research on different products for a couple weeks before deciding on coloredepoxies.com. I knew I didn’t want to use one of the Rustoleum kits from the home improvement stores. I knew I wanted a professional grade product like the one used by epoxy professionals in our basement. So after much research, I went with this product. I found the prices were reasonable, the coverage was good and I felt confident with their reviews and information they provide on their website. I like the fact that they would sell to me even though I’m not a contractor and I am thrilled with the results. Our garage is 580 ft.² I purchased two kits of the white epoxy, so a total of 6 gallons, the prep work was extensive. It took about a week for me to clean the floors, cement patch and cracks, grind the patches down, then acid etch the floor using muriatic acid and then our power washer. Once dry, I laid the first coat by pouring it out. I quickly realized that using a squeegee and being able to cover the entire area was not gonna happen with one kit so I grabbed a 9in Wooster epoxy glide roller and started rolling out the epoxy after I squeegeed it and spread it across the floor as much as I could. This was my base coat that I had down and there was some translucency where I could see some color of the floor through it but I knew that would be quickly covered with the second coat so I didn’t worry. 24hrs later I applied the second coat which also was very thick and difficult to spread using just the squeegee so I rolled that out as well after pouring it on the floor. I had to work quickly because it does start to set pretty fast the following day it looked great and was dry to walk on but I knew that because I used white I would need to apply a polyeurethane coating over the epoxy so that I wouldn’t get any ambering from the elements so I used a product from PPG called PSX700. It’s a polyeurethane/epoxy hybrid that is considered a Siloxane coating. 24 hours later I applied my first coat of that in the same way I did the epoxy and then 36 hours after that, I applied a second coat of the PSX700 just because I wanted to get a good thick coverage that will hopefully last a lifetime. It’s been a week since the first coat went down and I haven’t parked my car in the garage yet but will in a couple more days. Everything else is moved back in my garage. I accidentally dropped my drill from a 10ft ladder and it hit the floor and chipped it just a hair and I was so mad at myself but surprised it wasn’t worse given that it had only been a couple days and it’s not fully cured yet. I’m going to wait and hope it doesn’t get worse or Continue to chip before repairing it. I attached photos for reference and hope this review is found useful for anyone considering this product. I highly recommend.
N**O
Amazing epoxies!!
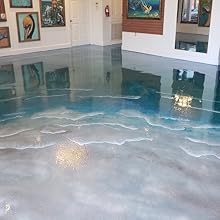
I have never thought to venture to DIY an epoxy floor. Perish the thought! I was over 4K to do a two car garage. So I began some research and I ran into color red epoxies. With the ongoing pandemic, my kids have been limited in what they can do and have been mostly in the house. I felt sorry. So I embarked on a project to transform my garage space into usable space where my kids can have fun.I started with the concrete floor preparation. I did not want to make mistakes in the manner I prepared the floor. I first etched it but I was not pleased with consistence in the profile. So I got myself a grinder and ground the concrete floor to the surface that you see in the attached photo..As you can see, I chose colored epoxies. This was not because of any particular persuasion or prior knowledge. I just read up on it and figured I could use it. I read some negative reviews and many positive ones. I prepared myself with all the tools and appropriate weather and concrete temperature conditions. I knew I had to work fast. I consulted with Jabob at colored epoxies for some feedback before I began and I could not be more satisfied with the attention, care and interest this gentleman demonstrated in guiding me, reassuring me and motivating me to do this - just outstanding support and guidance.My primer went down excellent. No issues at all. I then applied my second coat of gray and broadcast flakes into it. I ran a little short on flakes and my inexperienced broadcast was not uniform. I spoke with Jacob again and he proposed a great solution. I still had the kit for my clear coat. So he suggested that I split and apply a coat over the the flakes and broadcast more flakes into this layer. I ordered more flakes, applied the clear part and this time I came up with a clever way of filling in the flakes. It turned out amazing. My wife could not believe it.After 24 hours, I applied the last clear coat and it just popped the floor to another incredible level. I could not believe I had just done this. In all the process of doing this work, a lot of people walked or stopped by to comment on how I ground the floor and thought this was amazing. When they saw that I was doing epoxy floor, I had many stop overs asking me to do theirs, thinking I was a contractor. They got to find out I was the home owner, lol!I would recommend this product and other colored epoxies to anyone any day. A lot of work goes into the floor preparation and you cannot cut corners. But this epoxy is extremely easy to work with when you follow the instructions properly and, as you can see in my photos, I am a very happy customer and so are my kidos! They just want to be in that garage!Thank you colored epoxies customer service. Their guidance and support is second to none. Particularly Jacob. If I ever want to speak to anyone in customer service anywhere, it would be someone like Jacob. Amazing individual and I truly thank him for the support.PS: I have included a photo of my garage before the work for your reference on what you can achieve with these epoxies.
O**N
Very good quality
Very good quality as advertised .I used it in my 2 car garage. Look so besiyiful
D**P
Mostly what I expected with a couple exceptions, especially the MCU coating.
I applied this epoxy on a 350 sq ft plywood floor. I did a seal coat using 3 gallons first and it went as expected and I was super happy with the low VOC of this epoxy. They're not kidding about 30 min max work time though so make sure everything is ready before you start mixing because it's easy to run out of time. My second coat was 6 gallons and I did it in 2 mixes with some helpers tossing flakes and torching the few bubbles, it went on fine and looked great after it dried. The third coat was a problem. I did 3 gallons of clear to cover and seal in the flakes. This coat was mixed the same as the first two coats with the only difference being it had no pigment in it but it acted like a completely different product. This coat acted like it didn't want to cover kinda like water on an oily surface and there were tons of bubbles to the point that it almost looked foamy in spots but I got most of them out before it set up. The next day it didn't look nearly as good as the first two coats did. It was kind of patchy looking with lines that looked like cracks about every 5 or 6 inches. Some areas were nice and glossy like the colored epoxy coats and other areas had a more matte look. I wasn't terribly worried about it because I was still going to put their urethane top coat on it and I hoped it would even out the gloss and fill the cracks some. It did a pretty good job of evening out the gloss but only helped a little with the cracks. Most important!! don't be fooled by the low VOC claim on the label. The MCU coating DEFINITELY requires a respirator if used indoors and it will take a day or two of good ventilation before the vapors are gone.
L**A
Good to use
Excellent
Trustpilot
3 weeks ago
4 days ago