🌬️ Feel the Breeze, Own the Style!
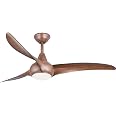
The MINKA-AIREF844-DK Light Wave Ceiling Fan combines modern aesthetics with functionality. Measuring 52 inches and weighing just 6.35 kg, this fan operates at a low power of 16 watts on a 120V system, making it an energy-efficient choice for any room. With a sleek distressed koa finish and remote control capabilities, it’s designed to enhance your living space while providing optimal airflow.
| Brand | Minka-Aire |
| Model Number | F844-DK |
| Product Dimensions | 26.67 x 26.67 x 34.29 cm; 6.35 Kilograms |
| Power / Wattage | 16 watts |
| Voltage | 120 Volts |
| Auto Shutoff | No |
| Item Weight | 6.35 Kilograms |
W**O
Great fan!!
Love the appearance of this fan. Easy to operate with remote. Moves the air well in a large space. I really do recommend this fan great quality….this is the 3rd one I have ordered for different areas.
H**S
Beautiful and functional. However, not very easy to install, and the instructions have some gaps.
Instruction Manual / Installation issues: A. I installed two fans. IF the two fans are on separate electrical circuits (controlled by different fuses in your electrical panel), it is easy to program the two fans separately, although one has to read "frequency interference" in Section 11, "Troubleshooting," or the yellow "change the frequency setting" insert. However, if both fans are on the same circuit, change the frequency to something other than the standard frequency on the first fan BEFORE installing the second fan. Then use the standard frequency setting for the second fan. B. In Section 5, "Hanging the Fan," Step 6: BEFORE lifting the motor assembly into position, strip insulation from the three wires as necessary. Also, perform Section 7, "Finishing the Installation," Step 2 (removing and loosening screws) NOW, not later in Section 7. C. In Section 6, "Electrical Connections," Step 1, strip insulation from the five receiver wires AND the black, white and ground wires protruding from your ceiling BEFORE inserting the receiver into the hangar bracket. Why do all this work before lifting the motor assembly into place and inserting the receiver? Because it is far easier to do this work on the floor instead of looking up at the ceiling and performing the work overhead. D. Section 7, "Finishing the Installation." You will have to make six electrical connections: 3 receiver wires connect to 3 wires powering the fan. Two receiver wires connect to the black and white wires protruding from your ceiling. And green ground wires connect to the copper ground wire protruding from your ceiling. Therefore, six wire nuts and the wires themselves will have to fit under the Canopy that covers the wires, wire nuts, and hangar bracket. So use the smallest wire nuts possible. Fortunately, the kit comes with six small wire nuts and three medium wire nuts.Other than minkaAire NOT thinking through the instructions as well as it should have, and employing an author who should have had better command of the English language, my wife and I LOVE our two Light Waves. They are beautiful, work as expected, and are simple to operate. If you are reasonably adept at mechanical work, go for it. Otherwise, hire an electrician and expect tp pay for a little extra time required to read and digest the Instruction Manual.
P**T
Great Design and Rustic fan for the office and a nice finish.
Fan install was relatively straight forward. After install I did notice some slight clattering, so I lifted off the canopy portion that sits atop the fan motor and clamped it to stay up(it just sits down on the fan motor by gravity with no fasteners). Turned the fan back on high and the noise was still there. So I put that canopy cover back in place and removed the small upper canopy screw cover and checked for noise again and it was still there. I then removed the 2 screws holding the upper canopy cover on and then let it slide down on top of the lower motor cover. I then turned the fan back on high and "Wa-Lah"....totally quiet, so I knew I'd found the culprit. Did some troubleshooting, and looked at the upper canopy cover on the inside and then looked at where it sits up next to the fan mount bracket and saw that it was metal, just like the canopy cover, so I took some Gorilla double sided tape(any double sided tape will work) and cut three little strips that would just fit between the metal on the mount bracket and the metal on the upper canopy cover where they fit next to each other when screwed down. I slid the upper canopy cover back up and installed the 2 screws and then put the trim screw cover back on. I turned the fan back on high and guess what....no more rattling. I'm assuming I'm not the only one who has experienced this and thought I'd get this written in the review, as someone else might not have to scratch their head as long and get the issue fixed ASAP. If the Manufacturer is reading this, please put a couple thin little rub-strip pieces on the inside small diameter of that upper canopy cover, so there is no metal-to-metal contact when those 2 screws are tightened down. Okay....enough here on this, and I'll once again say I Love the fan and its design. I'm only docking one star on the noise level, and it's something that can easily be rectified with just a small piece of rub-strip material. Best Regards to all other owners of this fan.
D**D
Love this mid-century look fixture!
Beautiful fixture that goes great with my mid-century modern room! It was very difficult to find something with a true mid-century modern look and color - so I was so happy to find this one! I've had several people give positive comments on it - including the electrician that installed it. I didn't watch him install it, but he didn't mention any issues during the install, so I'm guessing it was simple enough to install. I believe I read that the blades are a composite material, but you would never know that to see it. It looks and feels just like wood - however, I am guessing if they used a laminate wood in time it would peel - so I'm actually happy it is not wood. I was going to give it 4 stars because of the light - but it is so nice, I decided that wasn't enough to drop it a star. The light works from a remote control (as does the speed of the fan). It is dimmable; my electrician must have put in an LED bulb [NOTE: based on other reviews, the bulb is already installed in the unit; I did not know that since I did not watch him install it. hmmm...I wonder how you replace the bulb when it goes out??] I think it is too bright white. When it burns out, I will see about getting a soft-white dimmable bulb instead. On its highest setting it is overpowering and difficult to even look at - even though the globe is frosted - it is like an intense spot light. For general use, the lowest setting is fine - which is similar to a 40 watt incandescent. There is a few moments of lag from the time you turn on the light switch until the light actually turns on. The fan speeds are fine - but there is a bit of a hum at the fastest speed. I use this in my office so I don't notice it - if it was in the bedroom it may be a different matter. The slow and medium settings are totally silent. I was concerned it might be a bit large for my 12x14 room, but it looks fine - now that I'm used to it. :-)
W**M
Very stylish fan that generates significant air movement even on low setting
We installed 2 of these in our home when we remodeled this year. We are in a coastal community and this fan blends nicely with the tropical and coastal décor. Visitors have commented about the pleasing aesthetics of the fans.We typically run them on low setting, and even at that they generate more air movement than our prior flat blade fans did. The included light kit produces a fairly warm light, and is dimmable. In order to dim or brighten the light simply hold down one of the buttons on the remote control used to turn on and off the light. A short press on one of those buttons will turn on or off the light whereas a long press will dim or brighten it.Installation was a little different from our old ceiling fans. With these there is a remote control receiver that must be wired and then mounted within the fan bracket. We are operating these with the included remote controls. We ultimately installed 4 Minka Aire fans (the other 2 were a smaller version) and it was easy to set each remote control to operate its respective fan. If desired the remote control can be set to control multiple units, but of course that would make changing settings on just one more difficult. There are dip switches that can be used to make this setting, and included instructions then walk you through the final steps to get the receiver and remote control to communicate with one another.We are very pleased with the appearance and operation of these fans.
Trustpilot
2 weeks ago
1 month ago