


Illuminate Your Life with Style! 💡
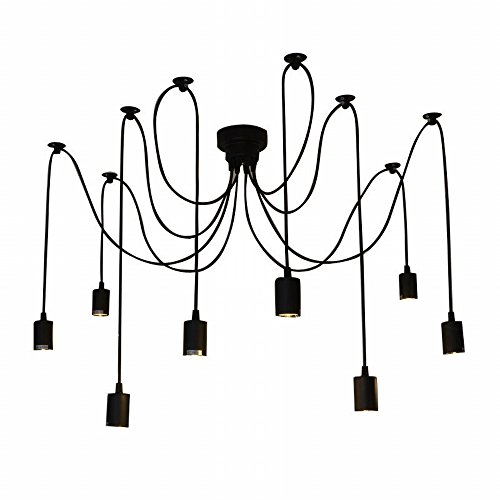
The Lixada 8 Arms Adjustable DIY Ceiling Spider Lamp is a retro-inspired chandelier featuring eight light sources, each with a customizable 1.8m wire for optimal height adjustment. Designed for easy installation without drilling, this lamp combines safety and aesthetic appeal, making it a versatile choice for various indoor settings like kitchens, bedrooms, and restaurants.
| Unit Count | 1.0 Count |
| Item Weight | 1302 Grams |
| Item Dimensions L x W x H | 9.3"L x 5.2"W x 10.1"H |
| Theme | Retro/Vintage |
| Shade Color | black |
| Shape | Bulbs |
| Style Name | Retro |
| Light Fixture Form | Ceiling |
| Color | Black |
| Finish Types | Matte |
| Shade Material | Plastic & Mettal |
| Material Type | Plastic, Steel |
| Required Assembly | Yes |
| Installation Type | pendant mounted |
| Lighting Method | Downlight |
| Wattage | 60 watts |
| Bulb Base | E26 |
| Mounting Type | Hanging |
| Fixture Type | Non Removable |
| Light Source Type | E26 & E27 bulb |
| Number of Light Sources | 8 |
| Voltage | 265 Volts |
| Room Type | Kitchen, Bedroom |
| Specific Uses For Product | Bedroom, Kitchen |
| Indoor Outdoor Usage | Indoor |
| Power Source | ac |
| Additional Features | Not Dimmable |
C**O
Nice light !
After unboxing I noticed that all eight cords all had a mind of their own with twists and kinks. After several hours at room temperature, they still looked odd. What to do ? Heat up a gallon or so of water on the stove and put the majority of each cable in the hot but not boiling water. I kept both ends dry to be safe. After 10 seconds or so the wires were as limp as boiled spaghetti so I wiped off the water and let them hang overnight. Now they seem to have a memory of being straight cables and will install without kinks. Thanks to some random YouTube video for this idea, it worked !
Z**R
Great Buy, but Read a Few Reviews Before Deciding Yourself
I did my research/shopping in store and online before I finally decided to chance this one. I knew ahead of time it had to be completely wired and put together, but that kind of stuff doesn't bother me. (It's a lot of pieces and looks intimidating, but you don't need the majority of them)Also, one already assembled was going to cost $150+ and that wasn't happening. I will say this was kind of a pain to put together because they don't send enough wire nuts for as many wires that need to be linked together. (I bought the 8 arm chandelier) Don't attempt to fit all of them together either for safety purposes.. it's not worth shorting out the light fixture or potentially burning your house down. Buy extra wire nuts. They only sent me 3.Once we got it completely put together and up to the ceiling, the center screw isn't long enough so you have to fiddle with it to make it work. Overall very happy with how this turned out. (Pictures attached)Note: Please make sure you know how to properly wire electrical before purchasing.. the instructions are awful and don't explain at all how to do this. You really do need extra wire and wire nuts to SAFELY make this happen.
M**
Fun!
This thing was so easy to put up, and looks amazing in my salon. Good quality, good price, we are buying a second for our home
A**Y
Light
Love it I have
R**C
DIY kit
Four stars because the lights look good, the materials are pretty good, and the price is good. Keep in mind this is a DIY kit, not a fixture until you put it together.Like others have said, the directions are so bad they might as well leave them out.I have put together dozens of light fixtures over the years, so I didn't find it difficult. Do yourself a favor and buy wire connectors. Trying to get six wires, plus the wires in the ceiling together in a wire nut is going to make you crazy.The center threaded piece (technically a nipple, but you just giggled, didn't you?) is too short. I picked up a longer one and the lights went up no problem.Wires are EU color coded. Just do a quick search for the US conversion.The screws included are pointed, don't use them in your electric box. You'll need new screws, or use the ones you had in the old fixture.I wrapped the wires around inexpensive cafe rods to streamline the look. Very happy with the look once the wires hung for awhile and smoothed out.
A**R
Love it!!
This is a really cool fixture and I’m excited to use it to complete my design idea. As far as the instructions go, they are the easiest because those pictures are difficult to see, but I’m here to help you!ASSEMBLY DIRECTIONS:First, you want to open all your packages and ensure you have all your hardware and dangly bits.Remove the long black pieces (#6) from the hardware bag. These pieces, coupled with the black caps (#7), will “pinch” the dangly bits to create tension and keep them from slipping from the base You don’t want to assemble this any other way or your dangly bits will be hanging loosely, held together only by a wire cap (#10), thus creating a dangerous fire hazard!!Hold one long black piece (#6) and insert the short threaded end into the base from the outside. You want the short threaded end of the long back piece (#6) to insert into the base from the outside so the small lip on the long black piece (#6) catches on the base.From the inside of the base, place a crimped washer (#3) and a bolt (#4) onto the threaded portion of the long black piece (#6) and hand tighten the bolt. Do this for all your holes that will have a dangly bit. At this point, your fixture should look like picture A on the inside and B on the outside.Now, if you want to attach the dangly bits to the ceiling all spider-like, you’ll want to add the ceiling attachments (#8) to each wire and secure them. I didn’t use mine so I didn’t include pictures.Once you have the ceiling attachments on your wires, place a black cap (#7) on each wire with the pointy end pointing in the direction of the bulb housing and the large end closest to the exposed wires. See picture C.Now poke the wires up through each of the long black pieces (#6) and hand tighten the black caps (#7) to create tension on the wires.Adjust the length of each dangly bit to your liking and wire your fixture according to the remainder of the directions. Congratulations! Your dangly light is done!!
E**H
Some Assembly Required
As other reviewers have mentioned, this is a kit that comes in pieces. I'm giving it 3 stars because it was a pain to assemble for the non-electrician types. Nice light when done, though!
K**R
Perfect with patience and know how
Love this 8 arm fixture, for us it took only about an hour and half, but my husband is great with electrical. If you're not, be aware the directions are rubish. We're not picky people, but we even had the blow dryer out to see straighten and smooth out the arms(electrical cords). All of the parts were in the box except of course the bulbs. We bought 8 Edison 550 lumen 6w bulbs and it lite my kitchen up well.
L**S
Falsches Zubehör geliefert
Ich liebe diese Lampe über alles, aber der Aufbau beziehungsweise die Montage war sehr problematisch. Ich musste mir einen Elektriker hinzuziehen, der mir geholfen hat die Lampe anzuschließen, weil die mitgelieferten Materialien nicht die richtigen waren beziehungsweise mangelhaft vorhanden waren.... also Montage und in Betriebname haben mehrere Stunden bzw. 2 Tage beansprucht..... das muss ich negativ werten, aber ansonsten sieht die Lampe sehr schön aus, ich bin sehr froh das ich mir sie gekauft habe 😊
E**A
Es muy original, me encanta
La compré reacondicionada de Amazon. La única pega es que la caja estaba estropeada, valió la pena el descuento. La lámpara genial, con instrucciones y todo bien. Montarla no ha sido tan difícil como parece y nos ha quedado muy bien. Las patas las hemos pegado con pegalotodo tipo "no más clavos".Después de 9 meses no se ha caído ninguna pata, aguantan perfectamente con el pegalotodo. Sigo muy contenta y da muuucha luz.
J**A
STYLE MINIMALISTE ET DESIGN
ce luminaire est minimaliste mais il fait beaucoup d'effet dans le style industriel. Il faut privilégier des ampoules de tailles différentes pour un résultat optimal. Bon rapport qualité/prix. J'ai vu chez Leroy Merlin un article similaire en promotion à 89 euros au lieu de 120 euros. Donc cela reste une bonne affaire.
F**H
Five Stars
Amazing value! We have this up in our kitchen and it looks great.
S**O
Lámpara Vintage
El producto llegó dentro de los plazos estipulados por el vendedor, perfectamente empaquetada y protegida. La lámpara viene desmontada y hay que montar cada uno de sus brazos. El montaje es muy simple, y fácil para los que no sean manitas. Solamente necesitaréis un destornillador de raya pequeño, tijeras y comprar fichas de empalme para las uniones de los cables.Las fichas que van al techo se pueden colocar con tornillos o con cinta de doble cara (buena). Yo he preferido hacerlo con cinta para no hacer muchos agujeros en el techo. El producto me ha gustado mucho y lo recomendaría sin ningún problema.
Trustpilot
1 day ago
1 week ago