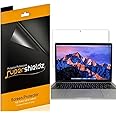
Shield Your Screen, Elevate Your Experience! 🖥️
The Supershieldz 3 Pack for MacBook Pro 13 inch (2016-2022 / M1, M2) offers a matte, anti-glare, and anti-fingerprint solution to keep your screen pristine. Made from high-quality Japanese PET film, these protectors ensure easy installation and a natural touch sensitivity, safeguarding your device from scratches and dust.


| Finish Type | Matte |
| Screen Surface Description | Matte |
| Screen Size | 13 Inches |
| Compatible Phone Models | MacBook Pro 13 inch |
| Special Features | Anti-Fingerprint, Anti Glare, Scratch Resistant |
| Compatible Devices | MacBook Pro 13 inch (2016-2022 / M1, M2) |
| Item Hardness | 3H |
| Unit Count | 3.0 Count |
| Number of Items | 3 |
| Item Dimensions L x W | 11.4"L x 8.6"W |
| Material Type | Polyethylene Terephthalate |
H**A
Fantastic Macbook Pro 2018 Screen Protector. NO BUBBLES!
I would definitely recommend this screen protector for your computer, and I had such a good experience with it, I would buy this brand of screen protector again.Quality: Very good. When you put it on, it definitely has a noticeable matte finish, but it's still easy to see through. The matte finish helps with glare on the screen. The screen protector is thin and fits the computer well.Installation: Fantastic!!! This was the best screen protector installation process I've ever had. The manufacturers were smart in the way they set up installation, and I ended up WITH BASICALLY NO BUBBLES! In my prior experience, there's always at least a few bubbles especially at the corners, but in this case I only have 2 very tiny flaws where a piece of dust got caught under the screen. Otherwise, no other air bubbles. And the installation process was pretty easy, and I got it on correctly the first try!For installation, there are 3 layers1) flimsy peel away plastic to expose the sticky side2) the actual screen protector3) a rigid plastic to use for positioning during installation but is removed after installation to expose the matte finishYou start by peeling away just the corner or top portion of the flimsy plastic layer in order to start sticking the screen protector to the computer. Then using the included squeegee, you slowly squeeze out the air bubbles and work your way down the screen, slowly peeling away more of the flimsy layer, until the screen protector is completed installed. During this process, the rigid plastic makes it easy to hold onto the protector and position it on the screen. After the protector is installed, the rigid plastic is removed. It was easy and effective in removing bubbles.Pro tip--to avoid fingerprints during installation and to keep the sticky side from sticking to your hands, wear thin plastic gloves. It helps a lot.
H**P
great product
Great product. It was easy to apply and it fits perfectly on my screen. Very durable adhesive.
M**T
Just Some Guy's Success Story
I recently received a new 2019 MacBook Pro 13" ( Model A1989) for work, so keeping it protected and in proper working condition was very important to me. I work from home time to time with two dogs at home...fur, spills, etc., so a screen protector (along with a few other Amazon purchases) were completely necessary. I found this product and checked out the reviews which were all across the board: success stories to nightmare stories. I order these cuz why not? They're $10. Anyway, after messing up the first protector (my fault), I got the second one on completely smooth and bubble-free (trust me, I'm as surprised as you are)! The instructions are fool proof, so any negative comments are likely due to user error (I was able to do it by myself, too). That said, a few tips to help make the process easier on yourself:- It's a 3 pack, so you have 3 chances to get it right. After sacrificing the first one for practice, I was able to nail it with the second one.- Be sure to clean your screen of any smudges and dust with the microfiber towelette.- Flip your laptop so the back of the screen is facing downward and let gravity help you (work smarter, not harder)- Work from one side (top and bottom corner) to the other (don't do both top corners or both bottom corners at the same time).- Don't start DIRECTLY in the rounded top corner otherwise you'll cover up part of the camera. Peel and stick enough in the top and bottom corners and on the side, then kind of lay down/fold the protective film to make sure you won't cover up the camera.- There should be about 1mm of unprotected edges all the way around the screen (see pictures above).- Go slowly and evenly side to side using the card to press out any bubbles. Try not to peel the film back up to much otherwise you're asking for bubbles and dust to get under there!- Voila!As for screen quality, you still have very crisp, clear visuals with significantly reduced glare and peace of mind from screen damage.This is my first time putting a screen protector on a laptop, and I was able to figure it out. If you go slow and have a steady hand, it's VERY easy to apply. Again, the instructions are fool proof. I would definitely recommend this product to anyone. Initial reaction: 5/5 stars. Hands down.
Trustpilot
2 months ago
3 days ago