🚗 Drive Smart, Park Smarter!
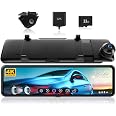
The REDTIGER T700 Rear View Mirror Camera combines cutting-edge 4K UHD recording with advanced safety features, including night vision, GPS tracking, and smart parking assistance, all displayed on an expansive 11" touch screen. Perfect for modern drivers seeking clarity and security on the road.
M**E
Installed easily in a 2021 RAM Promaster (Love so much, I got another one)
Update July 2023: no issues. I LOVE THIS REARVIEW MIRROR!!!Update April 2023:: still going strong. No issues :-)REDTIGER mirror dash cam backup Camera, 11” UHD 4K Front and 1080P RearI’d like to share my EASY experience on installing the the REDTIGER rear view digital mirror to remove the mystery and share how ridiculously easy it was. I am a 67 year old woman with no experience in this type of project. Yet, it was easy peasy. Read on if you want to follow my steps.Testing (Do not miss this step) -1) I mounted the Mirror over my current one with the bungee straps.2) I plugged the rear camera into the port on the mirror and sat the camera on my seat.3) I attached the power cord to the mirror4) Lastly I plugged in the 12V power plug into the cigarette lighter.I then started the Van and all was good. I observed a great picture from both cameras and played around with it a bit to get to know the menus.Run rear wire:I have vertical blinds in my house. I removed one and brought it to the van. (Stay with me). After popping all the connectors on the cargo side of the headliner, to loosen up the headliner (carefully with an auto upholstery tool) I slipped the blind slat under the headliner starting behind the driver's seat and slanting towards the mirror. It worked like a charm and appeared right beside the mirror. I taped a cotton string to that end and pulled the blind slat back out, pulling the string behind. I then detached the string and put my blind slat back at my house window. (A tool with its own convenient storage hanger).I unplugged the camera wire from the larger main wire and set the camera aside. Leaving the longer rear camera wire plugged into the mirror (so I wouldn't pull it too far, I attached the other end to the string and pulled it through above the headliner until there was little slack at the mirror.In the Redtiger box there is just enough wire to get it where it needs to go so don’t let a lot of slack.I then ran the wire through the channel at the top side wall in the cardo area. (I used the corrugated wire wrap where it went through sharp areas). When I got to the back I ran it around the corner and let it hang out of one of the holes.Remove rear cargo light.In the middle above the back door, inside, there is a Cargo light which can be carefully popped out. Do that so you have access to the back of the black box that is outside above your back doors. You can unplug this light if you follow the wires and get it out of your way or let it hang in your way. (I removed it)Mounting the camera outside:Now, here’s the easy part you can make difficult. IMPORTANT TO READ THIS.If you try to remove the black structure above the outside back doors you will likely find the factory rivnuts holding onto those 2 large screws are stripped. Therefore you might loosen the housing but won't be able to tighten it up. This will cause you to have to cut it apart and find a replacement at a junk yard. So DO NOT TOUCH THESE SCREWS. Instead - from the inside, at that middle area where you just removed the Cargo light, carefully press thru the back of that box with your fingers. There is a rubber covering over the opening that is sliced so wires can go through it from the RAM supplied back up camera and light. Locate the bottom of the box with your fingers and assure yourself it is an empty area. Drill a small hole there (careful not to let your bit go into the box much - (might use a drill stop). - just through the black case). From the outside, and into the hole you drilled, you can insert the short wire from the REDTIGER rear camera by finding a thin piece of bendable metal and creating a pull string like done at the front. Pull the wire inside. Keep at it until you figure out how to get it from the outside to the inside - use patience, SERIOUSLY DO NOT TRY TO UNSCREW THAT BOX. Once you have the wires routed to each other, plug it in and YOU DID IT. No mystery. Just easy.I’ve mounted my camera on top of the box using duct tape going over the top of it and onto the box until I was sure I liked where I placed it. I found the tape provided on the camera does not stick to the black plastic box. I used 100% clear silicon when I was happy with the placement after driving it around for a few days with the duct tape..I mounted it on TOP of the black box holding the backup light for 2 reasons 1) no mud can splash on it as it might if mounted at the license plate and 2) not enough wire to make it there to the bottom of the van and then outside.. You MUST mount on top of the balck box, not the bottom or your door will destroy the camera WHEN YOU CLOSE IT. There is no clearance.EXTERNAL GPS: when I’d read there was an external GPS I figured that meant external to the van so I wasn’t going to install it. Lol. It meant external to the mirror. You merely plug it in and lay it on the dash at the window in front of the passenger. You will then see your direction and speed right in the mirror, bottom left corner.You can hide wires at the windshield by tucking them under the headliner.Conclusion: For some of you there was no worry about this at all but for us newbies at working around car interiors I hope it helps. This install took me 90 minutes tops. I absolutely love this mirror. It is so clear, both front and rear. I have no rear windows and now see more of the rear of my van than a real mirror would give me.After loving this camera for a week, I re-ran the power cable above the headliner and back to my house lithium batteries (properly sized cigarette power port). So I then had 24/7 surveillance.Second Camera PurchasedThe great reveal I want to share with you is that this is the second one I purchased. The second one has the "mirror" camera looking out my left side cargo area windows. I ran this second purchase rear camera wire out a second hole I drilled into that outside black box and mounted the camera to look at the right side area of my van.I also power this with my house lithium batteries. (a second properly sized cigarette power port - don't try doubling up on 1 cigarette port)I now see the front and rear of my van from the front mirror, and both sides with my second "mirror" mounted at a side window.I've been running this entire setup for a few days now and I LOVE IT!!!! I will update with any reductions in stars or any more info I find.. So far this is a five star purchase. I'd get one for my prius, but that just might be when my neighbors think I've lost it. :-)
B**N
Good camera
At first it's a little weird having a camera instead of a rear view mirror. After about a week I got used to it and I now like it better because I can see more with the camera than I ever could with the rear view mirror.The camera is very crisp and clear and can be adjusted up or down by sliding your finger across the screen or physically tilting the cameras around. Very cool.Plug and play, easy set up. Only thing is make sure you have more than 1 aux plug if you need to use a car charger, the aux plug does not accommodate any other accessories. But that's expected with something drawing this much power.Only qualm, after about 2 months, the rear camera suddenly became very blurry. The company contacted me via email and sent a new rear camera. I think mine was just defective. If this one holds out more than 2 months, I would give it 5 stars because nothing is 100% perfect.
C**L
Great dash cam and awesome customer support
I really like this dash cam.I installed the front camera (which straps over the rear view mirror) and the rear camera of my Escape. At first I needed to get used to not having my normal rear view mirror because the camera unit straps in front of the mirror. I leave the dash cam to always view the rear camera and I can actually get a wider field of view on each side of my Escape. Of course, I mounted the rear camera to my back window so there is a bit of a tinted view but still very good.The main camera was very easy to install and easy to set up. The hardest part was routing the cabling under the headliner and the A-pillar on both sides of the Escape. The wiring instructions were easy to follow.I didn't order the Parking mode feature at first so when I inquired customer service on an estimate for the price of the kit, Nora from customer service sent the kit to me at no cost. She said that Redtiger wanted to show their sincerity and give me a good product experience.When I received the parking mode kit, I noticed the pre-wired kit included normal size automobile fuses. My Ford Escape uses the micro fuses instead so I couldn't use the provided fuses. Nora said that if I could find a micro fuse adapter, Redtiger would reimburse me. So, I found the micro fuse adapter at my local Auto zone store. I cut off the provided fuse from the wire and used the provided butt splice to connect both the B+ and ACC wires. I successfully installed the adapters and everything worked perfectly.Through all of this, I had sent email questios and had immediate responses from Nora and her team. The customer service is very good! One of my questions was how to tell whether parking mode was working. Nora and her team took the time to go out in the shop and capture the process on video and then emailed me the video which was very informative.I provided some photos. I show what the front camera view and what the rear camera views. I also included a photo of where the rear camera is mounted.I highly recommend this dash cam!
C**E
Great quality for price!!
Love it!!! After a couple of years it worked great but the camera has died . It stopped working entirely. The quality and image was great however. Will purchased again In the future!! Grey sound quality and looks good in the dark
Trustpilot
1 day ago
1 month ago