

Desertcart purchases this item on your behalf and handles shipping, customs, and support to Portugal.
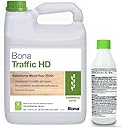
๐ ๏ธ Elevate your hardwood floors with Bona Traffic HD โ where durability meets eco-smart sophistication.
BonaKemi Bona Traffic HD Satin 128 Oz is a premium waterborne urethane finish designed for hardwood floors, delivering superior scuff, scratch, and chemical resistance. It dries fast in 2-3 hours, requires no sealer over stained floors, and features a low-VOC, non-toxic formula that supports sustainable living. Available in a professional satin finish, it ensures exceptional build quality with excellent flow and leveling for a flawless, long-lasting surface.
| ASIN | B09T74QGJB |
| Additional Features | Non Toxic |
| Base Material | Urethane |
| Best Sellers Rank | #20,453 in Tools & Home Improvement ( See Top 100 in Tools & Home Improvement ) #1 in Flooring Finish Compound |
| Brand | Bona |
| Brand Name | Bona |
| Coating Description | The world's leading waterborne finish, providing unsurpassed scuff, scratch and chemical resistance |
| Color | Satin |
| Compatible Material | Wood |
| Container Type | Pail |
| Coverage | Full |
| Customer Reviews | 4.3 out of 5 stars 195 Reviews |
| Finish Types | Satin |
| Item Weight | 8 pounds |
| Liquid Volume | 128 fluid ounces |
| Manufacturer | BonaKemi |
| Manufacturer Part Number | WT155618001-1 |
| Material | Urethane |
| Material Type | Urethane |
| Model Name | Bona Traffic HD |
| Model Number | WT155618001 |
| Number of Items | 1 |
| Number of Packs | 2 |
| Opacity | 1 inches |
| Paint Type | Watercolor |
| Size | 2 Piece Set |
| Surface Recommendation | Wood |
| Unit Count | 128 Ounce |
P**S
Excellent Product--A Thorough Review, How We Did It, and What We'd Do Differently
First time floor finisher here. We bought a 1920s house that had fallen into pretty hard disrepair back in June. One of the first things we did was pull up the disgusting carpet that had endured decades of heavy smoking and pets and discovered that the floors below were still in pretty good shape. Decided early on that we were going to sand and refinish them and then spent about two months watching youtube videos to learn how to do it while focusing on getting the painting mostly done (to help keep from spills on the newly finished floors). Eventually landed on the Bona system as the best option, partly because it was getting rave reviews and partly because the house is poorly ventilated and the low VOCs was a big plus. We decided to use the Amberseal first, figuring the really old floors could use it, but also liking the warmer, darker color it offered to straight sealing. Then topped it with this Traffic HD. We weren't exactly sure about our floor footage, but guessed it at around 600 (I think it's actually closer to 800, and you'd think getting an actual measurement at some point would be smart, but here we are, already done with the project and not really caring about the specifics anymore). We got two gallons of each. It took every ounce of the two gallons of sealer to get it covered with one coat. This top seal went a little further. We had hoped to get two coats in all the rooms but ended up only getting one in each of the two smaller bedrooms that we figured would have the lowest traffic and two on the other three rooms that would see more action. This product is as advertised. It was virtually vaporless. We had all air circulation off so we wouldn't be kicking up dust and didn't even open the doors and windows. It had a bit of a scent to it, but even that went away after a day or so. It was also incredibly easy to apply. Because the floors had a bit of spacing between the boards and we weren't interested in filling every one of them individually before sanding, we decided against the pour and spread method, figuring we would lose too much in the cracks. Instead, we used a standard sized paint roller on a pole and an 8 inch paint pad that we bought at our local Ace. I gotta say, this application is what those pads are made for. I've never liked how they work with paint so have never really used them much, but it was magic for applying both of these products along the walls. For the roller we used a 1/4 nap synthetic roller, figuring it would work best for the thin, even coats needed for floor treatments. This worked just fine. We had some standard 3/4 nap rollers that we thought about trying after several of the videos we watched recommended it, but never tried it. I was afraid it would leave a bit of an uneven coating because of its bushier nature, but if it's what professionals use, then I dunno. Dry times were pretty quick. By the time we finished spreading the sealer in the last room, the first room was pretty much dry--we were working as fast as we could, so it was only a couple hours, tops. Still, we didn't push it, so we let it sit overnight and hit it with the top coat the next day. They recommend getting coats on within 24 hours of each other, as I recall, so we didn't want to let it sit until the next weekend or anything before applying the top coats. The next day we started with the first coat bright and early then went and killed a few hours before coming back for the second coat. The floor was dry enough to walk on with socked feet by then and we did our second coat. Just to be safe, we didn't do anything in the house until the following weekend. During this time we did turn on some fans, which we probably shouldn't have done. There were some dust splotches that had scattered around and stuck in the sealer, but nobody but us will probably ever notice them. This was two weeks ago. We decided not to move any furniture onto it for as long as we can avoid it, just to give it time to cure. I think they recommend a month before putting down any rugs or leaving anything on there that won't let it breath, so we're doing our best to take our time on that end. It looks gorgeous. We couldn't be happier with the results. When I went back in there after that first week, I just walked around staring at the floor for a good twenty minutes, just marveling at the difference. I've included some photos but I'm afraid that we didn't do a GREAT job of getting before and after pictures from the same perspectives. Things I learned from this experience that might be useful for other people doing this for the first time: 1) Whatever time you think you'll need to sand the floors (if they are rough like ours were), probably give yourself an extra day if you want a really smooth result. We only had the sander for one day and we put close to 10 hours in that day, working with the rented big belt sander, a smaller hand held, and a random orbit sander. This wasn't NEARLY enough time, but we went ahead and returned the sander the next morning. We should have gone another day. We only managed to get to 80 grit, it would have been ideal if we could have gotten to 120. One of the small bedrooms we also didn't get enough time to even get to 80 along the grain, so it had plenty of cross-grain scratches. I figured I could get it with the smaller belt sander later. I did, but it took an addition two days of work to do it. Much regret. As for smoothness of the floor with only the 80 grit . . . it's fine. It would have been nicer with the 120 and would have finished clearing out a lot of tiny cross scratches that we really didn't notice until we really started looking. 2) Sanding/buffing between coats. This probably would be a not terrible idea. We didn't because we didn't have the equipment and didn't want to rent a buffer (we're two hours away from the nearest place that rents that kind of stuff). The end result looks great but the floor IS a bit, I don't know, gritty? It's a little bumpy and snags on swiffer pads and the like. This does eventually wear down, we've discovered as we walked on it, but it's not ideal. I'm looking around for some kind of floor buffer/polisher that isn't just a pad for sander to see if it helps, but haven't had much luck so far. This also likely would knock out the dust specks that floated in after we put the second coat down. And, kind of, that's all I would do differently. As a first-timer, I'm very pleased with the end result. I'm a bit of a nitpicky perfectionist when it comes to my projects, but at the end of the day we just kept telling ourselves "This looks magnificent compared to what it was and nobody but us will ever notice the little foibles that we see." And, as I've learned with other projects I've tackled in the past, this is absolutely true. So if you have a project like this that you're considering, get after it! This stuff is more expensive than some of the alternatives out there, but it's super easy to work with and the results are excellent!
J**N
Outstanding product
Saturday August 31: I am an experienced amateur remodeler, having done all aspects of this field for over 45 years. My home has a complicated stairway, and it was the only thing in the house still carpeted. I finally got the nerve to take on this complicated project and ripped out the carpet. The treads had to be custom-cut, I used red oak and chose an oil based stain to match the hardwood on the main floor. I researched finishes, and chose Bona Traffic HD. I followed the instructions to the letter, and the results after the first coat set up are amazing. The product is easy to apply, the surface is flooded, itโs not applied the way paint or poly or stain is applied. Doing stair treads, I have some vertical surfaces to coat, which I guess this product isnโt really designed for that, but using a quality foam brush, I was able to do the vertical portion and achieve the same results as the horizontal surface. I would pour some Bona on a tread and spread it with the foam brush. Any excess I would work right off the edge into a cardboard box and clean up the edge afterward. It was 80ยฐ F with a 70% humidity level, neither of which were in the ideal range specified by Bona, but the set up time was about two hours. Itโs interesting to note that this product is denoted as โprofessional use onlyโ, but an experienced homeowner who understands the basics and knows to follow the manufacturerโs instructions carefully should achieve top notch results. For the sake of convenience Iโm waiting 24 hours to recoat, I donโt know if Iโll do two or three. Some Bona users stop at two, some say three. One final note, as sold the entire gallon is intended to be mixed and used all at once. I have under 100 ft2 of stair treads, so I needed a way to mix up small batches. The ratio is 1:11.33, a weird amount, so further research revealed that Bona sells a mixing bottle for purposes like mine, and it sure simplified the process. Trouble is, the only folks you can get it from are distributors or (I guess) Bona themselves. Amazon should carry the mixing bottle, Iโm sure Iโm not the only one who didnโt use the whole gallon at once. I will update this review as I progress on this. Sunday September 1: I applied the second coat today, it is laying down one beautiful finish! Monday September 2: Applied the third and final coat. It really is important with this product that you find that sweet spot between too little and too much. If you really lay it on heavy, just make sure itโs even and not ponding, excessive ponding will not fully flow out. Applying it too thinly may result in a streaky finish. My first opportunity to install these will be week after next. Bona says itโs fully set in three days, so Iโll be well past that!
S**Y
Great product! Just expensive
Very easy to work with and result is phenomenal when done right. Very durable
D**N
Left Cloudy Spots
Left spots on the floor with proper prep. Too expensive to not preform as expected. Had to thow out, luckily started on small portion first
B**L
People are always asking me if our floors are white oak...
I'm like, "Nope! These are red oak floors. I sanded the floors throughout our new mid-century home from 36 grit all the way up to 100 grit. Then I got down on my hands and knees and used artists paint brushes to work oxalic acid into the 40 year old pet stains. I did that step several times, until I was happy with the lift. Once that was done, I saturated the worst areas in Urine Destroyer by Nature's Miracle to eliminate gnarly odors that were reinvigorated during the sanding process. Then I let the floors fully dry for about 72 hours. After that, I did a final sanding up to 120 grit. Next, I hit the floors with 2 coats of Bona NordicSeal and one coat of Bona Traffic HD Satin using a regular microfiber paint roller and a metal extender letting each coat dry in between passes. Once the Bona Traffic was dry, I buffed the floors up to 240, hit it with a final coat of the Bona Traffic HD Satin and called it a day. We moved in about a week later." So yes! I highly recommend this product. I have read that people found it hard to work with - but I didn't experience that. It was easy! there were some moments when it was drying where it looked like it might turn out milky or spotty, but I just waited for those to fully dry before doing the next coat and everything turned out great. If you manage your expectations, you CAN totally do it yourself: just be realistic and understand that you're not going to get a truly professional-level finish from your first attempt. If you professional: hire a professional. Otherwise, if you just want some awesome DIY floors for cheap, (or if your floors are so wrecked you have nothing to lose), just go for it! When we closed on our house, I thought our floors would have to be 100% replaced. DIYing with NordicSeal bought us time and breathing room to spend our money on other critical areas of the house, like upgrading our electric and buying a new roof. Once day, we'll probably replace the floors. Being able to put it off until later because they look pretty dang good has been a big win for us. Thanks!!
H**E
Beautiful
Love it. Goes on super easy, looks beautiful.
E**B
Not for the average DYI person with 3 week post application update...not over MINWAX with this!
This Bona Traffic HD is definitely not for the weekend warrior. There is a time limit you have with working this which is more than ample if you are up to the task. There is a lot of prep for ensuring this goes down and looks good. I did all the prep, watched the Bona videos a few times and it turned out to meet my satisfaction. If you are OCD about any debris getting into this and showing up later....you had better hire a professional with a long list of references and good reviews. I cleaned and cleaned and still I have small pieces embedded, but I'm okay with it as I won't be staring down every square inch...the overall is spectacular in look...You will need a T-bar, cut in pad or a roller versus a T-bar...and doing this for the first time under the pressure of time constraints will test your nerves. Go watch a video on YouTube by Bona on how this is done and you may decide that BONA Mega might be a safer bet. Either way, Bona will make your floor look it's best, but only if you put it down exactly as they explain in the video with all the preparation and planning that it will take. Not something to gamble on at about 150 bucks a gallon though. Update: cutting in paint around exterior door and pulled up painter's tape off floor and some comes with it some of the BONA Traffic HD...this floor had the stain cured for a week, was prepped as good as anyone is going to do it professionally and I am getting peeling ..don't expect this floor finish to hold up. Polyeurathane it next time and forget this high priced stuff that isn't bonding. BIG DISAPPOINTMENT to say the least!
K**S
Easy to use. Nice finish
Product was easy to use. The finish is smooth and seems to be durable. Time will tell. I wasnโt doing an entire floor just some stair treads and risers. Unfortunately there is no other size and this cost a good bit to do a small project. On the positive side the instructions do give a ratio for mixing smaller batches (being this is a two part product) this allows you to mix only what you need. Bummer that I still had to buy this large amount of product and Iโm sure by the time I ever need it again the two parts will be dried up or out of date. I have no complaints other than this being the only size this product come in.
Trustpilot
3 days ago
2 weeks ago