🎨 Elevate Your Space—Hang Art Like a Pro!
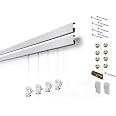
The STAS Cliprail Pro Picture Hanging System Set is a heavy-duty, versatile solution for displaying art and photos without damaging your walls. Covering 9.84 ft of wall space, it includes two 59" rails, four perlon cords, and four zipper hooks, allowing for easy rearrangement and installation in any environment, from homes to museums.


| Manufacturer | Stas Picture Hanging |
| Item model number | BC101502 |
| Package Dimensions | 152.4 x 6.35 x 6.35 cm; 934.4 Grams |
A**O
Sólido como una roca
La instalación es laboriosa pero sencilla. Será más fácil hacerlo entre dos personas.No incluye un nivel, así que será importante tener uno si no se instala contra el techo.Es fácil dañar el riel de aluminio con rayaduras o raspones si no se tiene cuidado.Una vez instalado, la pieza se siente increíblemente segura.
C**S
Un achat qui en vaut la peine! =)
Le look est super cool et l'installation est facile !! 10/10
T**C
Highly Recommend
I love this system for hanging photos. I used it in a wall I built for a local vendor market and have ordered another one for the wall in my office. It is very easy to install and looks sleek. I like having the ability to change artwork without putting multiple holes in the wall. It also makes getting multiple frames lined up even so easy. I ordered an extra cord and clips for hanging groups of images.
B**E
Change out your artwork rapidly!
My wife and I are photographers - and over the years we've accumulated a LOT of framed photos from shows, etc. At home, I'd like to keep a rotating 'gallery' display going, and this is exactly the product to do it with.The heavy monofilament support cord can carry more than one photo vertically, and with a level, a single cord can carry a framed heavy picture. The 'zipper' sliding hooks are easy to adjust up and down.I will be buying MORE - shown in the photo are 3 sections of four purchased. One more set of four will cover a larger wall we have available for gallery space.Base rail installation was not too bad - find studs, place your snap-on screws into firm wood (NOT just drywall!! Get yourself a cheap stud finder...) and be aware of where the section join (longer) snap-on heads need to go (you may miss wood studs with those...). Use a level to insure that your rail will be nice and horizontal. Attaching the rail takes a firm fist blow to "snap!" it on those heads, and trimming to length for the final section is a good job for a vibrating multitool with a blade.I did NOT trim the length of the down-cables - they coil behind the pictures automatically, and in the future I may well have lower hung pictures, or multiples on a single cable.Price seems fair for the quality of the product.
R**N
Carefully plan for the install
The ads for the system emphasize ease of installation. And the design does look easy until you are actually into the process. First prepare and plan to work in cm. Yes you can convert to inches, but if you can stay in cm the plan for the install will go more smoothly. The kit does not come with corner pieces. If you are going to run around a corner, those connectors are are available but need to be purchased separately. And if you are going around a corner, be mindful of the depth of the mollies that will be at 90 degrees from one another on each wall and make sure that they are far enough from the edge to not run into one another.The rails clip in solidly (so not without effort). Clipping into multiple clips is a challenge which, if you are using the 150 cm rails, is going to be 6 clips. Since STAS does not provide a clipping-on tool, you will probably by trying to use a rubber mallet -- but the closer the rail is to the ceiling, the more difficult it is to use a mallet. The video on the website shows using a segment of a rail to lever the rail OFF the clips, but it is not apparent that you could use a rail to help lever another rail ON TO the clips.The template they offer on the website to measure the minimum distance you need to put in a clip below a ceiling or molding is useful with a couple of observations: (1) if the ceiling or molding is not absolutely level, then using the template will not mark level points for the clips, and (2) while it may not matter if the rail is absolutely level (the cord will fall with a little crimp from the hook) the mollies MUST be placed in a straight line in order for the rail to actually clip in. If you want to be absolutely sure, create your own template out of wood or metal with a length of at least 1/3 of the length of the rail you are installing. Drill 6mm holes (the size of the mollies) 30 cm apart centered on the template. Attach a small bubble level to the template. Drill the first hole and install the mollie. Place the template over mollie and put in the screw and lightly tighten. Rotate the template to the level position and mark the other holes in the template for placement of additional mollies. Remove the screw and install the clip. Drill marked holes, install mollies and clips. Repeat as needed until all of the needed mollie holes are marked.The further away from a ceiling, the easier it is to do an install.The weight ratings are good for the system. You do need to pay attention not only to the weight that a single cord and clip can handle, but the total weight for the segment of rail. So long as you stay in the weight limits, the systems will be durable and functional.
Trustpilot
2 weeks ago
1 month ago