

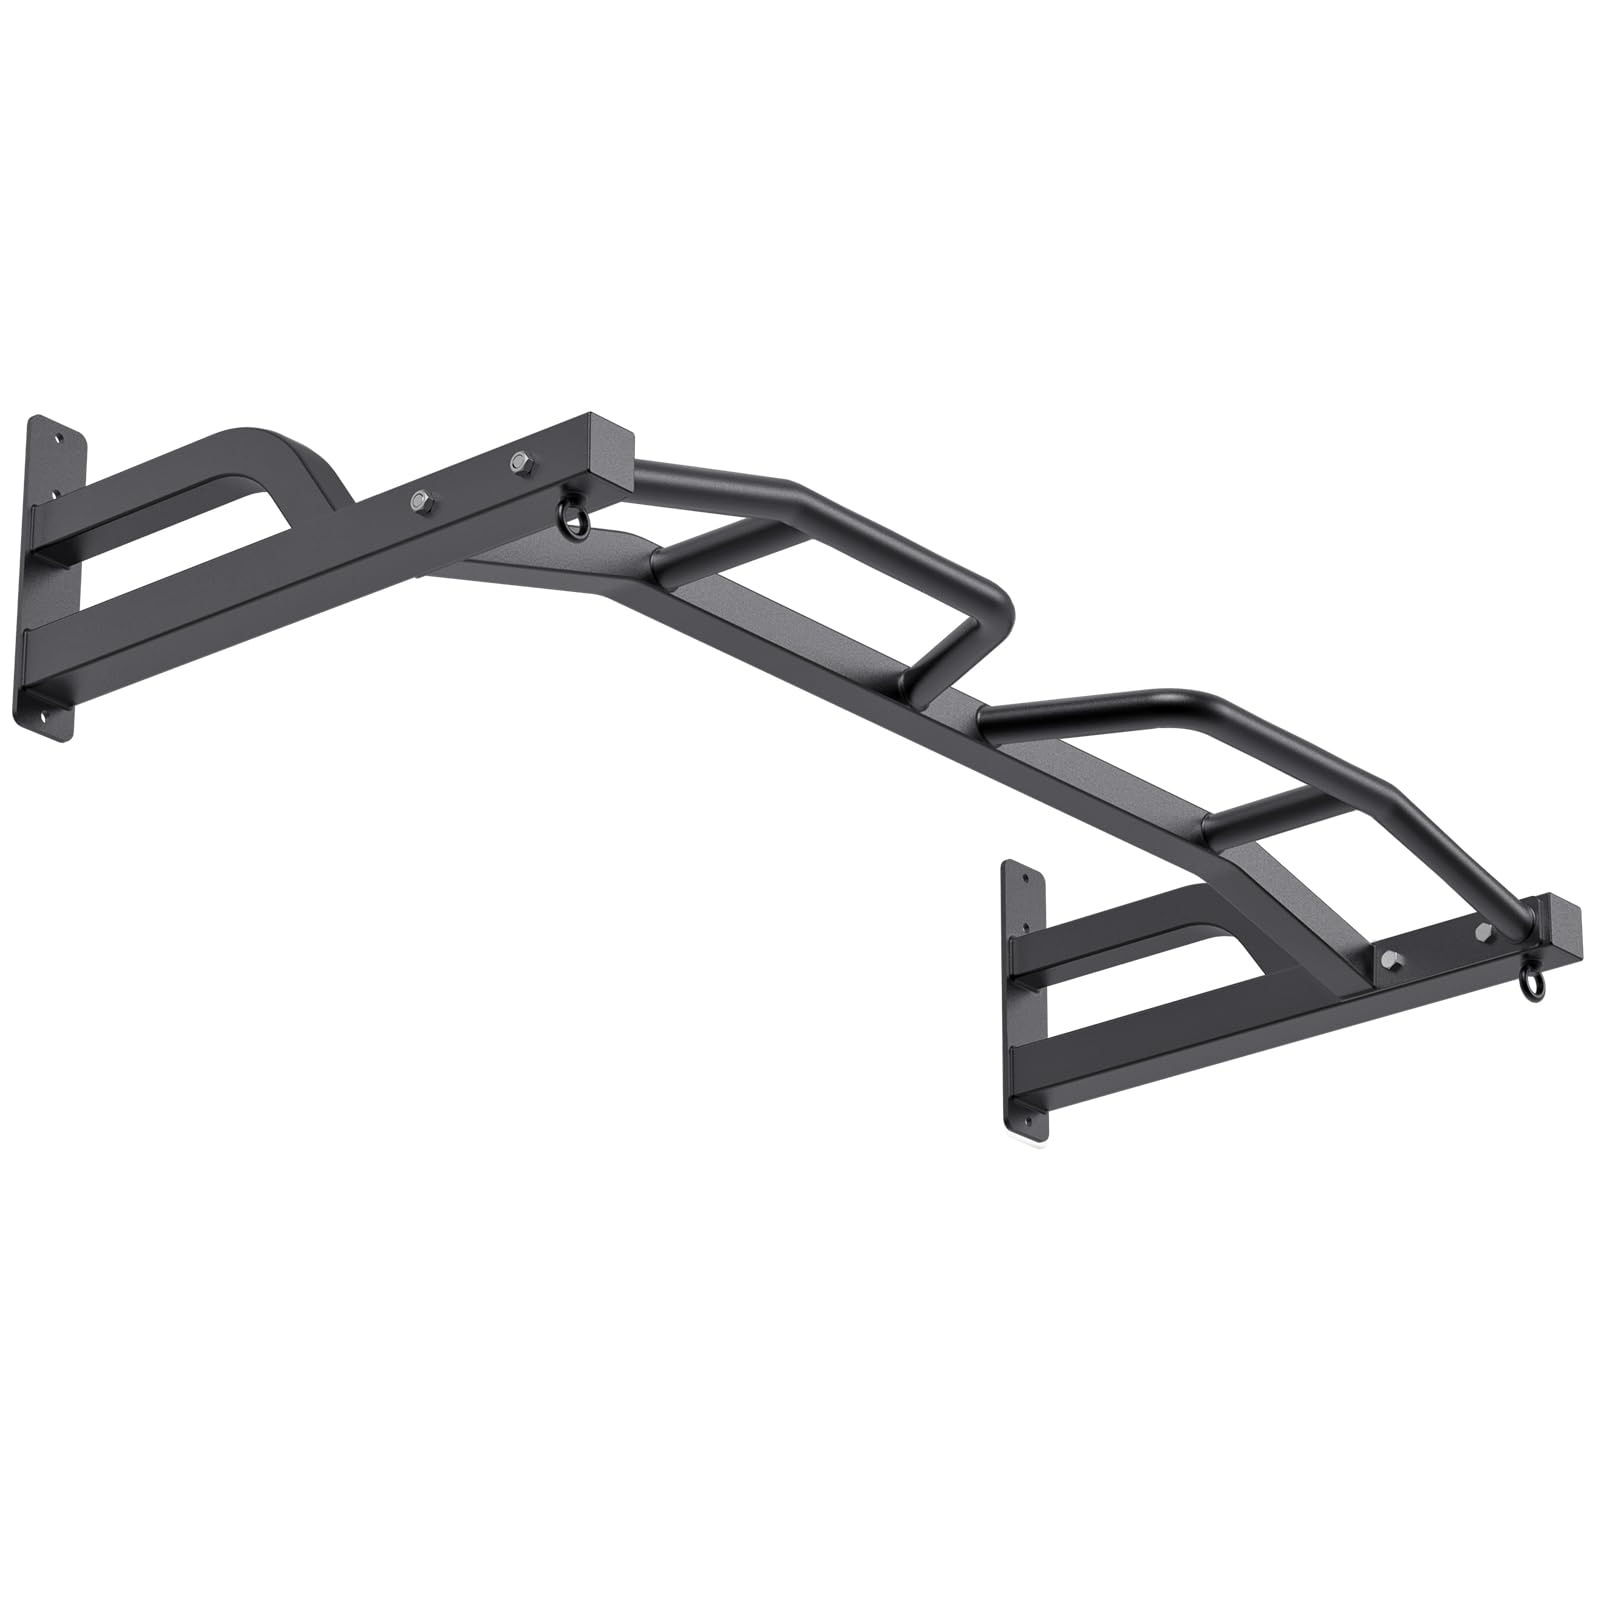


🏠 Build Your Home Gym, One Pull-Up at a Time!
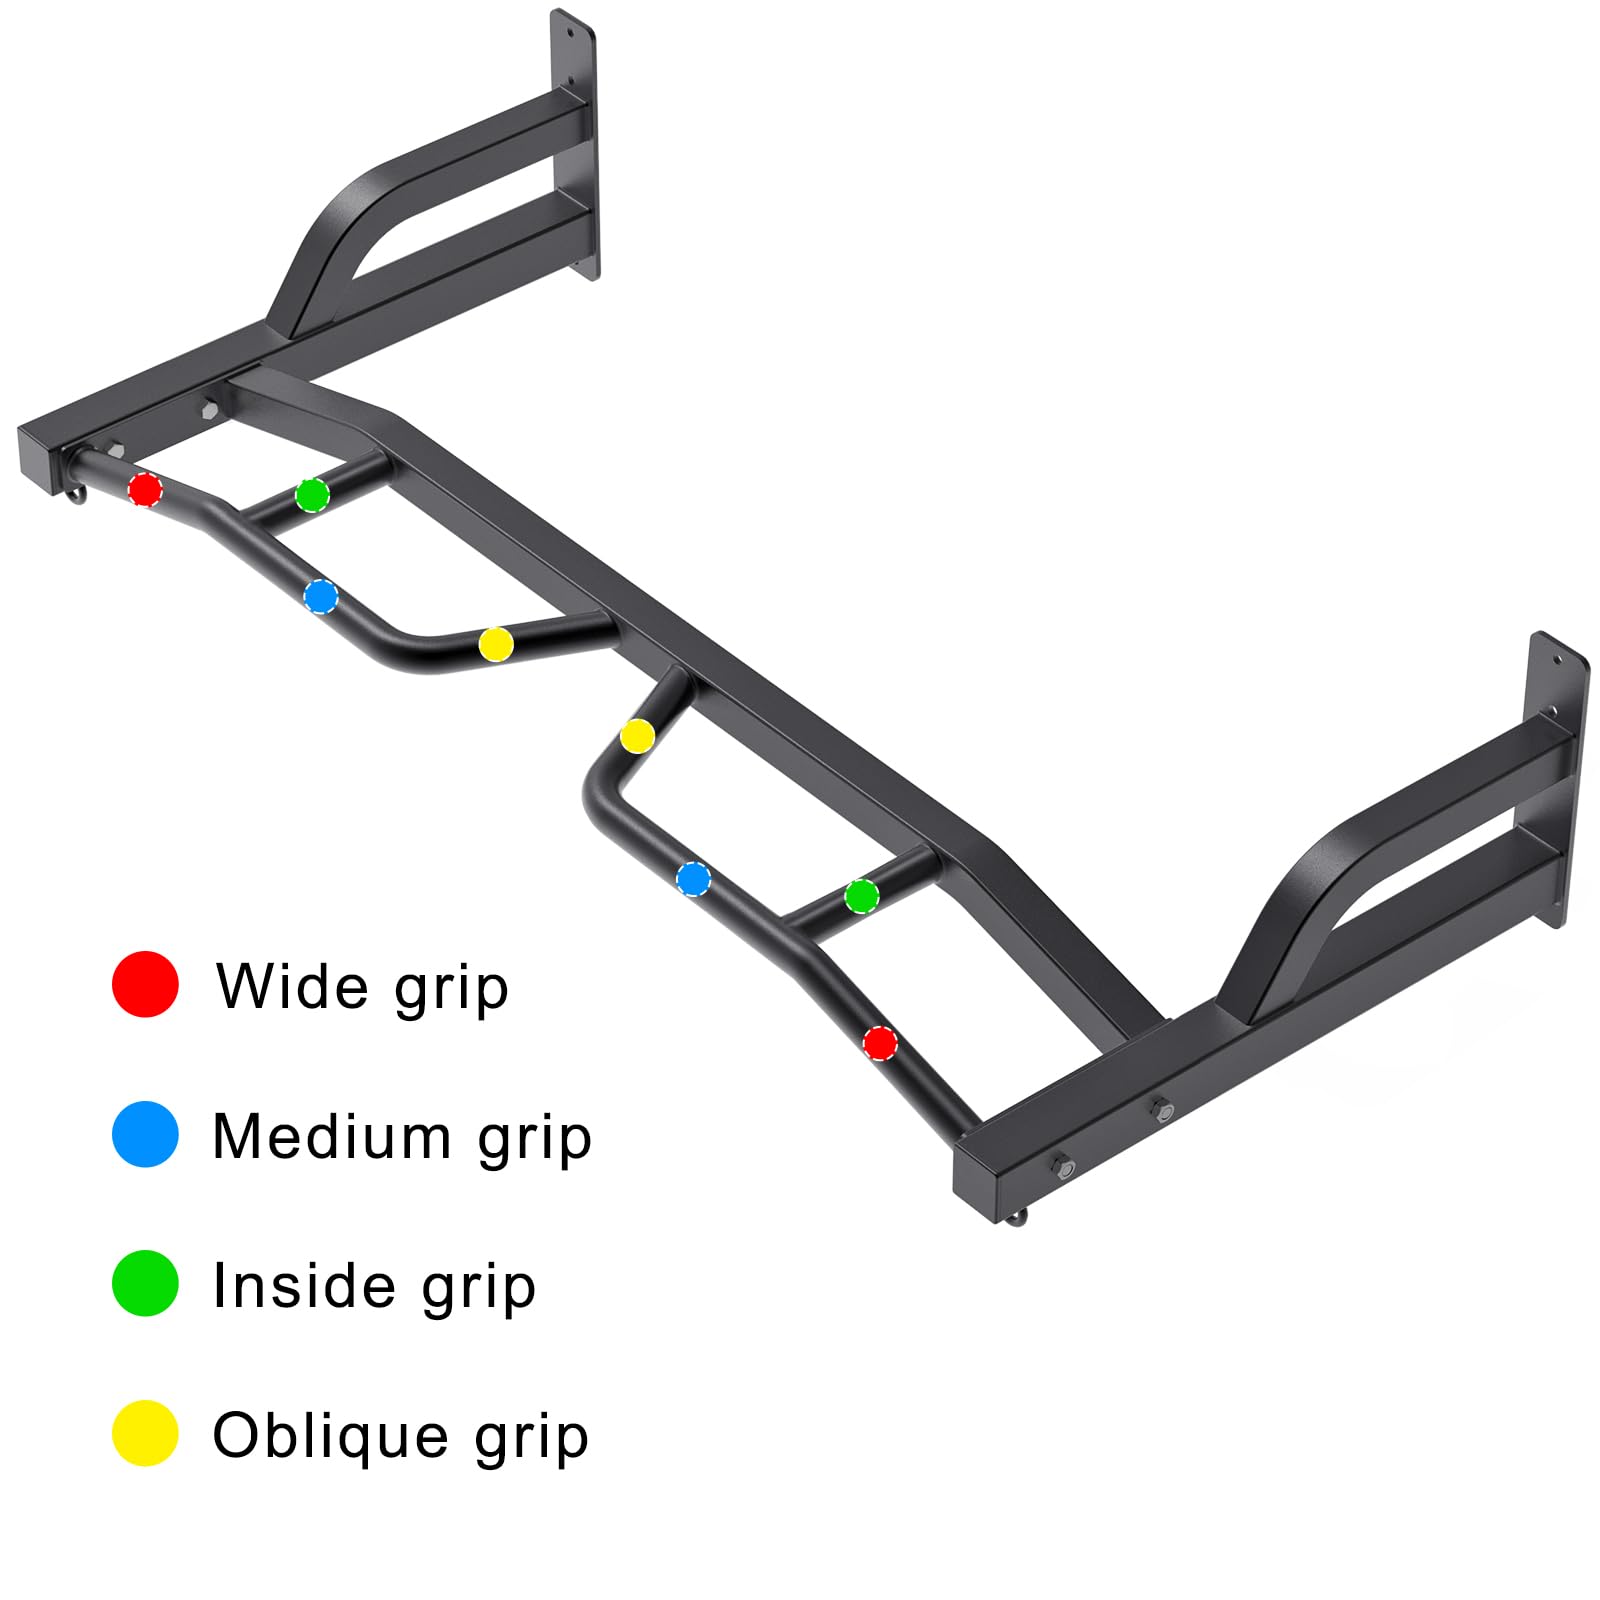
The Kipika 48" Wall Mounted Multifunction Cable Pulley System is a robust and versatile fitness solution designed for home use. With a maximum weight capacity of 500 lbs and 12 grip positions, it allows users to perform a wide range of exercises targeting various muscle groups. Made from durable steel and easy to install, this system is perfect for anyone looking to enhance their home workout experience.


| Brand | Kipika |
| Color | 48" Wall Mounted Pull Up Bar |
| Maximum Weight Recommendation | 500 Pounds |
| Mounting Type | Wall Mount |
| Material | Metal |
| Special Feature | Multiple Grip Position |
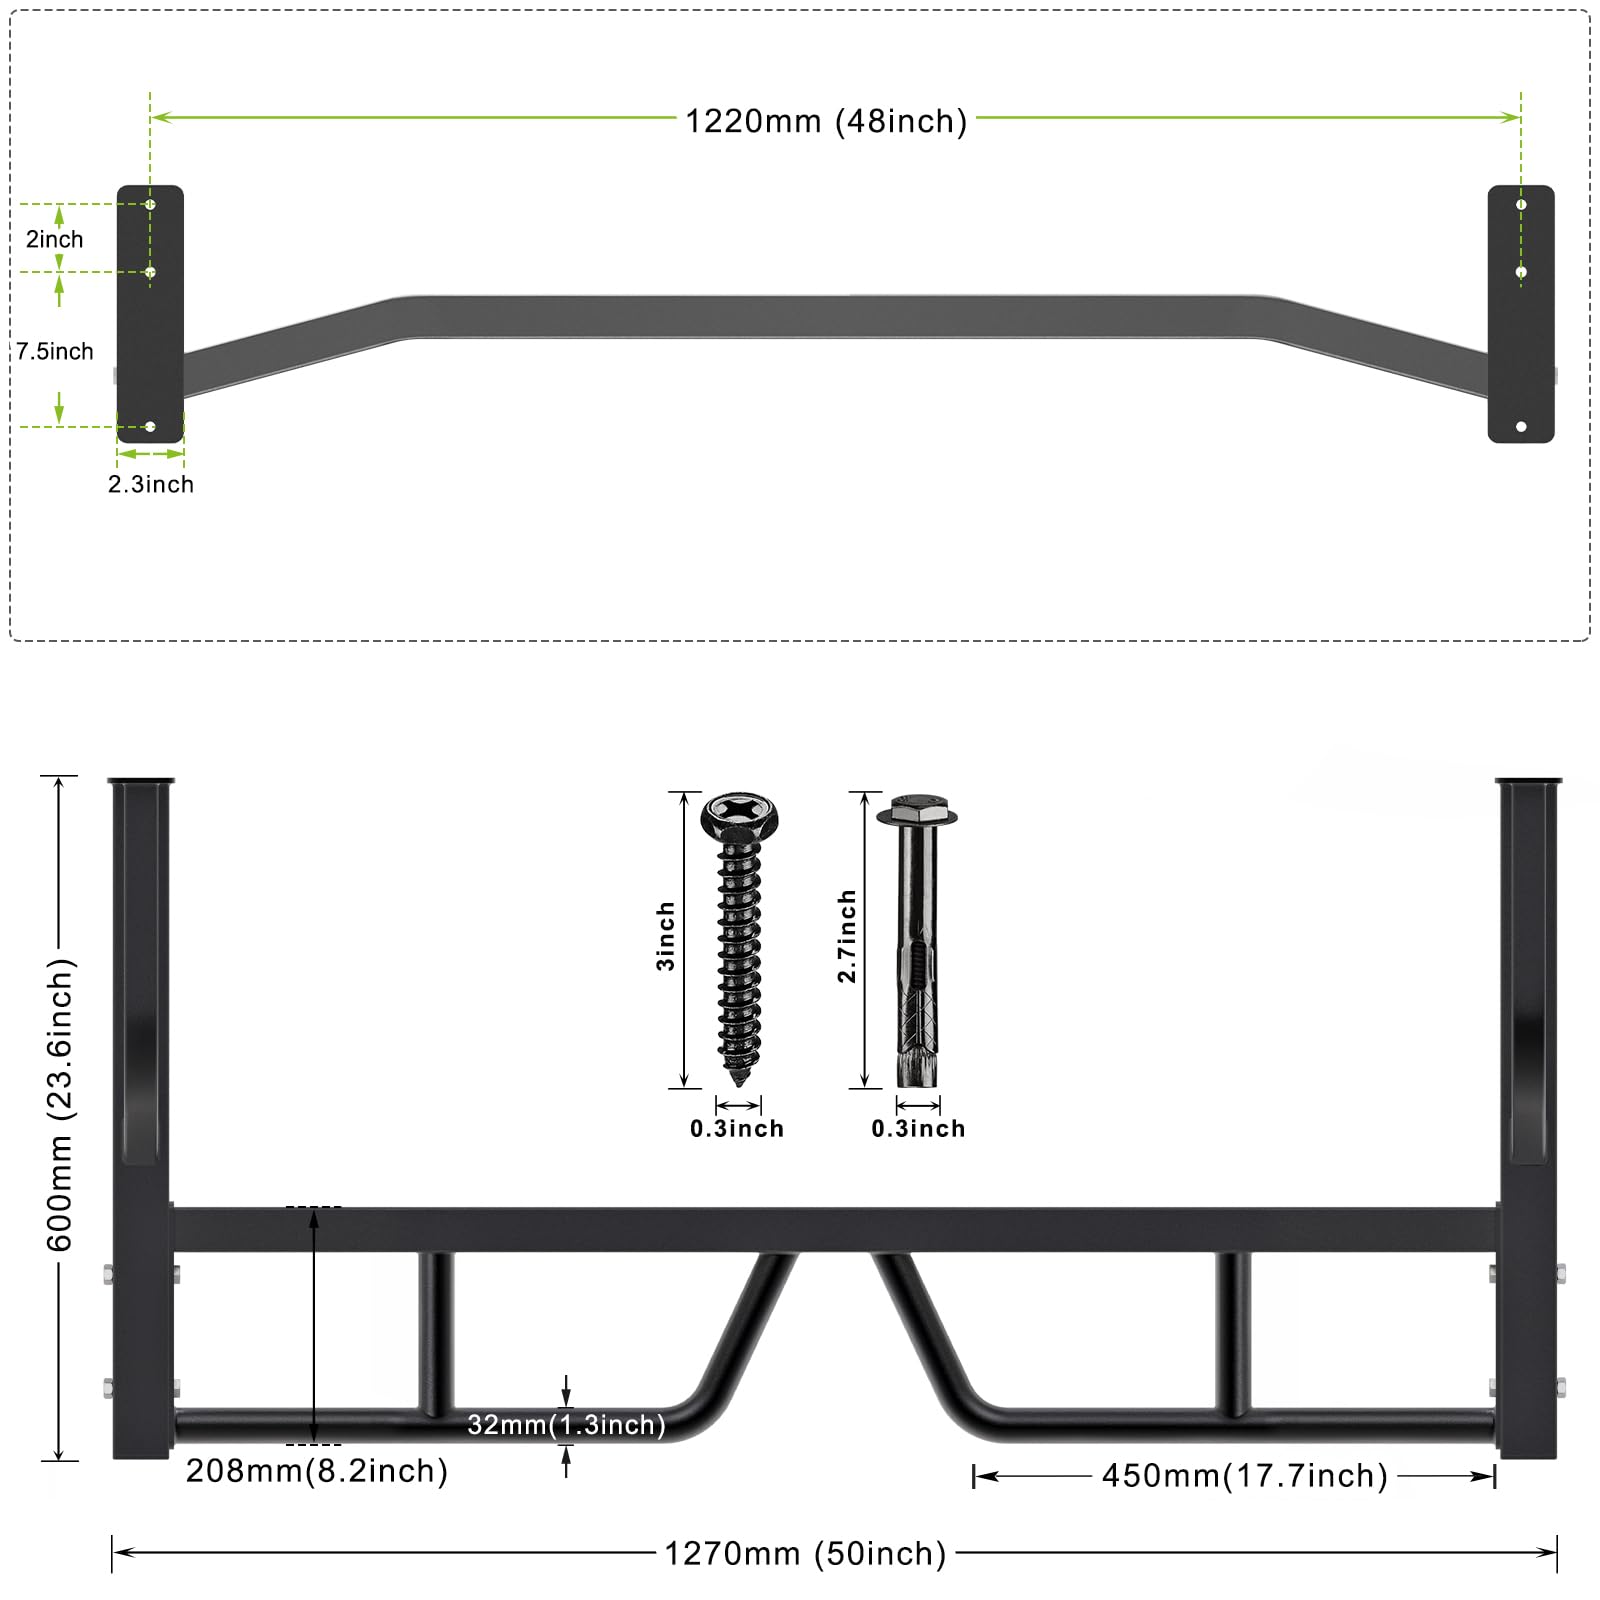
| Product Dimensions | 50"W x 7.5"H |
| Age Range (Description) | Adult |
| Item Package Dimensions L x W x H | 47 x 12 x 5.4 inches |
| Package Weight | 11.86 Kilograms |
| Item Dimensions LxWxH | 50 x 50 x 7.5 inches |
| Brand Name | Kipika |
| Manufacturer | Kipika |
| Part Number | KPPUB-17 |
A**R
Exactly as described
Great idea, really adds a lot to our home gym. The pulleys work well, and added bonus I can store my big exercise balls above it. We havent hung up a heavy bag yet, but it should work great for that too.
C**K
Quality Affordable Home Gym
Overall: The build quality is very nice. Powder-coated and heavy duty.Things to know about install: I would NOT advise mounting this to the wall without a backboard as shown in the photos. I used a 1x12 cut to 54.5”. The installation hardware expansion sleeves are meant for installing in concrete not drywall. The mounting brackets are spaced 48” apart on one set of holes, so you can mount those to studs with 5/16x3” lag screws through the backboard. The other set of holes for each arm I would suggest some toggle bolts to help prevent drywall blowout. They will also be supported by the backboard spanning 4 studs.Follow the instruction height measurements for the bar and pulley placement, if not you will end up like me with a cable that cannot reach the weight pin. I installed the bar a 1/2” higher for headroom and installed the pulley lower than the instructions. As you can see from the photos the cable does not reach the pin, but I fixed that with the carabiners that came with it. This left me with no extra carabiners for clipping the attachments, but we purchased a separate kit that came with some.Attachments: The rope that comes with the kit has the rubber orange ends and is longer than a standard rope attachment. The straight bar is also longer than most and has squishy rubber handles. The blue rope attachment is nice for chest workouts.Upgrades/modifications: Purchased a separate attachment kit for rowing handle, triangle pull-down handle, and single handed attachment.https://www.amazon.com/dp/B09FNXH3CK?ref=ppx_pop_mob_ap_sharePurchased lat pull-down bar.https://www.amazon.com/dp/B0BLH5JR9K?ref=ppx_pop_mob_ap_share
C**T
Nice addition to my home gym at a decent cost
I was hesitant at first not only because of the origin (China) but also because the instructions state to install on masonry (brick) wall. However, I started reading the reviews and gained more confidence and decided to buy.First, the build quality is pretty good for the price point. I am only rating 4-stars because I would have preferred knurling or some type of grip on the pull up bars. Sweaty hands + smooth bar = not a fun time.Second, if you want to install this on drywall you definitely can. I read all the previous reviews and took a few tips from each of them. I would recommend the same, but I'll list out what I did below as well.Items purchased:-2x12 piece of pressure treated lumber and had home depot cut at 60"-(12) 5/16" x 4" stainless steel lag screwsProcess:This process may not be the most efficient, but it worked for me as I did this myself.-Loosely assembled the bar to the 2 arms-Put the 2x12 on the floor then placed the bar on top-Lined it so that there's even spacing on the sides, top, and bottom of the 2x12-Circled in the 3 holes on the right side of both arms (you could also do left side, just make sure its the same holes on the other arm)-I measured 16" to the right of the circles from the left arm and penciled those circles in-Then I measured 16" from those circles and penciled in circles (you should now have 3 rows of 4 circles totaling 12 circles)-Using 6 of the 4" lag screws I mounted the 2x12 to two studs starting with the 2 sets of inner circles I drew (not the ones for the arms).-I then mounted one arm using 3 of the 4" lag screws for the holes that are going into the stud (I made sure to level the arm before completing all 3 screws)-I used 3 of black screws (that came with the bar) for the other set of holes that aren't going into a stud-I repeated the process for the other arm-I then installed the bar-Finally I setup the pulleyA few things to note:-Make sure before drilling in the lag screws that you drill a pilot hole using a 1/4" drill. Anything smaller and you will increase the amount of stress on the screw and can potentially cause it to snap (happened to me)-As others have mentioned, the bottom of the arm mount needs to be close to 78.5" so that you can mount the pulley at the bottom of the wall at the recommend 12" height. I basically mounted the 2x12 so that the bottom of the board was right around 77" knowing that the there was about an 1-1.5" gap from the bottom of the board to the bottom of the arm mount.-Before installing the pulley to the wall, I recommend running the cable through all the pulleys and even attach the weight attachment as well so that you can get a sense of the right heigh for your setup. Otherwise, the cable might be too tight (weights don't touch the ground) or too loose and you have too much slack in the pulley system-I swapped out the cheap carabiners with some spring snap ones that are rated at 250lbs each. There's no way I was going to unscrew/screw those carabiners each time to increase/decrease the weight...
R**T
Very solid, feels good in my grip
Powder coating finish grip feels good, not at all slippery. I mounted this to a 2x12, then mounted that to a handful of studs over my door - I can detect no movement when using it. The provided hardware worked well.
B**K
Solid pull-up bar with cable pulleys
Great pull-up bar that's not difficult to assemble. Cable pulleys are a great addition. I do wish it had pulleys on both sides for two-arm exercises. Biggest challenge is figuring out how to mount it in a normal stick-build house, so I thought I'd share my experience here. The mounts are 4 feet apart, so will match up with 16" center studs. But the mounting holes on the flange only fit on the wide face of a 2x4. My solution was to counter sink bolts into the back of a 2x4, then use 6" lag screws to screw that 2x4 to the wall stud with the count-sunk bolts sticking out. Then I mounted the pull-up bar to using the bolts. You could probably put a 60" 2x12 across the wall and screw it into the studs if you want a more secure option. But this seems to work just fine.
B**S
Installed/Tested/Working - Time Will Tell
Added Simpson Strong-Tie Outdoor Accents Structural Wood Screw DB Coating, Black in lieu of the supplied screws as I know and trust those over conventional and hey - I don't want to fall if things go south.Nice product and it holds my 235lb frame well.
C**Y
Awesome addition to gym
What you get for the price is simply great!The quality of the product is top tier. The pulley system was easy to install and figure out.The instructions were very clear and easy to figure out.I weight 185 and can jump on this and it won’t budge. Any movement on it can be attributed to its installation to the wall, aka user error.Would buy again if I moved and didn’t bring it with.
I**V
I’m disappointed by the presence of rust on the product.
Excellent geometry and pipe diameter.There is significant rust present at the weld points and in the recesses. When the plastic caps are removed, it’s clear that the metal is rusty on the inside. This is unacceptable given the requested price. The hardware is also rusty.The hooks for hanging also don’t inspire confidence. I definitely wouldn’t risk mounting a punching bag on them.
Trustpilot
1 month ago
1 month ago

