


โจ Transform your space with a countertop thatโs as resilient as your hustle!
Countertop Epoxy FX Poxy is a 2-gallon, clear resin kit designed for durable, customizable countertop coatings. It cures fully in 36 hours, offers industry-leading UV resistance for indoor and outdoor use, and withstands heat up to 500ยฐF. The non-toxic, zero VOC formula is food safe and scratch resistant, perfect for professional-grade kitchen and woodworking projects.


| ASIN | B00866QSLK |
| Brand | Countertop Epoxy |
| Brand Name | Countertop Epoxy |
| Color | Clear |
| Compatible Material | Wood |
| Container Type | Bottle |
| Customer Reviews | 4.1 out of 5 stars 142 Reviews |
| Full Cure Time | 36 Hours |
| Item Form | Gallons |
| Item Package Quantity | 2 |
| Manufacturer | Countertop Epoxy |
| Material | Resin |
| Material Type | Resin |
| Model | CE-2G |
| Other Special Features of the Product | UV resistance, food safety, durability, customizability, heat resistance |
| Part Number | CE-2G |
| Special Feature | UV resistance, food safety, durability, customizability, heat resistance |
| Specific Uses For Product | Countertop, Tile Repair, Woodworking |
| UPC | 783583143523 |
| Unit Count | 256 Fluid Ounces |
| Viscosity | Medium |
| Viscosity Level | Medium |
| Volume | 2 Gallons |
| Water Resistance Level | Not Water Resistant |
P**R
Good product at a great price! Practice pour first!
I wanted to start out by saying that I ended up going with this brand because CounterTopEpoxy is great. They answered every question they could and helped me along the way. The customer service alone is worth it. I'll also mention (they don't really say it here) but this is different epoxy than what they sell on their website! This is "Standard" and the website is "Premium". The differences (as I'm told) are essentially that Premium is completely, perfectly, water clear; Premium has UV protectant; Premium is a bit harder when cured; Premium is nearly DOUBLE the price. 1) Color: This has a very slight tint. It's clear, but it's clear like oil based polyurethane. If you were to coat something bright white, it will see that it looks off white. If you coat light wood (birch, pine, maple) it will give it a light tint, rather as if you put a very think coating of shellac on it. The counter top in my photos is birch with shellac and about 1/8" of epoxy. You get the color idea from that. 2) The accursed bubbles: I read a bunch of reviews and test poured 4-5 times before I did the final pour and you need to figure out the correct way to do it for your material! If you got a bunch of bubbles, basically you did it wrong. Some things I learned that might be helpful: 1) Temperature during the pour is IMMENSELY important. I did some test pours in my basement and ended up having to turn the heat in the house up and put a space heater under the table to get it warm enough to cure correctly. Think 75 degrees. Like, you should be working quickly not because the epoxy is going to cure but because you're uncomfortable with the temperature of the room and you want to leave. 2) Always pour the Hardener into the container FIRST and THEN pour the resin in on top. I have no idea why this is such a big deal but I did it the other way around a couple times and the stuff goes all weird. 3) When you're mixing, stir SLOWLY and deliberately. Watch the epoxy from the top and after approximately 5 mins of slow stirring you will be able to see it chemically change right before your eyes from a very hazy opaque mixture to a crystal clear mixture! When this happens you know it is mixed! Once you see this, transfer it to a new, clean, container, stir it for a couple more mins and then pour it. You can't mess it up if you watch for that. If you don't see that chemical change it's not mixed! 4) Seal anything porous REALLY well. There's stuff about a seal coat, I personally found that to be really difficult to do without making a huge mess. I found that Varathane clear sanding sealer worked quite well and was not messy at all. 2-3 coats of that worked very well. The more the merrier. I'm not a Varathane salesman or anything but I personally tried it and it worked and they sell it at home depot for like $15. 5) Don't skimp on your flood coat! If you think you might need 64oz, use 100oz. It makes a mess, but it levels out and if you don't have enough you're just going to have to do it again because you'll have humps and rolls in the surface from not having enough. The undermount sink cutout: This was actually not that difficult. I looked around online quite a bit and even contacted the company and it doesn't seem like anyone had done it before! I first did a seal coat on the back of the top, let that dry for a day, then flipped it to the good side. I touched up a couple little spots that had dripped with sandpaper (you could just as easily have sanded the entire top at this point and then shellac'ed/sealed it, but I had done this first), then poured a flood coat. It wouldn't hurt to pour it in two coats because it was butcher block and the end grain wicks up TONS of the stuff. You need at least sealer and 2 coats on the ends to cover. (I got this with sealer, bottom pour, top pour.) TL;DR, Good stuff, make sure you test first, check your temps, watch for cleanliness and clarity!
Z**S
Great product! Wonderful company
This stuff is wonderful! This company is wonderful. Excellent customer service and quality product. I purchased this epoxy without any previous experience poring countertops. The instructions are very good, FOLLOW THEM EXACTLY! When you mix the two parts, make sure you mix for 4-5 min in one bucket, then pour mixture into a NEW BUCKET and use a new stirring stick to mix for an additional 5 min before pouring. This ensures it hardens completely everywhere and you aren't left with some soft or tacky spots because it wasn't all completely mixed. Cover your floors with plastic very well and tape and mask everything in the area cause it get's messy. You can clean up spills with acetone and a rag easily while it's still soft. If it hardens you may need to scrape it and use acetone to finish cleaning. The pigment options to make creative designs are endless and beautiful. This is you solution to a budget custom countertop!
M**N
I'm a hack and I DID it!
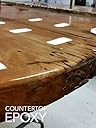
Update 12/2018: Nope. One winter, and ALL of the epoxy lifted save the ogee edge, which we had to sand off. I was under the assumption this product would adhere to all surfaces, but it didn't stick to the stain-covered concrete. This was a pure surface, too. I can't necessarily blame the product, because they can't possibly warrant every application. But if anybody wants to use it like I did, don't. Original Post: I am a hack with guts. My hubby and I poured a concrete counter in four pieces on an outdoor kitchen last year but wanted to match it to the reddish brown pavers on the patio. We couldn't find anything anywhere to do this, so we took a stab in the dark and bought regular wood stain to match. It took three coats, but it sealed the top of the counter. Then, because our concrete work was less than perfect and we preferred a more glossy look, we purchased 6 gallons of this UV epoxy to finish it. Our experience might help others. First, we followed the directions exactly. I'm anal like that. We bought the 64 oz plastic throwable containers, using two for each batch, the paint sticks, and even a few painters pads, about a foot wide. I started with a small amount to see how I liked it, and my initial opinion was it was workable (I know...that's a $500 gamble!) I mixed 64 oz at a time, and it took three pours each for my two large countertops and one pour for the two smaller countertops. Doing it by myself for the first one, I learned it took too much time between batches for it to provide me with a perfectly level surface. It was sticky tacky for about four hours, then began curing. By the following morning, I could still leave a thumbprint on it, but it was definitely hardening. Two days later, I can't stick my thumbnail in it at all. The counter is overlooking a lake, under a canopy of oaks and maples. To say I had an invasion of bugs is an understatement. I was not overly worried about the bubbles, because the concrete counter has minor pock marks in it, anyway. Oddly, I don't see any in the finished product. I did, however, see bug corpses in my finish. I took a drill bit and drilled the corpses out, sanded off areas which had surface bugs, and just left the ones that were below the epoxy (it would endanger my red finish). I'll call those character. We solved part of the bug problem by doing a bug bomb the day before coat #2...but not all. "Charlie" is large and will stay. Only his eyeballs are above the surface. He really worked his way beneath it, and I'm all out. Using three batches simultaneously, we were able to pour, feather in the edges, and level it out to a nearly flawless finish. Nearly. One mistake I had was in assuming the ogee edge would take the epoxy the same way the flat surface did. It doesn't. It found those minor pock marks and created valleys between it. I coated it a few more times and probably brushed it too often, but it's starting to blend in. I wanted UV protectant in my epoxy, but the truth is the counter is mostly shaded. A small degree of yellowing will not trouble me. That glossy finish is so nice to look at, and the rare sun beam that finds it emphasizes its beauty. The ONLY reason I gave it one dock in stars is because there are no directions included with the product. Seriously? I have lousy internet service, and trying to find information took literally HOURS. If I pay $500 for six gallons, kindly provide me with a $.50 photocopy of directions. I'm guessing the profit margin will allow for it. And I will update this if issues arise.
A**Y
great countertop resurfacing option.
This is a great product for countertop resurfacing. It was more forgiving than I thought it would be, I had a few things go wrong during the pour but the counter still came out great. From my experience I would be to make sure you use good tape when you mask because the weight of the dripping epoxy caused mine to pull away from the cabinets and led to a big mess. Also test your propane touch when you point it down to make sure it doesn't go out because it will leave a big carbon stain in the epoxy as I found out the hard way. Of course this didn't happen on my test pour. Finaly make sure your edges are very smooth and Follow directions exactly and you should get good results. This is a good product and was an inexpensive but great looking solution for resurfacing my kitchen countertop.
K**N
Not quite that easy!
BE CAREFUL NOT AS SIMPLE AS THEY MAKE IT SOUND! I bought this in may and just used it last weeked, i spent the little spare time i had over last 6 months building a desk for my home office. Maybe im not the best at these finishes that might require a certain touch, but i followed the instructions to the "T" and i warn anyone that thinks this is a simple mix and pour process to try and have someone experienced help them! Because i have spent the last 12hrs sanding trying to get a level finish and it still looks like dog s!!!t. The first coat was half way decent but there were patches i kept spreading over and it kept running away, weird i know, i prepared the wood according to the instructions and its not like they were high spots. So i used the rest of what i had for second coat but i used a brush this time because of a few small vertical pieces the blade wouldnt work on. Part of it was i couldnt move fast enough and i was still trying to even out the places i had to reapply and it started to cure. Well just look at the pictures, they dont quite do it justice The look it coulda had woulda been great if i had done this a few tims before. But id have to say the selfleveling.... not so much. Theres a technique to getting the flat level finish you want. So now i have been sanding all day and i have about half done but i cant get the gloss back to it and im using 600 grit sand paper..... i might just have to stip it all off cause theres no way im spending another dime on anymore of this stuff. I coulda just bought varnish for a 1/5th the cost. Now im out 140 for the epoxy, what will probably be the entire 3 day weekend cost of LOTS of sandpaper. Plus whatevrf i spend on a replacement. Hope the next person has better results than i did
B**B
Three Stars
good product but expensive
M**.
Great product!
Needed a way to seal and smooth tiles on an outdoor installation. followed the directions exactly and used the propane torch to lightly go over the epoxy and all the bubbles just disappear. crystal clear finish, and so easy to do. Great product for outdoor use since it is UV resistant and has a 500degree temp rating. If you need to tape off an area though the blue painters tape works great. Just make sure the tape doesn't have any decals or markings on the tape other wise the tape decals will transfer to the clear epoxy. I was fortunate that I was able to remove the marks with goof off.
A**L
This stuff is amazing!!
We used it to cover up our old countertops. We were super careful to follow the directions and felt that we had about 45 minutes and could still manipulate it. I spayed paint into the epoxy and dragged the paint with a stick and it came out great! We used a torch at the end to bring out the bubbles and it leveled perfectly. The only thing that might be a negative is that is does scratch on the surface but we are able to buff it out pretty easily. Buying more!
Trustpilot
1 month ago
2 weeks ago