


Buy anything from 5,000+ international stores. One checkout price. No surprise fees. Join 2M+ shoppers on Desertcart.
Desertcart purchases this item on your behalf and handles shipping, customs, and support to Portugal.
🚗 Tow Boldly, Tow Smartly — The CR-V’s Ultimate Hitch Upgrade!
The CURT 13119 Class 3 Trailer Hitch is a rugged, vehicle-specific towing solution designed for 2012-2016 Honda CR-Vs. Rated for 3,500 lbs gross trailer weight and 350 lbs tongue weight, it features a standard 2-inch receiver compatible with a variety of towing accessories. Engineered with high-strength carbon steel and protected by a dual-coat powder and liquid A-coat finish, this hitch offers superior durability against rust, chipping, and UV exposure. Tested to SAE J684 standards and crafted for a precise factory fit, it delivers reliable performance for hauling boats, campers, bikes, and more—making it the go-to upgrade for serious CR-V owners who demand strength and style.


| ASIN | B007JEJQP0 |
| Automotive Fit Type | Vehicle Specific Fit |
| Best Sellers Rank | #575,625 in Automotive ( See Top 100 in Automotive ) #1,575 in Towing Hitch Receivers |
| Brand | CURT |
| Brand Name | CURT |
| Compatible with Vehicle Type | Honda CR-V |
| Customer Reviews | 4.6 out of 5 stars 1,663 Reviews |
| Finish Type | Powder Coated |
| Included Components | Class 3 Hitch |
| Item Type Name | Honda CR-V |
| Item Weight | 29.6 Pounds |
| Manufacturer | CURT |
| Manufacturer Part Number | 13119 |
| Manufacturer Warranty Description | Limited Lifetime Warranty / 1 Year On Finish |
| Material | Carbon Steel |
| Material Type | Carbon Steel |
| Maximum Towing Capacity | 3500 Pounds |
| Model Number | 13119 |
| OEM Equivalent Part Number | 13119 |
| Pull Force | 350 Pounds |
| UPC | 612314032945 |
| Unit Count | 1.0 Count |
| Vehicle Service Type | Honda CR-V |
B**C
Great hitch, great price! But...installation a bit more difficult...
The hitch and its construction are first-rate. The price on Amazon beat what I could get from a reputable hitch dealer by about $80. That's why I'm giving the hitch five stars. Now, before you buy, you should think about how comfortable you are with the installation. The instructions say 30 minutes for somebody who is experienced and an hour for a novice. I'm a novice and it took me about four hours on my 2012 Honda CRV. It is, as they say, harder than it looks. Of course, individual results may vary. If I had to install it again, I would do a few things differently: 1) Be prepared to work in a tight space. The video shows the car on a lift during installation. Few of us have lifts at our homes, but if you can find a way to elevate the rear of the vehicle, do it. Otherwise, prepare to work in tight quarters--doable, but not comfortable. 2) Do not remove the plastic underbody panel to cut the hole for the hitch--just leave it on the car and make the cuts with the panel in place. The instructions say to remove the panel, but it is rather tricky to reinstall the panel due to how it fits into the wheel well. Several posts on Amazon, which I should have listened to, say cut the panel with it on the car. Heed that advice. 3) Get exhaust removal pliers for the muffler. We spent quite a bit of time trying to lower the muffler as it was tough to remove from the brackets. The pliers make easy work of this thankless job. (Check your local auto parts store or just grab them here on Amazon: Lisle 38350 Exhaust Removal Pliers ) Yes, auto care professionals may not need the pliers, but they will save the rest of us time if not accustomed to removing the muffler. Beyond those items, having a second set of hands is a must. I did and it took us both to get the hitch raised in a tight space. The hitch looks great on the CRV and is a solid, sturdy fit--it just took much more time than we had planned to install!
A**R
Curt Solo Hitch Install
Curt builds a great product. They also provide excellent instructions and have a video on their website (as does YouTube). Our Honda dealer wanted almost $900 to install a class 1 hitch. For a whole lot less, I ordered this class 3 hitch for my new CR-V and it arrived in less than one week. The box was a little battered, but the hitch wasn't damaged, not even scratched. I asked a friend to help me with the installation, but he was running late, so I started alone: First step was to lay out all of the parts and the recommended tools to verify that I had everything as well as the instructions which I re-read three times. Second step was to decide if I needed to jack up the car. It seemed there was enough room and I am too cheap to buy something that I would only use once; so no stands. Third step was to disconnect and drop the exhaust/muffler which was made easier with WD-40 spray on the rubber isolators and a big screwdriver. Fourth step was to cut the plastic underbody panel (There was no way I was going to remove the panel as recommended, especially since many reviews said removing it wasn't necessary). I laid out the hole with a tape measure, a framing square, a white artist pencil and then cut three sides with a utility knife (The panel is thin and easy to cut. The sound insulation above the panel was easy to cut with scissors). Fifth step was to hang one end of the hitch on the muffler bracket and the other end of the hitch into the hole of the underbody panel. The hitch was hanging, and I really needed help holding it up to install the four bolts into the weldnuts, but my friend was still late; so I used my car jack with a towel to keep it from slipping and raised the hitch into place. Sixth step was to attach the U-bolt into the hitch and hand tighten with the flange nuts. Then I installed the four bolts into the CR-V weldnuts in the frame rails. Seventh step was to torque all six nuts/bolts to recommended pounds. Eighth step was to cut a little bit off of the underbody panel to get a tight close around the hitch bracket. I drilled some small holes and used wire ties to keep it closed. The hitch is now complete and my bicycle rack is in use. All by myself took a little over one hour to install this Curt class 3 hitch onto my new Honda CR-V. My friend showed up as I was putting away the tools and cleaning up.
J**M
Install The Hitch Without A Hitch! Tips For Installing
Firstly, the vendor and shipping speed, as well as the packaging are amazing, received the hitch the very next day, packaged in a heavy cardboard box, with the hitch wrapped and padded inside the box. Secondly, the hitch is very well made, excellent welds, paint quality, as well as thick metal. Some tools I highly recommend to purchase are the muffler removal tool, as well as a 10mm X 1.25 tap, and a little wire brush for cleaning out the holes. I lubed the rubber muffler mounts with Wd-40, and used the muffler removal tool to drop the muffler, easy. Next I could see that the threaded holes on the muffler side were corroded from the elements and road salt over the years. The bolts would not even start in the threads. I ran the tap through the holes, along with wire brushing and Wd-40, which made the threads like new again. Next I used the instruction sheet to measure and mark the rectangle needed to be cut in the underbody plastic. I used other reviewers tips to only cut the front, back, and muffler sides, with a box cutter, and leaving the side away from the muffler intact, creating a door that could be opened. I used a bungee cord to hold the door open. The two threaded holes that were under the underbody plastic were in great shape, so I sprayed WD- 40 in all four threaded holes to provide some rust protection and lubricant for the bolts to easily thread in. Following reviewers tips again, I put the muffler side of the hitch on the muffler, then put the left side through the cutout in the plastic, and threaded the middle U bolt by hand, to hold the hitch in place, as I was doing this alone. I threaded the left and right side bolts in by hand, then tightened all the bolts with a socket wrench. I finished the tightening with my torque wrench to the recommended pounds. I drilled holes in the door I had made in the underbody plastic, and used zip ties to stitch it securely shut. Securing the muffler again was simple, easily pushing the mounting tabs in by hand, no tool needed. All in all, I would say that prepping the threaded holes on the 2016 CRV was the mos time consuming task, everything else was easy, and I did this alone. The hitch looks great, and I am hoping to get many years out of it. I highly recommend the vendor, as well as the Curt Hitch, just buy it!
M**Y
INSTALLATION OF THIS HITCH
ON 2012 HONDA CRV Fine product. Fitted excellently. 1) Beware: YOU DO NOT NEED TO REMOVE THE PLASTIC UNDER PANEL !!!!!! You can look up through some holes in panel and with a light see the nuts that are welded to the upper side of the frame ( really smart forethought on part of manufacturer). Then you can start cutting some explorable holes with a sharp razor knife and cut a bigger hole per size of the instructions. I cut the hole in < 10 mins. 2) Useful to have car up on blocks. I used about 5''. 3) My petite wife helped hold up one end of hitch while I got the 2 nuts started at the center mounting 'u' bolt and one bolt on an end. From there I finished in about 10 mins. 4) My biggest problem was cleaning out the threads in the nuts situated above the muffler. Use a circular plumber's wire brush and spin it in the nut treads to clean out. This was the most difficult task as I wanted to make sure bolt would thread in easily once hitch was up into place. I could NOT get the forward bolt cleaned out so as to receive the bolt and therefore did not use that bolt. The strength of the steel of the hitch should be sufficient to support the hitch, particularly since I will be towing a sailboat of relatively light weight that I can lift it and move it across a level surface. 5) You should apply liquid soap on the muffler mounts ( mandatory) and work the rubbers back and forth as you apply more soap and rubber cushions will come off easier. Apply soap on the metal prongs for reinstallation and the rubbers will slide on very easily. 6) Would buy this product again if needed for a future car.
A**Z
Awesome hitch, easy installation, follow various good tips in these reviews
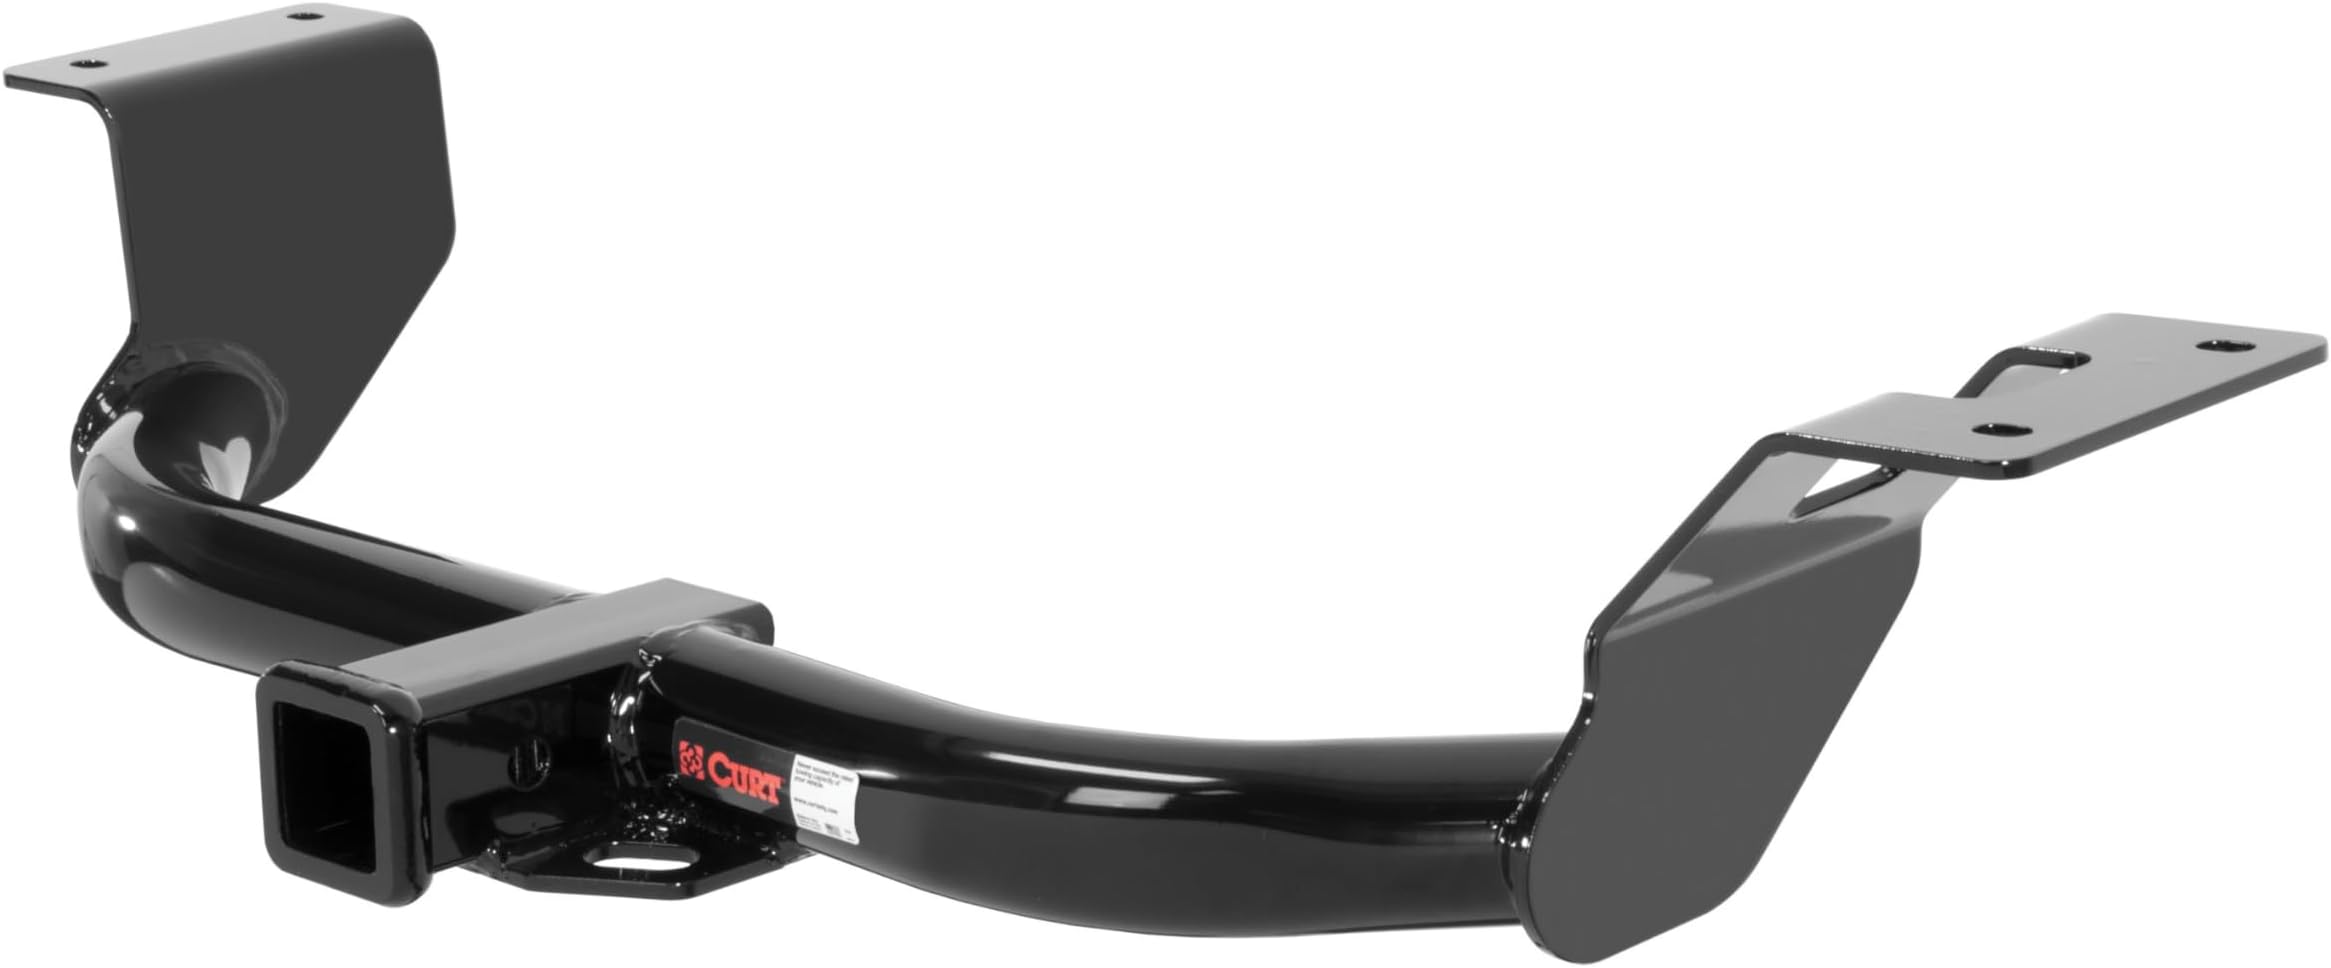
Like many others I really wanted a 2" hitch for a bike carrier, I won't ever tow anything. I downsized from a large, gas guzzling SUV to 2014 Honda CR-V so I have a nice bike carrier that is designed for a 2" hitch. I could use it with an adapter but it would be suboptimal, i.e. wobbly. Besides, Honda wanted over $500 for the small type hitch. Pft... The small type hitch secures with a pin, the full-size 2" hitch secures with a big-ass bolt so the carrier sits in place like it was a part of the car. Ever seen a bike rack on a car in front of you that moves around with the bikes on? Yeah, that's the smaller hitch. Sucks. Full-size, 2" hitch is the way to go if you want a bike carrier. Some really great tips in the reviews here. Make sure to read some of the top reviews before installing this. First of all, the hitch is top notch. Heavy with solid weldings. Your UPS guy will ask you WTF this thing is! But! The packaging is... well, there is none. The super heavy chunk of metal just flies around in a cardboard box. Upon delivery the box was all cut up by the hitch and the edges of the mounting plates were all scratched up. Lucky, this is the invisible part that will be hidden under the car. The bag with the bolts is taped to the hitch, otherwise it would certainly fall out of the holes in the box. One star less for lousy packaging. Just installed it this morning and just to confirm what other said. Nothing is particularly difficult or hard about the installation and the included instructions are excellent, Curt really did a great and detailed work on the instructions. How easy it is will depend on your strength since the hitch is very heavy. Getting it up was the hardest part for me, since I'm not very strong. I'm a cyclist, I have no upper body strength :) First though: - Get a roll of gorilla tape. - Get a fresh, sharp blade for a utility knife. - Get a torque wrench with a 9" extension. - You do NOT need a Dremel for this. - You do NOT need to raise the car unless you are a very large person. - Wear safety glasses as crap WILL fall down on your face. - Make sure the car is cold, no fun working around a hot exhaust pipe and a muffler Without a torque wrench you will likely NOT tighten the bolts enough. Even with a long handle of the wrench I had to pull really hard to get the specified torque. As many reviewers already pointed out: there is absolutely NO need to remove the plastic underside panel. I'm glad, because based on my previous experience with removing such panels it sucks: it's time consuming and it's impossibly hard to put them back on. The plastic is soft, barely thicker than the bottles engine oil comes in. A sharp utility knife cuts through it without much effort and there is nothing to be damaged on the other side, no fuel lines, no cables, nothing. You will save yourself at least 30 minutes or more and hell of a lot of frustration. Cut the opening an inch larger in each direction than the instructions say and only cut it on three sides, leaving the side facing the left side of the car (away from the muffler) uncut. Bend the cut plastic away and hold it in place with a piece of gorilla tape. Later, let it fall back in place and just make a cutout for the hitch and tape it all back in place with the gorilla tape. Under the plastic there is some fluffy, cotton-like stuff, just cut it on three sides like the panel and do not remove it. Tuck it back in place after the hitch is bolted and before taping the panel back. It's probably there for a reason. Yeah, DO NOT remove the plastic panel completely, it's there for a reason. Some engineer though it should be there, otherwise the nice finance people at Honda would be happy to save few bucks and the panel wouldn't be there, hm? But it's there. Hint: it's right under the gas tank. There was some rubbery white goo in the holes on the muffler side I had to pick it out with needle-nose pliers and clean the holes with steel brush. I drove the bolts into all four holes just to make sure they're clean to avoid surprises when I'm trying to bolt the actual hitch. Definitely use some WD40 on the rubber pieces that hold the muffler. I gave it a few minutes to penetrate and then just removed them both by hand, no special tools needed. Someone suggested to hang the hitch first with the u-bolt and man, thanks for that tip! Saved a lot of cursing as I would not be able to hold the hitch with one hand while bolting the plates to the frame. No freaking way! This worked great, but it was still pretty hard to lift the hitch up to the u-bolt. Once the hitch is hanging in the middle by the u-bolt it's trivial to drive the four bolts into the car's frame. Then tighten the 4 bolts with a torque wrench, hang the muffler back, again that can be easily done with your hands only. Then release the plastic you cut out, make a cutout for the hitch, tuck the fluffy stuff back, tape the plastic with gorilla tape. Now tighten the two bolts on the u-bolt and you're done. Don't worry about the u-bolt being centered, if you tighten the nuts with a torque wrench to exact value of 50lbs/ft the bolt will self-center. Total time? Maybe 45 minutes including getting all the tools together and cleaning up afterwards. I used blue Loctite on all bolts. I'm a huge fan of Loctite. I'm 5'11", 200lbs and I had no problem getting under the car to do the cutting and to remove the muffler hangers without lifting the car. It's true what others said that the hitch sticks out, about an inch. Whether that can get you in trouble with the law, I have no clue. But you will definitely leave a nasty mark on any car you back into.
T**N
Very quality item!
Much higher quality than I expected. Easy install. Proper hardware included. Will recommend to others!
G**5
Perfect fit for 2015 Honda CRV
Perfect fit for 2015 Honda CRV. Installation Installation was a little unnerving as it entailed cutting the plastic cover under the car. The instructions were for a different year so the measurements for cutting the plastic cover / shield were not correct. I looked online with no luck, then called the customer service number. Surprisingly, I got through to someone very quickly and got an answer to my question. It wasn't the answer I wanted though... they didn't have a drawing for my exact model, year, etc. I had to hold the hitch in place, do a bunch of measurements, and basically figure out on my own where to cut the cover. I didn't deduct any stars for this since it would be a huge hassle for them to provide that kind of detail for every car they sell hitches for, and because I think it is assumed the person doing the installation has the ability to figure this out if necessary. As mention, the instructions called for cutting a rectangular section of the plastic to allow the hitch to go through the plastic cover and to allow for a wrench or ratchet to access the bolts that secure it to the frame. Instead of cutting a complete rectangle though, I cut three sides of the rectangle creating a rectangular flap that could be pushed back into it's old position once the hitch bolts have been tightened. On the long side of the cut I trimmed a little extra, maybe 1/4 inch so the flap could be folded back in place and not hit the hitch bracket. Doing it this way probably took more time, and required a lot of measuring and getting up and down. I tried staging it all under the car, measuring, then laying it out on a bench, multiple times before the first cut. The result was worth the effort, it looks like a professional installation. Quality The hitch appears to be very well made and heavy duty. I was impressed with the quality of the welds and construction in general. The supplied hardware was of high quality as well. The CRV has a towing capacity of about 1500 lbs so this hitch is way overkill in my opinion. I didn't buy it for towing, although it's nice to have that option down the road if needed. The main reason I got this was so I could attach a luggage rack / cargo carrier to the back. Here's a link to the review I did on that if you are interested. Goplus® 60" x 22" Aluminum RV 2" Hitch Mount Cargo Carrier Truck Luggage Basket 500LBS Shipping / Packaging Everything was well packaged and even though it's an oddball size/shape for shipping, the box held together fine and everything got here in one piece, and undamaged. I paid full price for this item and did not receive any compensation for writing this review. My opinions are 100% my own.
G**Y
Fits like a glove and works!
I scored a great deal on the USED hitch that Amazon had for sale. It came in the original box. I guess the previous customer returned it for some reason, but whatever it was I got a great deal on it. There were a few little scratches, but nothing bent, broken, or missing. When the box was delivered the hitch was partially sticking out so someone at Amazon did not properly pack the hitch back when shipping it out. But all the hardware and instructions was all there. Nothing was missing. The paper instructions that I got was not easily readable so I went to Curt website and watched the videos instead. Super easy to install. I would say less than a 30 min job with a second set of hands. I did it by myself and took a little over an hour. Took me longer because I had a hard time getting one of the exhaust rubber hanger off. I also wanted to trim the plastic undercover but not leave a big hole like how the manual states to trim away. Pretty much what I did was cut 3 sides and left one side uncut. This allowed me to slide the exhaust in and put the cover back to make it a clean fit. Used some good tape and it will look like the original. Also this keep water and nasty stuff from getting inside under than cover piece. The instructions said to remove the plastic undercover piece, but I left it on. There is no need room spend all that time to remove the under cover. Measure according and trim away. I used a rotary cutting wheel and took less than a minute to trim. Super easy and the hitch mounted on perfect. No issues what so ever. The hitch receiver does stick out slightly and not as flush to the bumper as I thought, but hey I scored a great deal and now I can put my bike rack on. No complaints. Happy customer!
G**Z
Pieza de uso rudo y de gran calidad.
Compre este tirón para usar un rack de plataforma para mis bicicletas. A continuación lo que he visto del producto. Se coloco en una crv 2014, pesa aproximadamente 15 kg. La instalación fue muy sencilla, se debe bajar la tapa que se encuentra abajo de la cajuela hacer un pequeño corte y listo. Necesitarás algunas extensiones de dados para llegar a apretar lo suficiente. El jalon está algo sobrado para el uso que le daré, pues este es clase 3, con un clase 1 pude resolver mi necesidad sin embargo el producto estaba muy barato. Con este jalon puedo arrastrar otro carro pues soporta 3500 toneladas de jale y 350 de carga. El producto llego con toda la tornilleria necesario para su instalación, solo hace falta tener un poco de herramienta.
K**S
Excellent product, moderately difficult install, ok instructions
One of the best hitch receivers for a Honda CR-V (2016 EX-L). I installed it myself. Maybe if you took it to a professional might have been easier. The installation right up to mounting the hitch was smooth. However I hit a snag installing the screws on the passenger side (over the exhaust). I didnt get much clearance to screw it in. Also the 17 mm screws seemed way tight. Had to use a WD-40 and after hours of racking my brain was able to install it. But the instructions dont do justice to this product. Most youtube videos will show you the car mounted on hoists. So if you do it yourself, DO NOT use jacks. Just have the car parked on level ground and work with whatever clearance you have. Now for the product itself - it is excellent. I used it to mount a 4 bike carrier rack and took two adult bikes and one kids bike over a four hour drive. Was rock solid. My only advice is - if you dont have the tools or time, get it done from a mechanic or u-haul. May save some time and pain but dont pass off on this product. It is GOOD and sturdy. Fits CR-V like a glove.
ラ**カ
CURTの動画を見て簡単に取り付くとは思わない方がいいかと。
CR-V RM1用で購入しましたが、CR-VのUS仕様とは違い、日本仕様では車両側のフレーム取り付け穴4ヶ所に溶接ナットは付いていませんでした。 実際ナットは用意しましたが、とてもじゃありませんが、CURTの動画のように一筋縄ではいきませんでした。 付いてしまえば剛性もありそうで満足してます。 あとヒッチコンセントの取り付け穴等もないので、そこも要検討です。 あとマフラーブッシュはシリコンスプレーガン塗りで対処。 アンダーカバーの綿は引くようにしてきらず、押して切ること。 切り口はボンドスプレーG17をかけて生乾きで押さえ込む、ぐらいでしょうか。 初めて車イジリされる方は間違いなく業者で日本製ヒッチを付けたほうがいいかと思います。 ただ重ね重ね商品には全く問題ありません。
M**S
Perfecto. Fácil de instalar
Honda CRV 2014 a la perfección con la Ayuda de mi esposa lo instalamos
A**T
Good price for a quality product.
Great product for the price. install was fairly straightforward, took a little long than expected and we used a hoist and shop tools, but all required hardware was included. only issue would be dealing with rust on the screw holes and the muffler on a vehicle that isn't new.
Trustpilot
1 day ago
2 weeks ago