🛠️ Seal cracks like a pro—don’t let damage define your space!
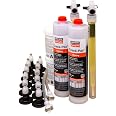
The Simpson Strong-Tie ETIPAC10KT Crack-Pac Injection Epoxy Kit features a low viscosity resin designed to penetrate fine to medium concrete cracks. This compact, easy-to-use kit enables fast, durable repairs with trusted Simpson Strong-Tie quality, making it ideal for professionals and managers who demand reliable structural restoration.
| Manufacturer | Simpson Strong-Tie |
| Part Number | ETIPAC10KT |
| Item Weight | 0.01 ounces |
| Product Dimensions | 11 x 7.66 x 10.91 inches |
| Item model number | ETIPAC10KT |
| Is Discontinued By Manufacturer | No |
| Color | Black |
| Material | Resin |
| Item Package Quantity | 1 |
| Special Features | Strong-tie |
| Usage | Repair |
| Included Components | Sealent |
| Batteries Included? | No |
| Batteries Required? | No |
G**S
Works Well but Takes a Little Planning
Purchased to patch a crack in basement wall. Kit has excellent CD with instructions, watch it before you begin. Follow instructions and the kit will work. Two pieces of information. Do a little homework first and figure out how deep and wide your crack is. Look at the table for how much each tube fills. I calculated I needed 5 tubes and I used 5 tubes. The tables are accurate. Order it all at once and you won't be disappointed. Also, my basement is a poured wall that looks like rough brick. It was difficult to get the patch-over epoxy to cover it well in the time allotted (it sets fairly quickly) and I did have a little leakage when injecting but not much. If you have smooth walls you'll be ok, otherwise I'd recommend mixing small batches to make sure you get proper coverage in the working period. They supplied enough product in the kit though to cover the whole crack. Overall, a good product and easy use. Just do your homework first and read the instructions and you'll be ok. Way cheaper than hiring someone to do it.
F**R
This fantastic product works
We had a leak in our concrete foundation, right under a window. Of course, water was leaking into our finished basement. After we opened the drywall and examined the crack, we had a few contractors give us bids. One was as high as $6500!! I did a bunch of research and found that all we needed to do to fix the crack is to find a professional product to fill in the crack. This product did the job! Make sure you use it exactly as directed. It's not too complicated to use but you do have to be precise. I even watched a YouTube video to make sure we did it right. Also, it takes a lot of strength to apply. (My husband had to inject the product into the crack. I wasn't strong enough. :() Ultimately, it worked just as described. The leak was completely filled. It hasn't leaked in 2 years, even with record rainfall in Oregon. We are thrilled, and it cost a lot less than $6500.
H**A
Good Products but if you are not a savvy...
I am living in the great Boston area, MA. I bought a new house with a basement about 4-5 feet underground. About a year late the basement had a crack across the foundation wall, about 5 feet high. Only big rain would leak. I saw SIMPSON Crack-pack Kit with pressure injection at Amazon.com. I am not a handyman but decided to give a try. The kit contains a video CD with detail instructions. The steps of paste-over are really straightforward. However, as video said if the crack crosses through wall, it should paste-over cracks inside and outside walls. It was hard to do outside, I had to dig a hole around the crack, eventually went to 3 feet deep.Before the works I read other reviews, and felt that paste-over leaking could be a big problem. I did very careful about the paste-over, covering every possible hole.The injection part is a little trick. First is to assemble cartridge and nozzle, then the E-Z-Click tube. Following the video instruction, I used hand to twist off nozzle tip, however, the breakpoint went too low, which caused the E-Z click tube could not firmly attached to the nozzle, and terrible leaking from the junction during injection. So the first set was waste. For second set, I used knife to cut off the nozzle tip at very top and the E-Z click tube was perfectly attached. To ensure no leaking from nozzle-tube junction this time, I tested inject cartridge without attach to the injection ports, but surprising there was no flow. I thought something was wrong and called SIMPSON. The first call did not go through and I left a message. About 30 min late I called again. The SIMPSON tech-supporter was very nice. He explained to me that there is a safe-feature, if the assembled cartridge did not attach to the port, the E-Z click tube is in close position, so would not flow. And he sent me two sets of new free cartridges. The cartridges came next day. I immediately injected to the ports. This time everything went very smoothly. As expected the first epoxy cartridge fast ran out in the two lowest ports because the low part of crack on outside wall was not sealed. The rest went beautifully, no any leaking from the paste-over! A little short for the last two ports however, both of them are above ground.My lessons:1. Using knife to cut off nozzle tip not hand twist off.2. If test assembled cartridge without attached to the ports, there will be no flow. It is normal, a safe feature to prevent leaking.3. The finished paste-over can last a few days (in my case 2 days), then do the injection, which allows multiple injections if the port has not used.Recommendations:It may have an option for the kit including 3 or 4 sets epoxy cartridge, in case of accident or using more such as could not seal the crack on outside wall.
D**G
Very easy to use and great results
I found this kit very easy to use. I did watch the video to ensure I would not get stuck with any gotchas (who says men don't follow instructions ;) Pay attention to the curing times of the different epoxys to ensure you don't waste any product. What I mean is when you are mixing the epoxy for fastening the ports and covering the crack, don't mix too much at a time as you don't have a lot of working time. I followed this rule when I did my project and was glad I paid attention to the instructions. When you are doing the actual crack injection epoxy, you cannot start and stop this process. If you cannot inject the entire crack in one session, don't start that process. Also, make sure you close your ports as you work your way up the crack. All the stuff in this review is just echoing the instructions - except I may be a little more blunt!!!!
T**6
chadams66
i "had" a 32" foot long crack in my foundation wall, that leaked lots of water when it rained. having worked in the architecture business for over 30 years, i was more than familiar with Simpson Strong Tie. it did take me 3 kits to fill and fix the main crack and it's off shoots. i found the included dvd very helpful, and the whole process went very smoothly. taking the cover off was the hardest and messiest part of the whole operation. i now have a leak free, structurally sound foundation wall. before finding this product i was looking at thousands of dollars worth of repairs. it is worth every penny.
D**.
Product has its limitations.
It probably work great on some types of concrete cracks, but not mine. My use was for a bulkhead. My bulkhead must have had voids behind the wall that got filled with the epoxy as the epoxy never made it up the wall to the higher ports. If you cracks go all the way through your concrete you could be passing this very expensive epoxy to the back voids of your wall and not fixing anything!
Trustpilot
2 months ago
3 weeks ago