🔧 Upgrade Your Print Precision!
This 2-Pack of CR10 Z Axis T8 Anti Backlash Spring Loaded Nut Elimination Gap Brass Nuts is designed for 3D printers like the Ender 3 series and CR-10 Tornado. With an 8mm lead screw diameter and 2mm pitch, these durable brass nuts enhance printing accuracy and reliability, making them an essential upgrade for any serious 3D printing enthusiast.
M**E
Don't think these are plug and play....Do not loosen the lead screw nut screws!
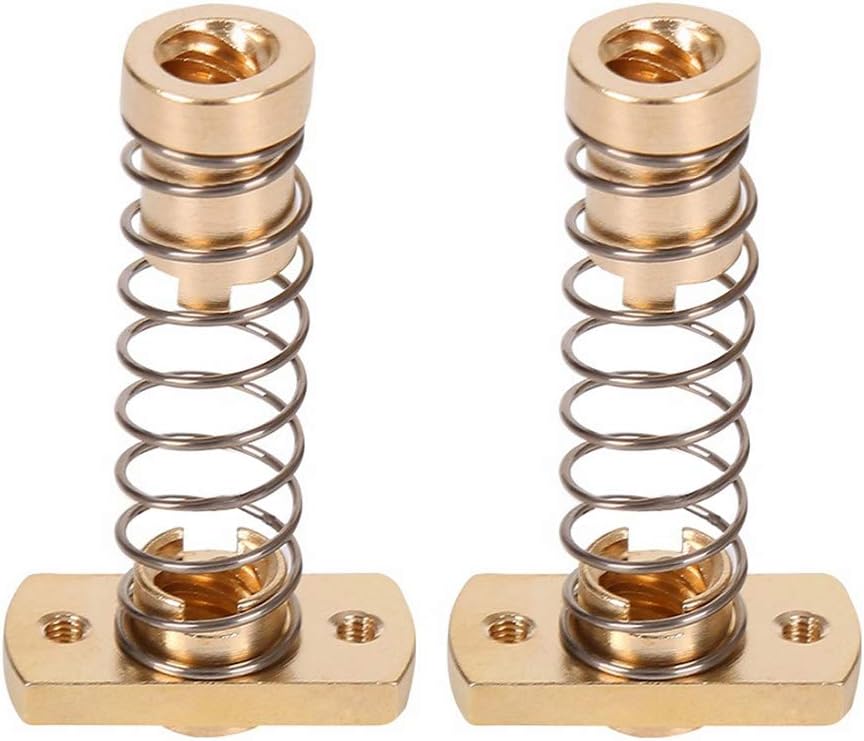
The media could not be loaded. This lead screw nut is too long to expect it to bolt right in and work 100% of the time. It will work with everything tight though, I even attached a picture of the screws being tight and a video showing there is no binding. If you need to loosen anything and leave it loose you need to address the problem with the printer not blame the nuts....don't be a hack...Loosing the screws that hold in this nuts is NOT the solution. If you are loosing the lead screw nuts screws to reduce/eliminate binding then you effectively just moved the slop in the nut to slop in the screws.First when you install these nuts, they will feel very tight almost like the thread pitch is wrong, it is not. Just use a bit of force the thread pitch is fairly steep it will be difficult to actually cross them them. Its brass so it will conform to the steel lead screw. Dry fit them on the lead screw off the printer and verify you can spin the assembled nut up and down the lead screw. Once you verify that you know it works and other problems need to be addressed separately.With the lead screw off, the gantry should want to slam into the printer bed. If it doesn't you need to adjust the rollers on it so it does. But you want to also want to verify the they aren't too loose. There is a step at the end I use to perfect this adjustment. If the gantry binds at certain points you need to loosen the vertical rails from the base of the machine, move the gantry to the bottom and retighten it. That will insure the spacing is good. Then loose the vertical rails at the top move the gantry to the top and retighten them.This is the most critical and difficult step. When you install the lead screw into the nut when it clears the nut by a 1/4" or so make sure you have the gantry as low as it will go and thread in the lead screw the rest of the way. It needs to be perfectly aligned with the z dimension stepper motor and freely drop into the coupling. If it does not then you can expect it to bind.To correct that sometimes its simple. Run the lead screw into the z dimension coupler and loosen the screws on the lead screw nut, wiggle everything and retighten them. Then loosen where the stepper bolts to the rail (horizontal screws) wiggle everything and retighten them.Worst case the bracket holding the screw screw nut (near the x dimension step) might need a slight tweak to make sure its pointing precisely at the stepper.Back to the rollers I mentioned above.. Tighten them to the point there is no slop but you can still force one wheel to spin against the rail. One of them should be able to spin with a bit of effort freely. This way you know it has good pressure to hold tight but not so tight its producing friction.I've used tons of these nuts and some printers they work with no effort, others have annoying required all the above steps.
F**O
You never know how clapped out your lead screw bushing is until you install one of these.
I was having print trouble on the Z axis with layer shifts, so I bought these to try out. They made an immediate difference, you don't know just how clapped out your lead screw bushing is until you install one of these.The tolerances on these bushings are such that there is virtually no play on the lead screw, and the spring loading keeps them tight. It fixed most of the issues I had with the Z axis, the other being the rollers that were also changed.
G**A
Decent quality
Had a little trouble getting these started on my Z-Rods but once I got past the burr on the threading of these it went on and works great.
O**Y
Precision part that meets muster.
Used this kit to upgrade the stability of the Z-axis on my Creality CR10S-Pro V2. Gantry kept sagging to one side when the power turned off. Installed these puppies and *poof* - no more tilt! I can press gently down on the frame and it stays put.The nice thing about these is that you don't have to cut the brass fittings to fit onto the frame- just remove the screws, compress each unit and install. Better have two sets of tweezers to hold the small parts when reinstalling, though. Also, if it doesn't screw onto the axis the first few times, no worries- it's a precision part.Here are the steps I followed.1. Gently unscrew the threaded rod from the frame. Remove the current brass fittings, set the screws aside in a safe place. A towel or small bowl is fine.2. Rotate the brass collar slowly and as straight as possible until it screws on enough to stay put. Do not screw it on all the way.3. Compress the rest of the fitting onto the part before continuing the rotation. The teeth should be locked into each other.4. Secure the brass fitting to the frame of your machine using your screws, but flush the nuts with the underside of your frame before you finish securing your screws.5. Make sure the top of your rod is flush with the top of the frame before you secure the collars to the motor. This will prevent the threads on your axis from being misaligned.Hope this helps!
M**A
Works
Works
M**E
Should have gotten it sooner
This solved my cr touch issues, my second layer issues, and what I thought was an extrusion problem. Make sure to mount yours upside down like mine, spring facing upwards so the anti-backlash is helped by gravity.10/10 purchase, just get it already.
I**R
They do what I need them to do! They Preserve my bed levelling.
These "backlash" couplers do what I want them to do on my CR-10S and that's to keep the z axis from moving when I power down the machine. Before I installed these I used this machine for 3 years and frustratingly had to level my bed almost every time I used the machine!I could literally see the jackscrews move when I powered down thereby destroying my bed levelling. These "backlash" couplers put enough drag on the z axis screws to prevent them from moving (usually downward) when turning off the machine.My bed stays at the proper level the next time I use it, which is the way it should be!I put "backlash" in quotes because this device is not really doing anything in regards to backlash and that's not its primary purpose. It's purpose is to prevent movement of the jackscrews when you power down so as to preserve your bed level adjustment.
Z**S
Threads to far apart to match their own product.
I bought both the nuts and an oldham coupling and spent 2 hours trying to get the screws in to the nut from the oldham coupling. The first issue is that there was NO instructions and no included screws, but even after I looked at a different brands listing to see how they worked, I realized the reason I had been struggling was because the screw holes on the nuts were farther apart then the oldham coupling openings. Frustrated and impatient, I clamped down on the two parts with pliers and forced the screws in and got it together. Mostly because I didn't want to go to the hassle of sending it back and most of these seem to have people listing the same issue. However, these are some of the more expensive ones and I don't see any reason to spend the money. Buy cheaper!
L**S
Good
Purchased bc nut tolerances on the 2 z axis upgrade for my ender 3 were poor.Tolerance on these parts fit my setup very well. The anti backlash might not have had much affect but prints are cleaners now.
B**D
Belle finition
Fonctionne parfaitement sur ma Kobra Max
L**E
Kläre Verbesserung der z-Richtung
Ich hatte auf meinem alten Ender3v2 typische Artefakte, die auf Vibrationen und Mterialfehler des Druckers zurück zu führen sind.Durch die Federn sind die Wände meiner Drucke deutlich besser geworden. Sollte eigentlich Standard bei allen Druckern sein.
C**N
Perfetto
Preso per Anycubic Konbra max, sono perfetti
C**N
Excellent service
Fast shipping and great quality
Trustpilot
4 days ago
1 month ago