Desert Online General Trading LLC
Dubai, United Arab Emirates
Desert Online General Trading LLC
Dubai, United Arab Emirates

🌿 Grow Bold, Grow Smart — Your Garden’s New Powerhouse!
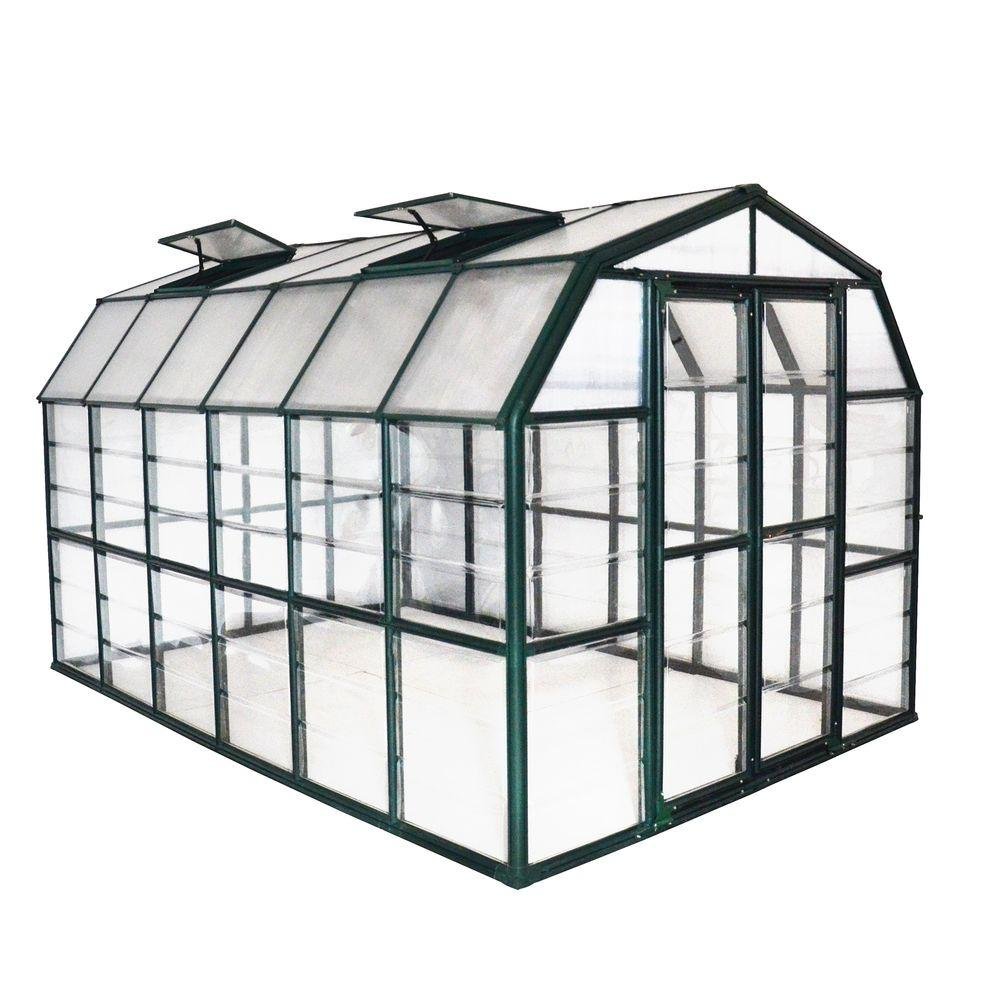
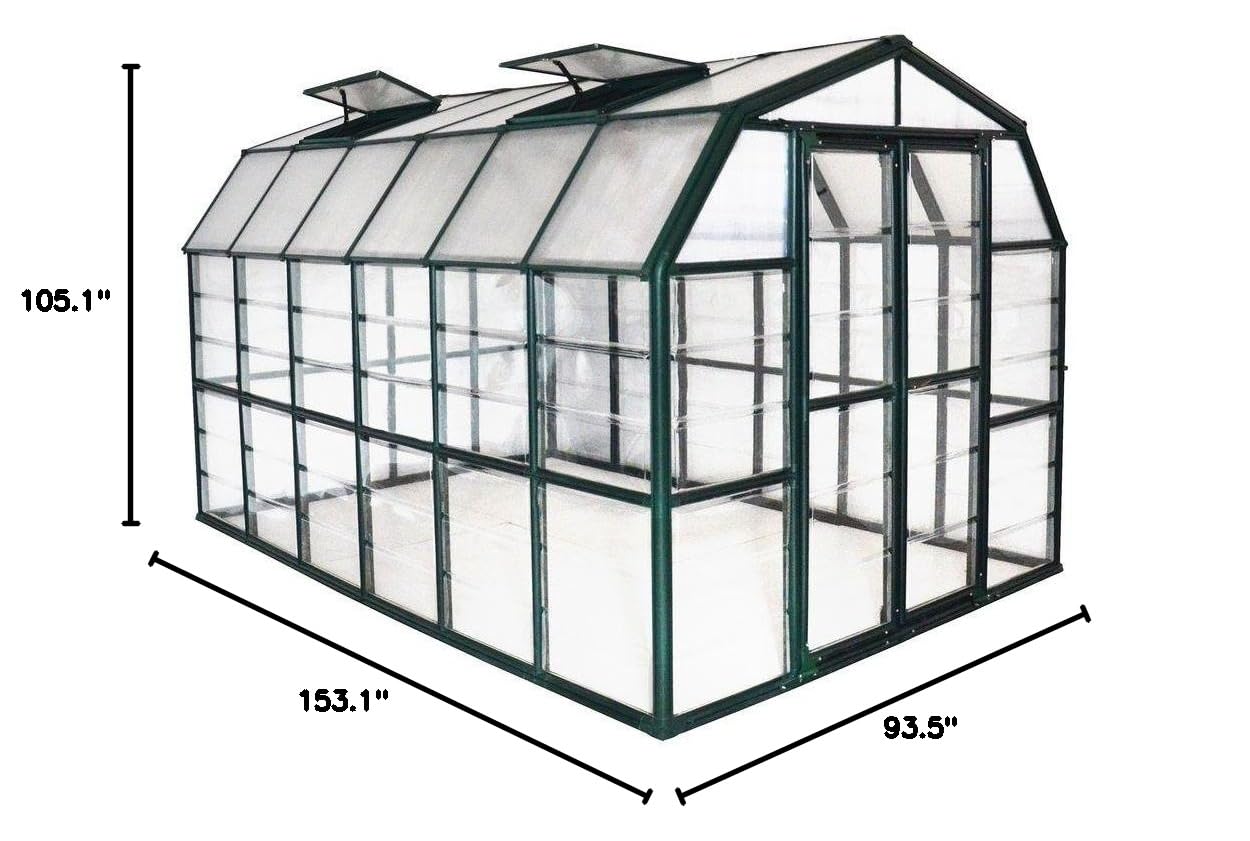
The Palram Canopia Rion Grand Gardener 2 is a large 8x12 ft walk-in greenhouse featuring virtually unbreakable 4mm twin-wall polycarbonate panels with full UV protection. Its barn-shaped aluminum frame with heavy-duty resin coating offers superior durability and insulation. Designed for easy DIY assembly with a pin and lock system, it includes French doors and a window vent for optimal airflow, making it the perfect all-season gardening solution.


| Frame Material | Aluminum |
| Cover Material | Polycarbonate (PC) |
| Item Weight | 297 Pounds |
| Nominal Wall Thickness | 4 mm |
| Item Dimensions L x W x H | 153.1"L x 105.1"W x 93.5"H |
| Door Style | French Doors |
| Color | Dark Green |
| Number Of Vents | 1 |
| Number of Doors | 2 |
M**I
Nice Greenhouse...Time Will Tell
Ordered the Rion Grand Gardener 2 8'x16' Twin-Wall Opaque greenhouse. Took 3.5 weeks to deliver.The instruction manual is all photos, no instructions. My advice is start from the back of the manual and work towards the front of the manual.I did this to make the greenhouse very secure from high winds:1. I modified the roof so the 3 vents would be secure by adding 2 2.5" (modified) metal hinges to each vent (photo below showing roof vent hinge bolt from the inside), which I bolted to the hinge frame.2. I also screwed 1 2.5" metal roofing screw (with rubber seals) in the middle of the rails that hold the panels onto the roof, as the flimsy pvc connectors were sure to detach in strong winds, because that's all that holds the roof panels onto the roof.3. I also used 4 2.5" screws to hold down the 4-point caps onto the roof, and 3 2.5" screws on the 3-point end caps on the roof.4. I attached the frame to treated 4x4 beams with 3" dry-wall screws, then hammered 6 2' pieces of rebar (1-3/4' deep) at angels on the outside of the base (3 on each side), then attached them to the 4x4's with clamps, then placed huge rocks all along the outside of the base to hold down the greenhouse and to make it unmovable.We'll see if this greenhouse holds up, as we had 50mph winds 4 days ago, and it's snowing for the 3rd time this winter, and it's only October.UPDATE: It's now July 2020, and at 8,500' and lots of snow, the greenhouse held up very well during the winter. I used a snowrake to remove snow on the top. We had strong 60mph winds days ago & the vents are very secure with the addition of the vent metal hinges that I added. Greenhouse is very secure with no movements whatsoever, with the addition of the 6 rebar rods, the 4x4 base, and a ton of large rocks around the base.The flimsly vent channel that holds the vents onto the roof will not hold up in high winds because the channel will flex slightly and the winds will blow them off. No problems here.UPDATE: All polycarbonate panels are pre-cut to the correct size. Do NOT cut any of the panels or they will not fit correctly and the winds will blow them out.UPDATE: I built and installed 2 pollen-proof exhaust fan vent boxes and 3 pollen-proof roof vent boxes to keep pollen out of the greenhouse. Works very well, as we had no contamination this year. I also replaced the manual plastic vent openers with automatic metal vent openers.UPDATE: Vent Hinges. National Hardware N127-365 V280 2-Inch Light Strap Hinges_Zinc-plated_2-pack (These are the hinges I used/modified). the hinges must be bent to fit outside of vent box and outside of vent box container (for a custom fit), then drill holes into vent box and vent box container, then bolt together with bolts, nuts, washers and lock washers. Be sure to CENTER vent box BEFORE drilling holes in vent box container OR vents will not open/close properly.UPDATE: 04/2021. Greenhouse survived the 2020-2021 winter just fine. Fully intact (thanks to my extra efforts to make it so) with no problems whatsoever. I like this greenhouse so much that a friend is buying one (their second greenhouse). They are making the improvements above to secure the greenhouse.Someone here had a Rion just like mine, but they obviously assembled it without making that extra effort to keep it intact, and the winds totally destroyed it. Live and learn.UPDATE: 05/28/2023. Greenhouse is still solid & secure, no problems whatsoever.UPDATE: 05/01/2024. Greenhouse is still 100% secure & solid as this is our 6th year using it. The 50-60-70mph winds blow right by it, no movement whatsoever.For those having the wind blow the vent windows out, you MUST use hinges to secure the windows to the frame box & use screws on the top to keep everything intact.
S**E
Great Greenhouse but not perfectly engineered.
I ordered the 8x12 and it arrived in 4 boxes - one for the front 2 foot section, one for the back 2 foot section and 2 for the middle 4 foot section. Be warned: there are close to 1,000 pieces in these boxes. But don't be put off by that, most of them are very small connectors to hold the joints of the larger pieces together.It took me about 20 hours to put this greenhouse together by myself. Here are my thoughts about that process and the pros and cons I experienced:As I said above the boxes contain the pieces to specific areas of the greenhouse so it will help to have plenty of room to arrange these boxes accordingly. The instructions are are virtually wordless, pictures articulate the assembly process, and are specific to the smaller 8x8 greenhouse, so quantities need to be increased when gathering the required parts for larger structures. Just keep that in mind as you proceed. As with any instructional set primarily done with pictures pay very close attention to the orientation of the pieces during construction.Each of these individual pieces has a label attached with a part # for easy reference and assembly. They are also water resistant so don't worry if you are putting this together in the rain (as I did), they will stay on and still be readable.VERY IMPORTANT: The greenhouse I purchased was the 8x12 model. However, IT IS NOT 8x12. I made the assumption that I could lay the foundation prior to the arrival and assembly of the greenhouse. This was a mistake as the actually foundation measurements of the greenhouse were several inches beyond that both length and width.As with any product of this nature (i.e., somewhat flimsy), the foundation is the key. So I recommend you NOT set this greenhouse directly on the ground, rather buy enough 4x4 treated lumber to form the foundation and level these out perfectly and squarely. Then, using 8 inch long galvanized screws with washers, fasten the corners to hold this foundation together. Inside for the floor use whatever you desire. I used 16" square red pavers with enough space in between for pea gravel for drainage. Of course you'll want this space to be as level as possible if you do something similar. But I digress. The reason I opted for 4x4 treated lumber is so that I could have a strong and fairly heavy foundation to screw the bottom rails of the greenhouse down to. Each two foot section of the greenhouse foundation has holes for exactly this purpose and you can use 3 inch decking screws, they'll work perfectly.Construction is pretty simple and straightforward. Gathering the required pieces from the various boxes can be tedious. But they go together well and are engineered so that once it is fully assembled the structure will provide adequate strength. I live in a fairly windy area, but the placement of my greenhouse (near the corner of a fence) will provide additional protections. What does give me concern are the clear side panels of the greenhouse. They are flimsy and are only held in place via slots in the structures of the walls.The greenhouse did come with a rubber seal that is supposed to go around each of these clear wall panels to further provide keeping them in place and increased protection from the cold (I assume?), but I have yet been able to install these with any success and for now they lay in a bundle on the floor in the greenhouse until I can come up with a solution. This is without a doubt one of the poorly designed elements of the greenhouse.The doors of the greenhouse is another poorly designed element - at least how to secure the second (french door) if you desire to only use the single door. This door uses two fence gate style slide latches mounted vertically. One at the top of the door and one at the bottom of the door. However, they are woefully designed and to get them to function properly is going to require some creative engineering on my part.Last element of failure on the part of the engineers that designed this greenhouse: they were thoughtful enough to provide a cabling system (4 of them in my 8x12 greenhouse) to hang hanging baskets from. Great idea! Poorly executed. I'm pretty handy, but it is impossible to install these cables as designed. I was able to partially install them so as to make use of them, but I'm not confident with it so I won't be putting too much weight on them.Overall, I am pleased with the greenhouse. And it's going to provide several years of growing pleasure in my backyard. The design issues that I've mentioned aside, it's a quality product that otherwise seems very well thought out and implemented. Would I buy it again for what I paid? Good question. Probably. But knowing of these design faults I would suggest that they lower the price of the greenhouse by about $200. Either that, or go back to engineering and fix these issues.UPDATE 03/25/2022:The greenhouse still stands and it still in great shape. It has survived winters with a foot of snow on the roof. I would recommend removing that much snow as soon as possible, as I could see stress on the structure. But it did hold it until I could sweep it off.Would I buy it again? Yes.
S**.
Less sturdy than I could have possibly imagined
The plastic frame is cheap, and just of poor, poor quality. After 5 months I'm still trying to figure out how to brace it so that I'm not terrified that it will be destroyed by the slightest breeze. Honestly, the best case scenario might be that a tree falls on it so that my insurance will cover the cost, and I can just throw the damn thing out. Unimpressed on every level.
T**Y
Reinforcements required
The 80 or so pages of instructions are not very helpful. You have to poke around the internet to find youtube videos of other experiences. It says nothing about building the roof on the ground and attaching it as one piece. If you don't, it's very difficult to reach over to work on the roof from the outside.The skylights are junk. The "hinges" (more like just a metal catch) are about 1/8". This does not hold up to any significant wind. You must drill into the frame and add your own hinges to reinforce and hold the things on. Do it on the ground BEFORE you raise the roof, or you'll be very sorry.The frame lasted 3 years in Minnesota winters. Just bought this one to replace the first roof, which completely collapsed and was shattered, by snow load. This time, I will build wood framing on the inside to reinforce the roof strength. Full disclosure, I have the 20' x 8' model, so the middle gets very weak.The panels themselves are light, and it serves as a nice greenhouse. However, it gets WAY too hot. Suggest cutting a fan into the side to pull in cool air to then vent out the skylights. The skylights themselves don't do it. Not enough air flow.OK, so I liked it enough to replace the busted one, but if starting all over, I think I'd look at other options. Not terrible for the money, but it really depends on your local environment.
Trustpilot
3 weeks ago
5 days ago