🚀 Elevate Your Towing Game!
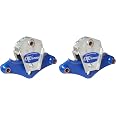
The MORryde CRE2-35 CRE3000 Suspension System is a cutting-edge solution for tandem axles with a 35-inch wheelbase, offering smoother towing, 3 inches of suspension travel, and protection against road shocks. Its easy bolt-on installation makes it a hassle-free upgrade for vehicles rated for up to 8,000 lbs axles.
| Manufacturer | Morryde |
| Brand | MORryde |
| Model | CRE2-35 |
| Item Weight | 1 pounds |
| Item model number | CRE2-35 |
| Manufacturer Part Number | CRE2-35 |
| OEM Part Number | CRE2-35 |
M**S
Glad I did it
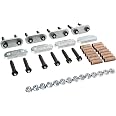
In short, I bought this. Installed it myself. Survived the experience. Glad I did it. Want a ridiculous amount of detail? Keep reading.PLEASE NOTE: Below I refer to parts that are part of MORryde’s shackle kit and NOT with the CRE3000 alone. Don’t think you’ll be able to do everything I describe below with only the CRE3000.On impulse I decided to upgrade the suspension on my 2006 26' travel trailer. Myself. In my driveway. I've never done anything like this before, but how hard could it be?So without revealing to my wife my grand plan to turn our driveway into an RV maintenance yard, I ordered the CRE3000 and (since I'd be removing the wheels and rusty bolts anyway), I decided to upgrade the shackles as well with the MORryde heavy duty shackle kit. I think it's called "wet" because you can lubricate it. ( MORryde UO12-016 Heavy Duty Shackle Upgrade Kit, CRE3000 / Stock / Equaflex 2.25" Shackles - Tandem Axle .Additional stuff purchased, using this project as an excuse, included: A 2 ton floor jack with a 23+ inch lift (enough range to lift my trailer at the frame). A grease gun (for the zerk fittings on all the new bolts GreaseTek Premium Pistol Grip Grease Gun with 18" Hose and Extension Pipe ). A 24" breaker bar (rusty bolts are fun!). A can of B'laster ( B'laster 16-PB Penetrating Catalyst - 11-Ounces . A set of impact sockets for my air powered impact gun. Two tall jack stands (tall enough to support the frame jacked up). Some work gloves.Additional stuff I used that I already had on hand: An air compressor. Air powered impact gun (pretty excited about my 2nd opportunity to use it in 10 years). A second, much smaller floor jack (I didn't expect to use this, but it was VERY handy to have - details below). A creeper/crawler borrowed from a neighbor. Two small jackstands for supporting the disconnected axles. A couple wrenches of appropriate size for my bolts. A rubber mallet. A hammer. A punch.I planned to tackle the project with my 13 year old able assistant on a Saturday afternoon. So starting Thursday, I began soaking the eleven year old bolts/nuts (7 on each side of the trailer) with B'laster hoping to make them easier to remove after a couple days of soaking.Saturday afternoon I hauled the trailer out to the driveway, jacked it up, placed the two tall jackstands to support the trailer, and removed the two wheels (on one side), revealing the entire suspension. Then, thinking it might take a some pressure off the leaf spring and bolts, I lifted each axle just a little bit and supported them with small jackstands. Now it's time to remove those rusty old bolts.So the bolts faced away from me. That is, they were inserted with the head toward the outside and the nuts on the inside (under the trailer). No problem. I put a wrench on the backside to hold the nut in place, and then used my air-wrench to turn the head. Or tried to. Didn't budge the tiniest bit. Then I hung my 13 yr old off the end of the breaker bar. Then I hung myself off the end of the breaker bar. Didn't budge the tiniest bit. More P'blaster, a little banging with a hammer to try and free the frozen bolts. No joy with any of the 7 bolts. I was extremely frustrated and had to really bite my tongue to avoid language my assistant shouldn't hear. Until one bolt finally gave just a little bit.At this point, some of you more knowledgeable folks already know my mistake. It turns out the bolts themselves (on my trailer) aren't intended to turn. Near the head of the bolt is a small area of grooves that locks the bolt in place. The nut has to be removed from the stationary bolt. At least until the nut backs off far enough that the bolt can be tapped out past the grooves and then turns as you might expect. So learn from my mistake - apply pressure to the nuts, not the bolts. I wish I had learned this lesson an easier way, say by looking at the brand new replacement bolts, seeing the grooves and realizing their obvious purpose. But that's not my style. Plus it was a lesson in perseverance for my assistant. If at first you don't succeed, cuss, hit it with a hammer, nearly give up, and then get lucky.Anyway, after the bolt design revelation things started moving much faster. Between the air-gun and breaker bar all the nuts came free without too much difficulty. The creeper and small size of my assistant (compared to me) was invaluable in removing the nuts under the trailer. Thank goodness for sturdy jackstands and his mom staying in the house.Then we used a punch to knock the bolts out, freeing the leaf springs and removing the triangular center hanger. More use of the punch to push the worn OEM plastic bushings out of all the bolt holes. Now disassembly is complete.Reassembly was mostly straightforward. Insert the shiny brass bushings (from the shackle kit) into all the bolt holes and gently tap in with rubber mallet. Hang the new CRE3000 in the center and drive in the center bolt, put the nut on the back, but not tight yet. Reattach the leaf springs to the left & right of the CRE3000 using the new shackles and bolts from the kit. One tip - on the center bolt (that hangs the CRE) the zerk fitting in the head of the new bolt faces outward toward you. On ALL other bolts, the zerk fittings face inward, under the trailer. That's supposed to make it easier to reach and lube when the tires are on. So unlike the original bolts, all the nuts except the center bolt will now be on the outside rather than inside. That'll be handy in the future when I forget the lesson learned above.The left & right ends of the leaf springs that attach to the front & rear frame hangers can be a little tricky to get aligned so the bolts will go through. The holes will be too high, too low, or crooked. This is where I used my small floor jack to push up on the end of a spring raise it, or push down on the spring to lower it. To push down on the spring, I set the jack on TOP of the spring and pumped it up until the jack foot hit the frame above. Than as I continued to pump, the jack pushed the spring down aligning the holes. It took a bit of fiddling, including with the axle jack stand, to get the leaf spring ends reconnected, but in the end it wasn't really hard.The last step was to tighten all the nuts and lubricate the 7 bolts with the new grease gun. Then we we replaced the tires and we were done. With one side. It had taken us about 4 1/2 -5 hours and daylight was running out. We finished the job the next day and, with the lessons learned, it took only about 2 1/2 hours to finish the second side. So roughly seven hours total including the time penalty for stupidity.We went for a test drive and I immediately noticed two things. First, the tires/axles didn't immediately fall off. That was a relief. My mind had been full of "what ifs" and "what did I forget?" and "where did that extra bolt come from?" (just kidding). The second thing was how QUIET the trailer was. I had gotten used to lots of squeaks and squeals over speed bumps and maneuvering at low speed, but now the trailer is whisper quiet in all circumstances and seems to float along behind the truck rather than bounce. I'm very pleased with the end result and glad I chose to do it as a DIY. It was actually a very satisfying project to complete with my son. MORryde UO12-016 Heavy Duty Shackle Upgrade Kit, CRE3000 / Stock / Equaflex 2.25" Shackles - Tandem AxleGreaseTek Premium Pistol Grip Grease Gun with 18" Hose and Extension PipeB'laster 16-PB Penetrating Catalyst - 11-Ounces
K**E
Worth the upgrade
If you are debating this, and already replacing your equalizer, do yourself, your trailer, and your truck a favor and buy this.It’ll be worth it in the long run, with its bronze bushings, chucking reduction, and vibration reduction.
M**E
Wow!
What an amazing difference. Shelves and cabinets of my trailer used to get re-organized every time I would time I would tow, now it rides nice and smooth.
J**K
good
replaced two worn out ezflex with these , took one 1200 mile trip they seem to be good so far
R**K
Great product
I installed this system on my 2020 Jayco. They worked so well that when I traded it in for a 2022 2970RL Imagine I ordered a set for it. I just dont understand why the manufacturers don't have installed as OEM.NOTE : Installing this I discovered the manufacturer neglected to put a bushing in one of the leaf springs. Just wanted warn somebody else what they might find ( or not find ).
Trustpilot
3 weeks ago
1 week ago