🔧 Measure Less, Cut More—Join the Revolution!
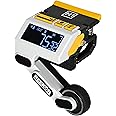
The REEKON M1 Caliber Measuring Tool is a cutting-edge device designed to streamline the measuring process for miter saws. With its patent-pending technology, it allows users to measure materials quickly and accurately, eliminating the need for traditional measuring tools. Compatible with various saw types and featuring a backlit LCD display, this tool enhances safety and efficiency for professionals in woodworking and construction.
Manufacturer | REEKON Tools |
Part Number | RKN-M1-001-A |
Item Weight | 1 pounds |
Product Dimensions | 6.1 x 4.5 x 3 inches |
Country of Origin | Malaysia |
Item model number | RKN-M1-001-A |
Batteries | 2 AA batteries required. |
Is Discontinued By Manufacturer | No |
Color | White |
Style | M1 Caliber Measuring Tool |
Material | Polymer |
Power Source | Battery |
Item Package Quantity | 1 |
Type of Bulb | LCD |
Measurement System | English/Standard |
Measurement Accuracy | ['+/- 0.029 IN', '+/- 0.75 MM'] |
Usage | Measuring Material |
Included Components | M1 Caliber, Case |
Batteries Included? | No |
Batteries Required? | Yes |
Description Pile | AA |
R**H
Fantastic cut with this
I couldn't belive until I used it. The accuracy is so high and easy use. The material is high quality. I hope their new Tape measure comes out (the chip one) and I can ordered it immediately
M**E
A must have for every Wood/Craft Shop.
Love it, Love it. Saves time makes projects go faster. No more measuring 2 or 3 times and 2nd guessing yourselfIt's so easy to use. Did I mention I love it.
T**.
So where to begin
This is a nice little machine. Getting is calibrated sucks, I followed the instructions again and again and again and it kept saying I was a 1/16th off every time so what they don’t talk about is you have to measure the thickness of your saw blade and you need to enter that into the machine otherwise it will always be off. Now for the money I spent. It’s expensive this is not a homeowner tool this is a professional homeowner tool after my struggles and a lot of YouTube videos I finally got it dialed in. Time will tell if it’s making my life easier but my advice to the creator is to drop the price or provide a No BS lifetime warranty. It’s got your name on it and that’s all you need you will fix it for free at this cost. A tape measure is $20 dollars I’ve done a lot with a tape measure your going to have to try and convince me otherwise that your M1 tool can improve my life
K**.
Worth the investment
Once you get this calibrated, measurements are spot on. Set up instructions and calibration are awful and incomplete. I found an independent YouTube video for setup that was complete and easy to understand.
D**S
Good Product
Good Product
T**C
Had such hopes
I really wanted this tool to work. It looked as if it would suit my needs but immediately after unpacking and installing, I ran into problems. The included directions are not accurate so I went to the website. Finally after watching a couple Youtube videos, I got it working; however, this was short lived. As soon as I turned it off and back on, the blade thickness which I just stored wasn't saved. I repeated the process as in the directions and the video. Still no luck. I tried it on a few short (less than 24") pieces and it worked well. The next piece was 52" long; it was off more than 1/4". Being relatively unfamiliar with the device, I ruled out user error and carefully repeated the instructions and steps several times making sure I followed each step. I had another employee try their hand. Still off. Very sad. I had to return the device for a refund. It is a good idea but good ideas don't make up for poor accuracy.
P**.
Nice tool
If you are doing one or hundred cuts, this is nice for continuous accuracy.
H**X
Not a bad tool, but not precise enough for fine cuts
I was attempting to trim 3/8" off the end of a board and after 4 attempts, I got a piece that measured 3/8". Two of the pieces were narrower and the other was wider. It wasn't off by much, but it was off. Here's the issue when trying to cut such a short piece...there are multiple ways to get to 3/8".Method #1 -- slowly slide your stock under the wheel until the readout says 3/8". Stop there and cut.Method #2 -- slowly slide your stock under the wheel until you are past 3/8", then slowly slide your stock back until the readout says 3/8". Stop there and cut.Method #3 -- slide your stock back and forth while the readout is showing 3/8". Work back and forth until you feel your midway. Stop there and cut.Each approach gives you a different result. When I did get 3/8", I couldn't tell you which method it was, but it was #2 or #3.Two more issues:1. The device also slips off my fence quite easily, but maybe that's my miter saw.2. I originally set my blade kerf to 1/8". After getting some off cuts, I tried to change it to what I actually measured it as - 7/64". I went through the blAde configuration, rolled the wheel, stopped on 7/64", and pressed the zero button. The display goes back to saying 1/8". When I go into the configuration, it still says 7/64". So even though I am setting the blade kerf to 7/64", the offset being used when I zero my stock is 1/8". I have no idea which number is actually being used, but this inconsistency doesn't help with accuracy.I have gone back and tried this a few times, but I end up back using a tape measure.Too late to return it now.
Trustpilot
1 week ago
1 week ago