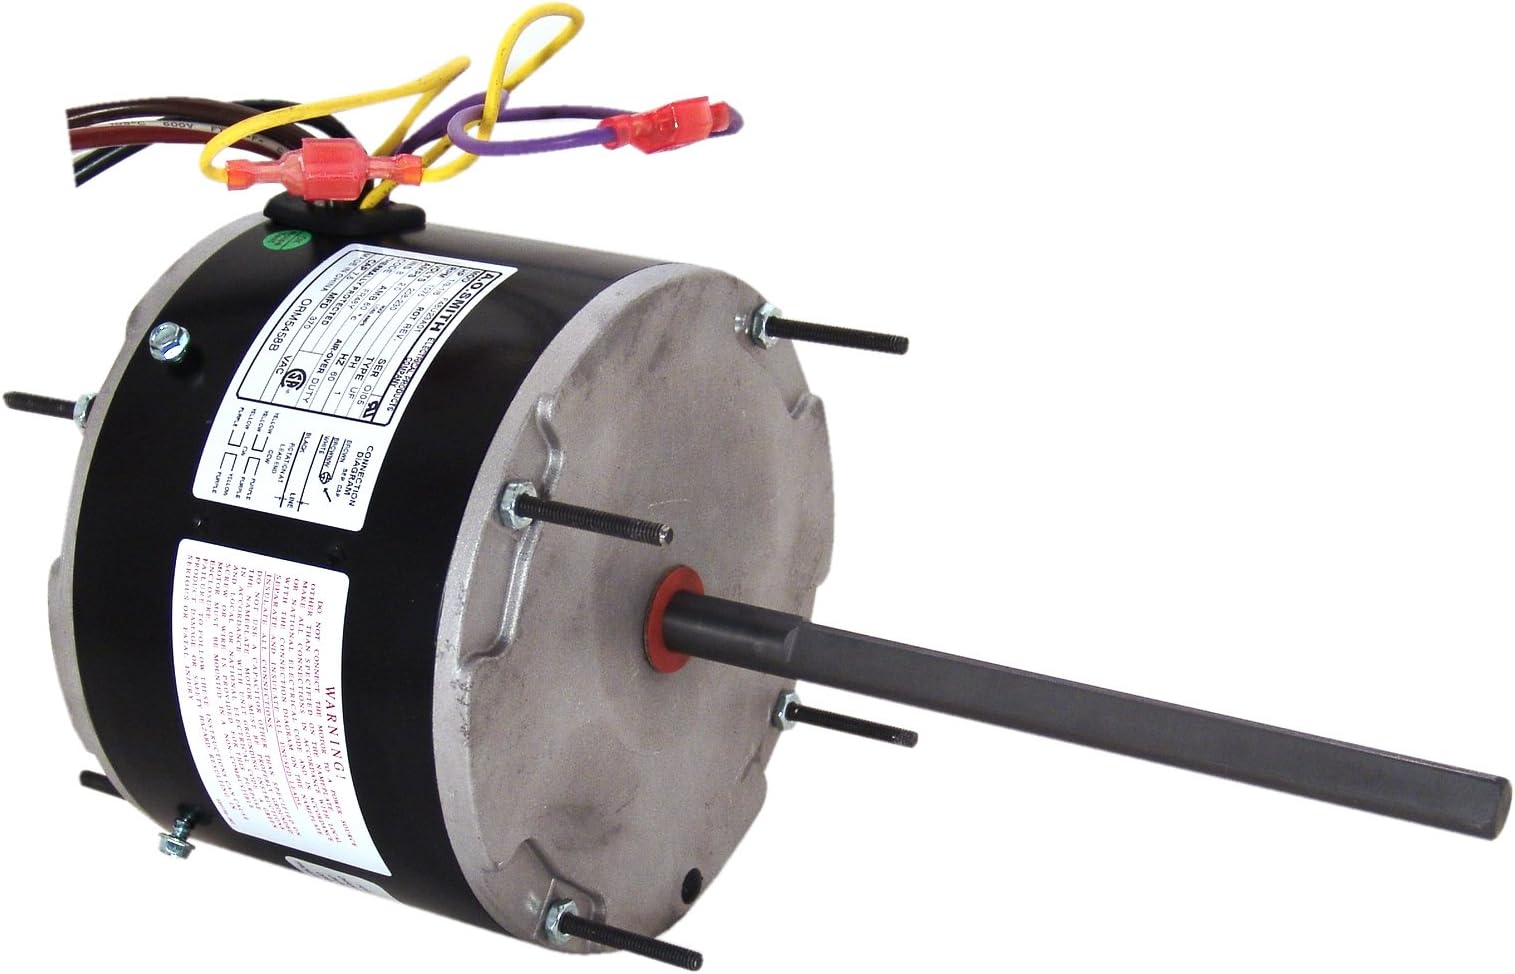
⚙️ Power your projects with precision and reliability — don’t get left behind!
The A.O. Smith ORM5458 is a versatile 1/3 to 1/6 HP condenser motor delivering a steady 1075 RPM at 208-230 volts. Featuring durable copper windings and a compact 48Y frame with sleeve bearings, it’s engineered for dependable, long-lasting performance in HVAC and industrial applications. Perfect for professionals seeking efficient, adaptable motor solutions with trusted Century/AO Smith quality.
Brand | Century |
Speed | 1075 RPM |
Voltage | 230 Volts |
Horsepower | 0.17 hp |
Material | Copper |
Item Weight | 5 Kilograms |
Manufacturer | Century Electric/AO Smith Motors Co |
UPC | 786674028273 |
Part Number | ORM5458 |
Item Weight | 11 pounds |
Product Dimensions | 14.5 x 6.5 x 6.5 inches |
Item model number | ORM5458 |
Batteries | 1 Unknown batteries required. |
Is Discontinued By Manufacturer | No |
Item Package Quantity | 1 |
Certification | Csa |
Batteries Included? | No |
Batteries Required? | No |
R**I
Works great and is flexible for multiple different installation needs.
We are going with love it (love at first install, anyway). The reason for the "love it" rating is two fold. First, it showed up as advertised and when expected. Second, the design allows for a lot of play in installing it. This can also be an issue with inexperienced do it yourselfers as the case/mounting bolts really need to be adjusted and cut or you can cause the fan to strike them. This goes for all the extra wires to make it universal as well. You need to take care that the wires are tied up and out of the way of the fan and in my case, make the portion of the case bolts shorter on top for the acorn/cap nuts on my really old Lennox, and cut off the excess on the "bottom" of the motor where the fan blade mounts. You could slide the fan further down the shaft, but that will (in my opinion) shorten the life of the bearings. The only issue that you will have is deciphering what your wiring is. I HIGHLY suggest two things. First take a picture of where your current wires are. Second, keep the old motor and make sure that you keep the wiring diagram usually printed on the side of the motor in tact when you are wrestling off the old fan (this can be a real pain in the ass and you can forget to be gentle when you are frustrated). You should probably snap a picture of the wiring diagram on the side of the motor as it may not be readable after you ceremoniously beat it to death with a sledge hammer after the fan blade removal ordeal! The pictures really help! I was a little confused by all of my wiring options and I was able to draw a correct conclusion by looking at the pictures and reading the diagrams on the new and the old motor (which I am now beating into a flat metal pancake with my short handled sledge hammer for satisfaction purposes)! Have fun and remember that you can pay a repair guy (in my case $235 for the motor and a service call of who knows what) or you can pay under $80 and do it yourself!
J**E
Easy Motor Replacement Overall for Condenser Unit. Recommend getting a HUB Puller for the existing fan blade removal.
Easy replacement install. Highly recommend picking up a Hub Puller too, before trying to do this replacement DIY. The fan blade is most likely locked onto the old shaft and even after removing the set screw, this is difficult to get moving and off. A hub puller is designed for this and they are under $30 on Amazon. I bought my on Prime as same day delivery on a Sunday when my fan went out and I had no other options. I live in Texas so it was near 100 degrees that day. I didn't know about the need for a hub puller and after it delivered shortly after 6pm I had no options to purchase one and get my system up and going again. I grabbed an awesome neighbor and we muscled through the old fan and with the use of a Sawall, Sledge Hammer, WD40, Screw Driver as Punch and some sweat, we got the fan blade off the old shaft without bending the blades (VERY IMPORTANT). Once this was done, I added some anti-seize gel to the new shaft (My neighbor had this) and slid the fan onto the new motor. The motor matched my existing mounting holes so I simply cut off the excess shaft so it didn't touch my compressor and installed the new unit. I wired up the system and added the new capacitor (ALSO Highly recommended, and cheap at under $5) and started the system back up. The sounds of harps and angels sang out as the cold air returned to my vents. Voila!!Now side note here that I didn't know when I originally installed the fan blade on the new unit. You have to push the blade pretty far up the shaft and close to the motor without the blades hitting the wiring & conduit going to the motor. I pushed it up just far enough to clear the compressor and left it there thinking it was good. During a recent visit by an air conditioning buddy to add some freon, he noticed my fan blade was low and air was being pushed up but some was being pushed back out through the coils below the top. He informed me that all of the hot air should be venting only through the top, otherwise the coils don't cool effectively as air isn't pulled completely through them. This was an easy fix and we moved the blade up further towards the motor (Good thing for the Anti-Seize Gel) Now all of the air was coming out of the top. Wow, what a difference.Good luck, and if your handy with tools, you can do this replacement yourself. Just follow the wiring exactly like it was, making special note of the setup including the capacitor. Crucial as electrical motors are not returnable (Due to miswire burnouts).
Trustpilot
4 days ago
2 months ago