We remain fully operational. Our teams are working around the clock to ensure your deliveries continue safely.

DOWNLOAD THE APP


Customer Services
Copyright © 2025 Desertcart Holdings Limited
DOWNLOAD THE APP

🏡 Upgrade your doorstep game with weatherproof style!
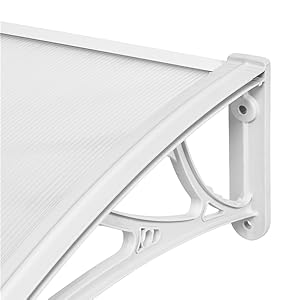
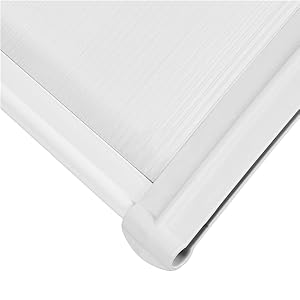
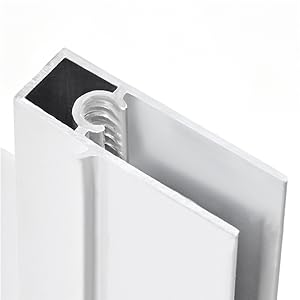
The Yaheetech Front Door Canopy is a compact, durable outdoor awning measuring 100 x 80 cm, crafted from high-quality polycarbonate and lightweight aluminum. Designed to shield your entryway from rain, snow, and hail, it combines modern aesthetics with robust all-weather protection. Easy to install and versatile enough for multiple outdoor locations, this canopy offers a sleek, long-lasting solution to enhance and protect your home’s exterior.


| ASIN | B0BNCTYC6H |
| Best Sellers Rank | 26,125 in Home & Kitchen ( See Top 100 in Home & Kitchen ) 4 in Window Awnings & Canopies |
| Customer Reviews | 4.5 4.5 out of 5 stars (2,754) |
| Date First Available | 26 Nov. 2022 |
| Item display height | 23 centimetres |
| Item display length | 100 centimetres |
| Item display weight | 2.45 Kilograms |
| Item display width | 80 centimetres |
| Manufacturer | Yaheetech |
| Manufacturer reference | MM-00118843 |
| Material type | Aluminium, Polycarbonate |
| Part number | MM-00118843 |
| Product Dimensions | 80 x 100 x 23 cm; 2.45 kg |
M**K
Perfect sturdy protector and easy to setup
Perfect as a replacement for an older canopy. Very easy to put together and setup. Just what we needed for our Back Door. Great all weather protector
S**Y
Good value and works great
Need 2 people to put it up as was difficult on my own but now it’s up it looks good and works well. The bolts to hold it to the wall could be better but do work. Handles wind well and diverts the rain well also. Good value for money and would buy again
A**R
Good value, sturdy product
Arrived quickly, easier with 2 people to assemble, and definitely needed a rubber mallet to ensure a good tight fit between canopy and brackets. A couple of screws missing, managed to find suitable ones. Once assembled seems quite sturdy. As in other reviews there was a slight bowing of the back. Instructions aren't helpful, though found some good videos on the web on fitting this general type of canopy. The bolts to fit to the wall look to be reasonable quality, and once we worked out the method for fitting give a solid strong result : Hold canopy with brackets against the wall, mark holes to be drilled, after drilling , hold assembled unit against the holes (easier with 2 people but possible on your own ), insert fully assembled bolt with nut through the bracket holes, tighten nut. Note : Don't insert the sleeve without the nut attached. There is a gap at the back so you may need to fill this as mentioned in other reviews. In this case the canopy sits under a wooden panel so no penetration of rain etc. and didn't need to fill the gap. Looks good, has survived the recent storms, wind etc. so far. Not sure how the clear canopy will deal with the range of sun/snow/rain/ etc. over time , however for the price, it's good value.
M**S
Strong sturdy canopy
Very pleased with this canopy Fast delivery arrived the next day actually. Light but very sturdy frame Easy to assemble but definitely a two person job Just my opinion but I think the M10 rawl bolts were a bit ott could manage with shorter bolts and the canopy would still be very secure because of the sturdy arms All said and done very pleased with the product.
D**Y
Decent quality and value
Having looked at both aluminium and polycarbonate options, I settled with the polycarbonate as it had a 1.2m single span wheres, the aluminium ones I saw, were limited to 1m span - a little tight for a 900mm doorway. Having said that, I would have been happy to invest more on the aluminium for its better durability (?) This canopy was better than some of the slightly cheaper alternatives as the polycarbonate sheet came in one piece - others were joined in the middle; another durability concern. Assembly was easy but, it took a few hours to install on my own with lots of up-and-downs on the step ladder and double measuring for the wall drilling. Hanging was also awkward (for one person) as the expansion bolts supplied are “push-through” and tighten whilst installing. A second set of hands would make things a lot easier. The expansion bolts are okay for the light weight polycarbonate canopy but, for a heavier canopy, I would prefer to use resin anchors on hollow brickwork as the resin would expand and distribute bolt load across the hollow void in the brick.
E**N
Front door awning
Easy to install and they look great. I ordered two and it’s very nice
A**N
Not bad
Materials are better than expected. Front and back are aluminium bars coated in plastic so are nice and solid. Sides seem to be made of some kind of soft PVC where the surface seems pliable but are pretty solid. Getting the screws into the rear bar was hard. I had to take apart and just work the screws in with a drill driver because you have to tap (thread) the aluminium holes as you go. The main panel had a few marks where the outer removable sheet was a little damaged. Not worried about that since it's going to be out in all weathers and likely covered in cobwebs in a few months anyway where I live. It seemed to not fit the gap and be short at first, but I believe this allows for thermal expansion and should be this way, so in all, once assembled it is fairly robust. Took me about 10 minutes to assemble, and I just threw the instructions as they are so bad you can't make anything out anyway. Good job everything can only go together a certain way which is pretty easy to figure out, as the slots are made to only take certain parts. The bolts, as others have mentioned should be thrown in the bin. Get yourself down to the local hardware store and pick up some proper anchor bolts. These will come apart with a slight bit of wind. They don't even open up properly so will be loose in most brick walls and easy to pull out. I'm actually screwing into wood so it's not an issue for me.
G**N
Great quality canopy
This canopy is great. Superb quality at a great price. I fitted this myself above my cabin door. Assembly is really easy. It took a few minutes to slot together. The order came with bolts which was handy. But in my case I didn’t need them. I used my own screws and attached it myself. It is so lightweight but strong and rigid that I could do it myself but it would be easier having someone else there to help. It keeps the rain off well and looks superb. I am so impressed with this that I will be buying another to go above my front door.
Trustpilot
3 weeks ago
2 weeks ago