Illuminate Your Space with Style! ✨
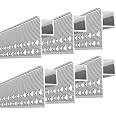
The Plaster-in LED Channel 6 Pack offers a modern, trimless solution for recessed lighting. Each 6.6FT aluminum channel is designed for easy installation and customization, featuring a milky diffuser for soft, uniform light. Perfect for various indoor applications, this package includes all necessary components for a seamless setup.
| Brand | LIGHTOTECH |
| Color | 6PACK 6.6ft |
| Material | Aluminum |
| Style | Architectural |
| Light fixture form | Recessed |
| Room Type | Bathroom, Kitchen, Living Room, Bedroom |
| Product Dimensions | 78.7"L x 0.59"W x 1.5"H |
| Indoor/Outdoor Usage | Indoor |
| Power Source | Corded Electric |
| Installation Type | Trimless Recessed |
| Special Feature | Trim Edge LED Channel for 12mm Width LED Strip |
| Control Method | Remote |
| Light Source Type | LED |
| Shade Material | Aluminum |
| Number of Light Sources | 6 |
| Theme | Indoor |
| Light Color | 彩色 |
| Included Components | Mounting Hardware |
| Lighting Method | Downlight |
| Number of Items | 6 |
| Controller Type | Remote Control |
| Unit Count | 6.0 Count |
| Mounting Type | Ceiling Mount |
| Fixture Type | Non Removable |
| Assembly Required | Yes |
| Manufacturer | Dliter INC |
| Part Number | 3815 |
| Item Weight | 6.39 pounds |
| Country of Origin | China |
| Item model number | LT-20230614 |
| Special Features | Trim Edge LED Channel for 12mm Width LED Strip |
| Batteries Included? | No |
| Batteries Required? | No |
A**B
Beautiful, But Know What It Will Take to Get These Installed as A DIY'er
These rails were easy to install and gave my project a nice clean look.Pro Tip:If you are new to this, you might want to enlist the help of a contractor for installation. They are a bit tricky to mud in. You MUST prep these for the best look. Before you plaster these in, you need to do your rail and light install. Test your lights. Next install the diffusers and then tape the diffusers off with painters' tape. Don't leave any tape overhang, or you will pull your fresh mud and paint back off of your rail. If you do not take the time to tape, you will have a rail full of mud and your project will be ruined. Mudding them in takes patience as they're likely installed in the back of something, so it takes a bit more effort to make sure that they're nice and smooth. Remove the tape promptly after painting your project. The longer you wait, the more difficult it will be to remove the tape. Immediately after painting, the tape is still soft. Use a razor blade to carefully score along the rail line for the cleanest finish. Again, your angle will probably be an odd reach.Another tip:If you're doing an entertainment wall like we did, think about putting the rails in the upper coves into the bottom of the cove so that you don't have to look at it when you're watching TV. In hindsight, I would have installed the very top and the top 4 side coves into the bottom of the cove instead of the top. Although it looks amazing, it would have been better to not have to see the lights when watching tv. Just a personal note there.Highly recommend the rails. They are economical and easy to install lights into. Just know what you're getting yourself into when installing something like this.
C**E
Do Your Research
These Lightotech Channels work great. They hold your LED strip lights, and the diffuser snaps on top. However, these LED channels are designed to be installed into your drywall—ideally before you tape and plaster. They can be used after you finish your drywall, but the edge of the channel will show.Notes-- Aluminum channels so they can be cut, but they can also bend- When complete they will give your room/area a very cool and professional look, if it is installed correctly.- The key to success is to know how you are going to use these channel lights and design everything around them.
Trustpilot
1 day ago
2 weeks ago