We remain fully operational. Our teams are working around the clock to ensure your deliveries continue safely.

DOWNLOAD THE APP


Customer Services
Copyright © 2025 Desertcart Holdings Limited
DOWNLOAD THE APP
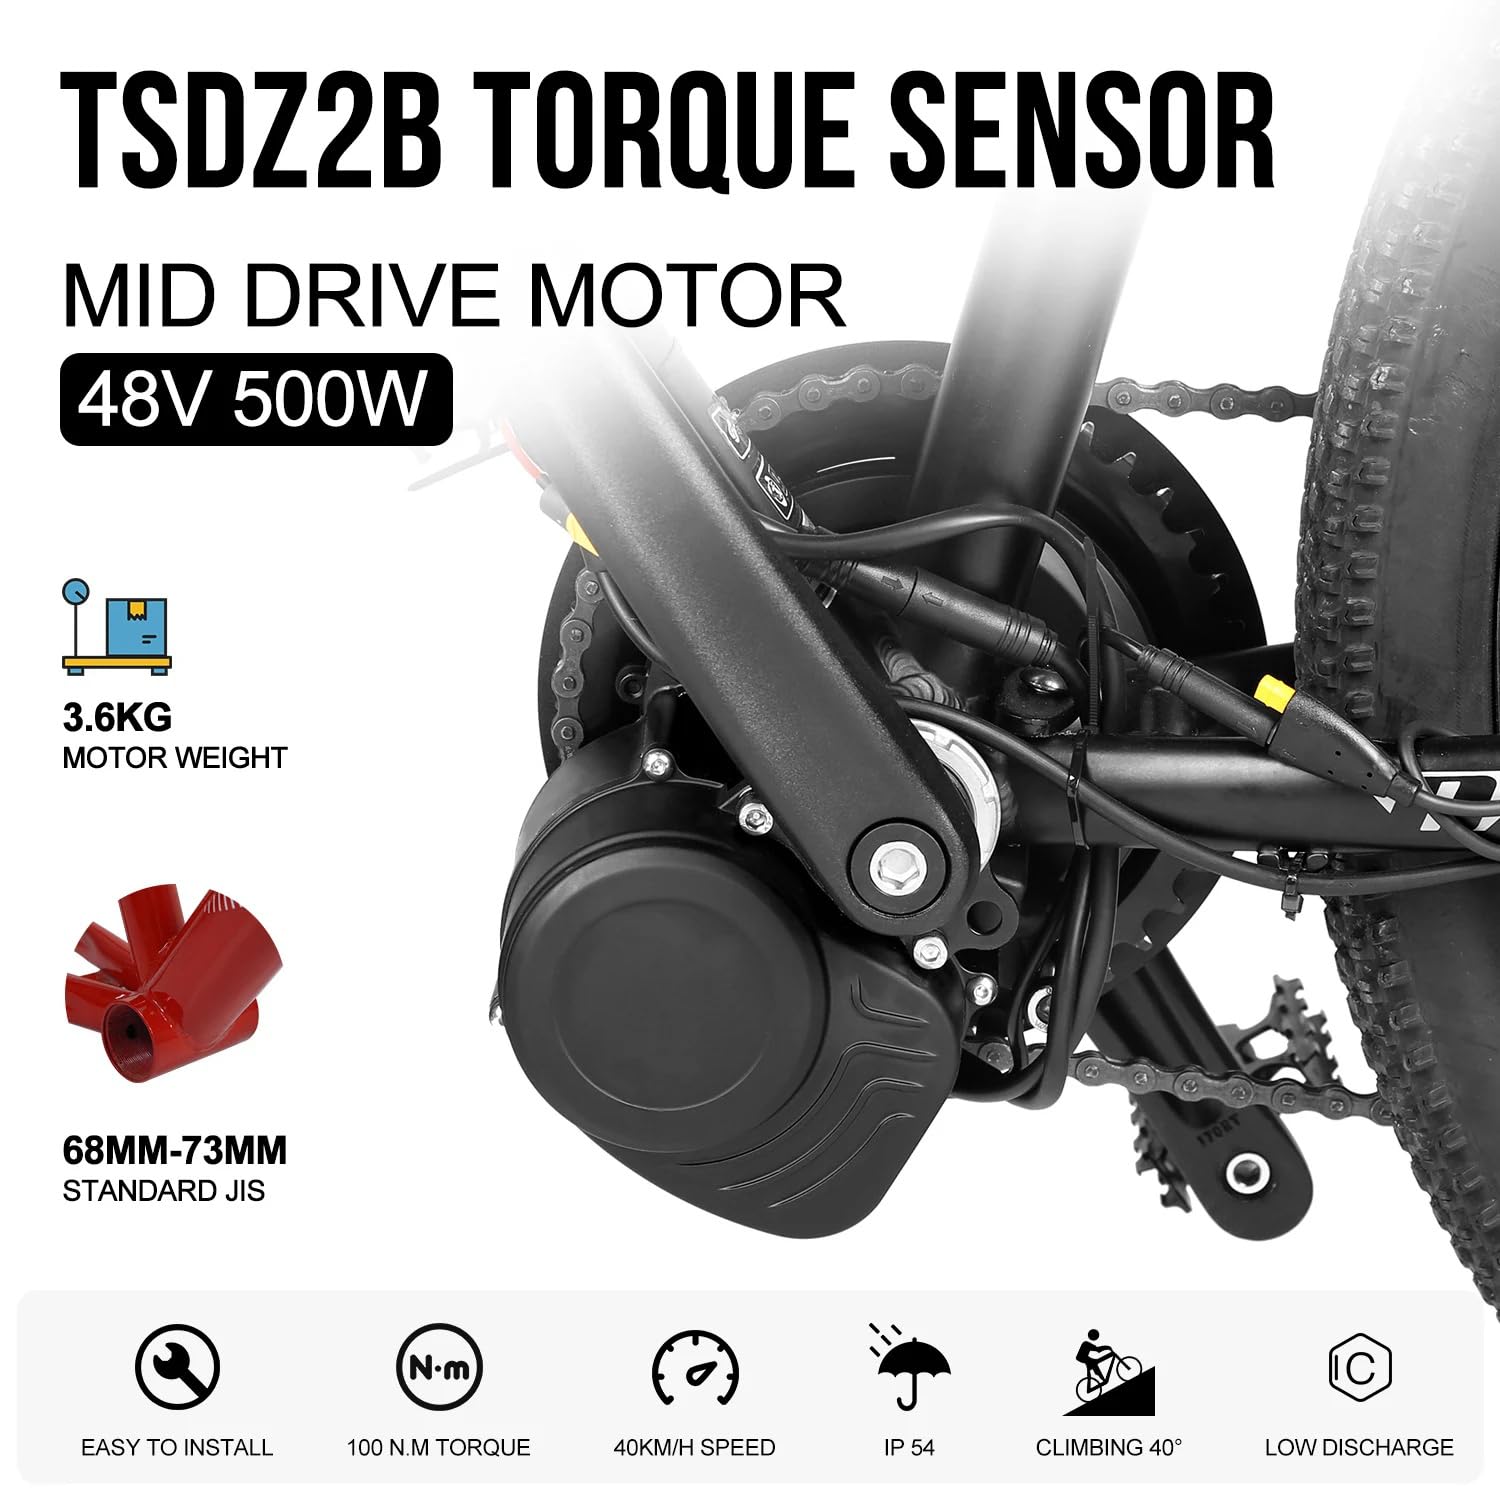

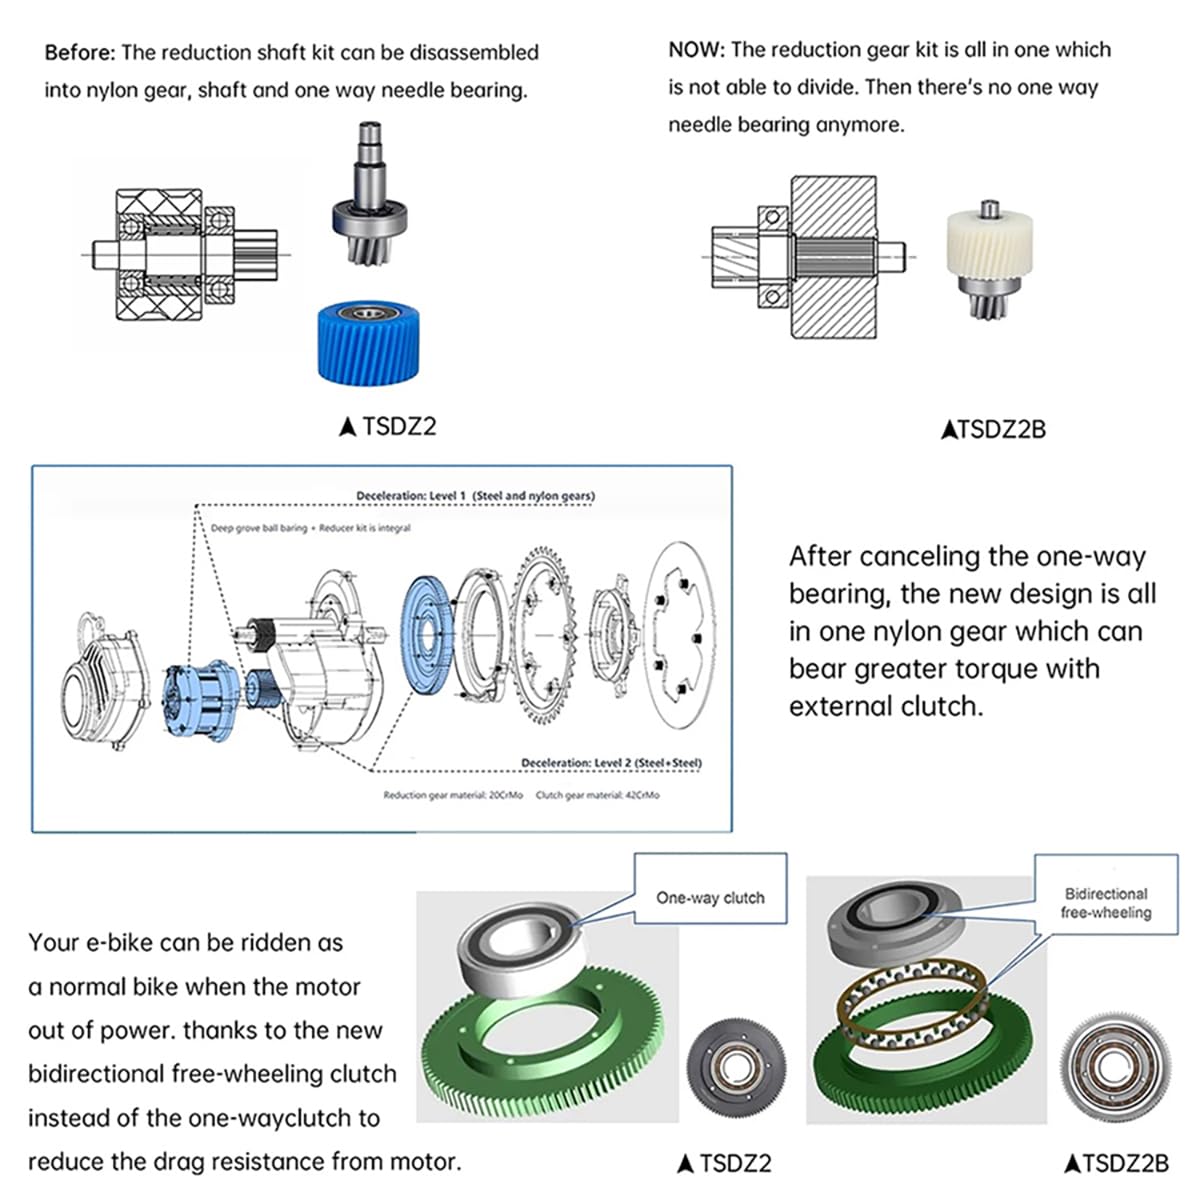

⚡ Ride Smarter, Not Harder — Power Meets Precision
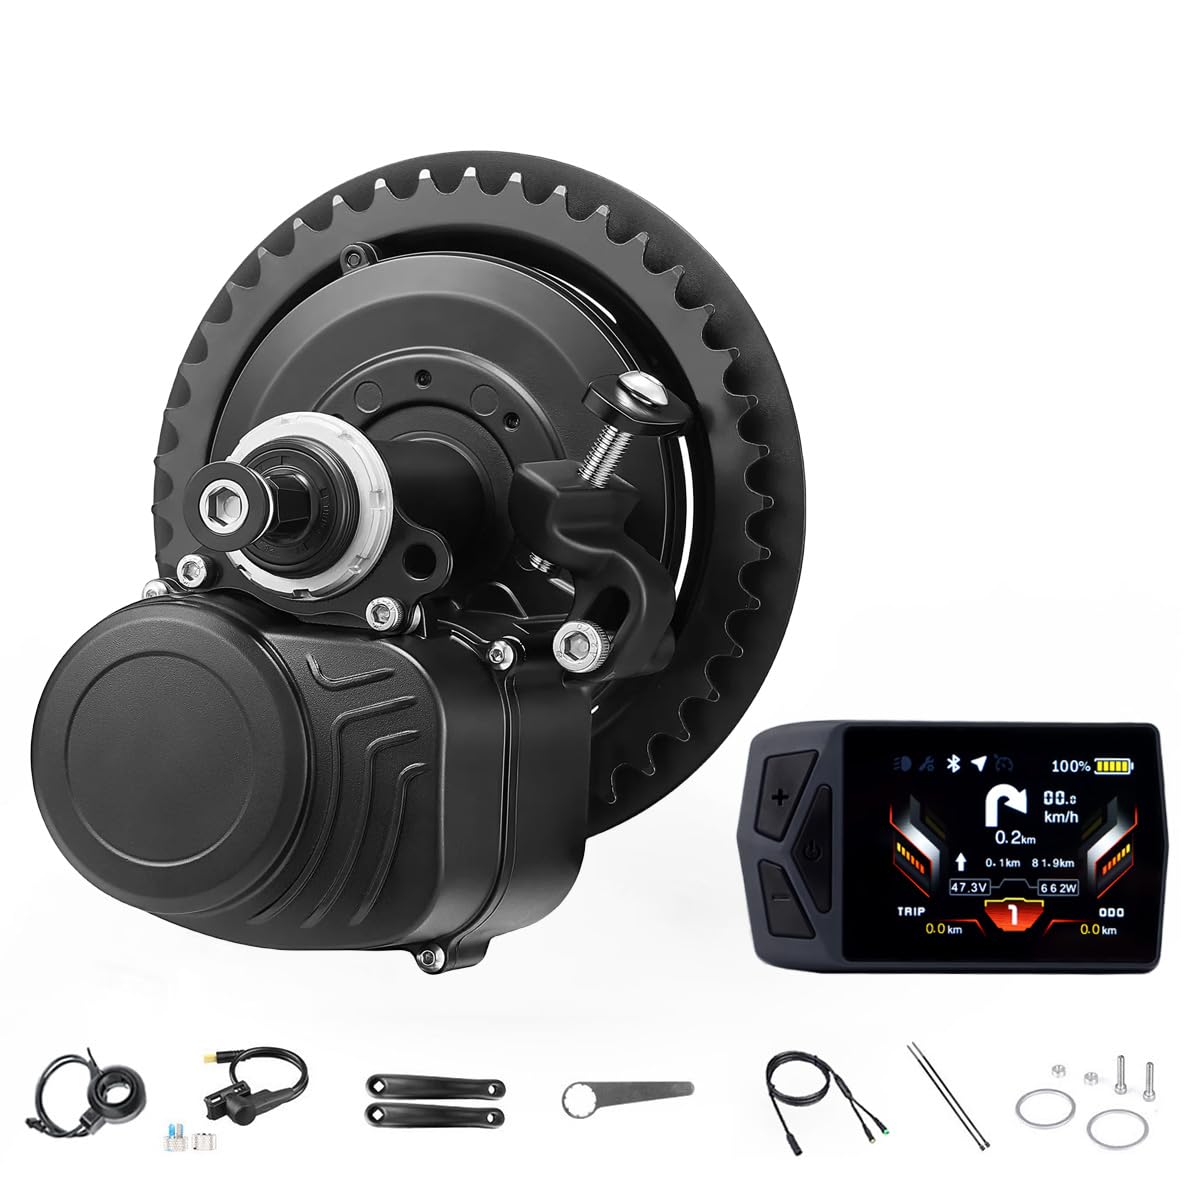
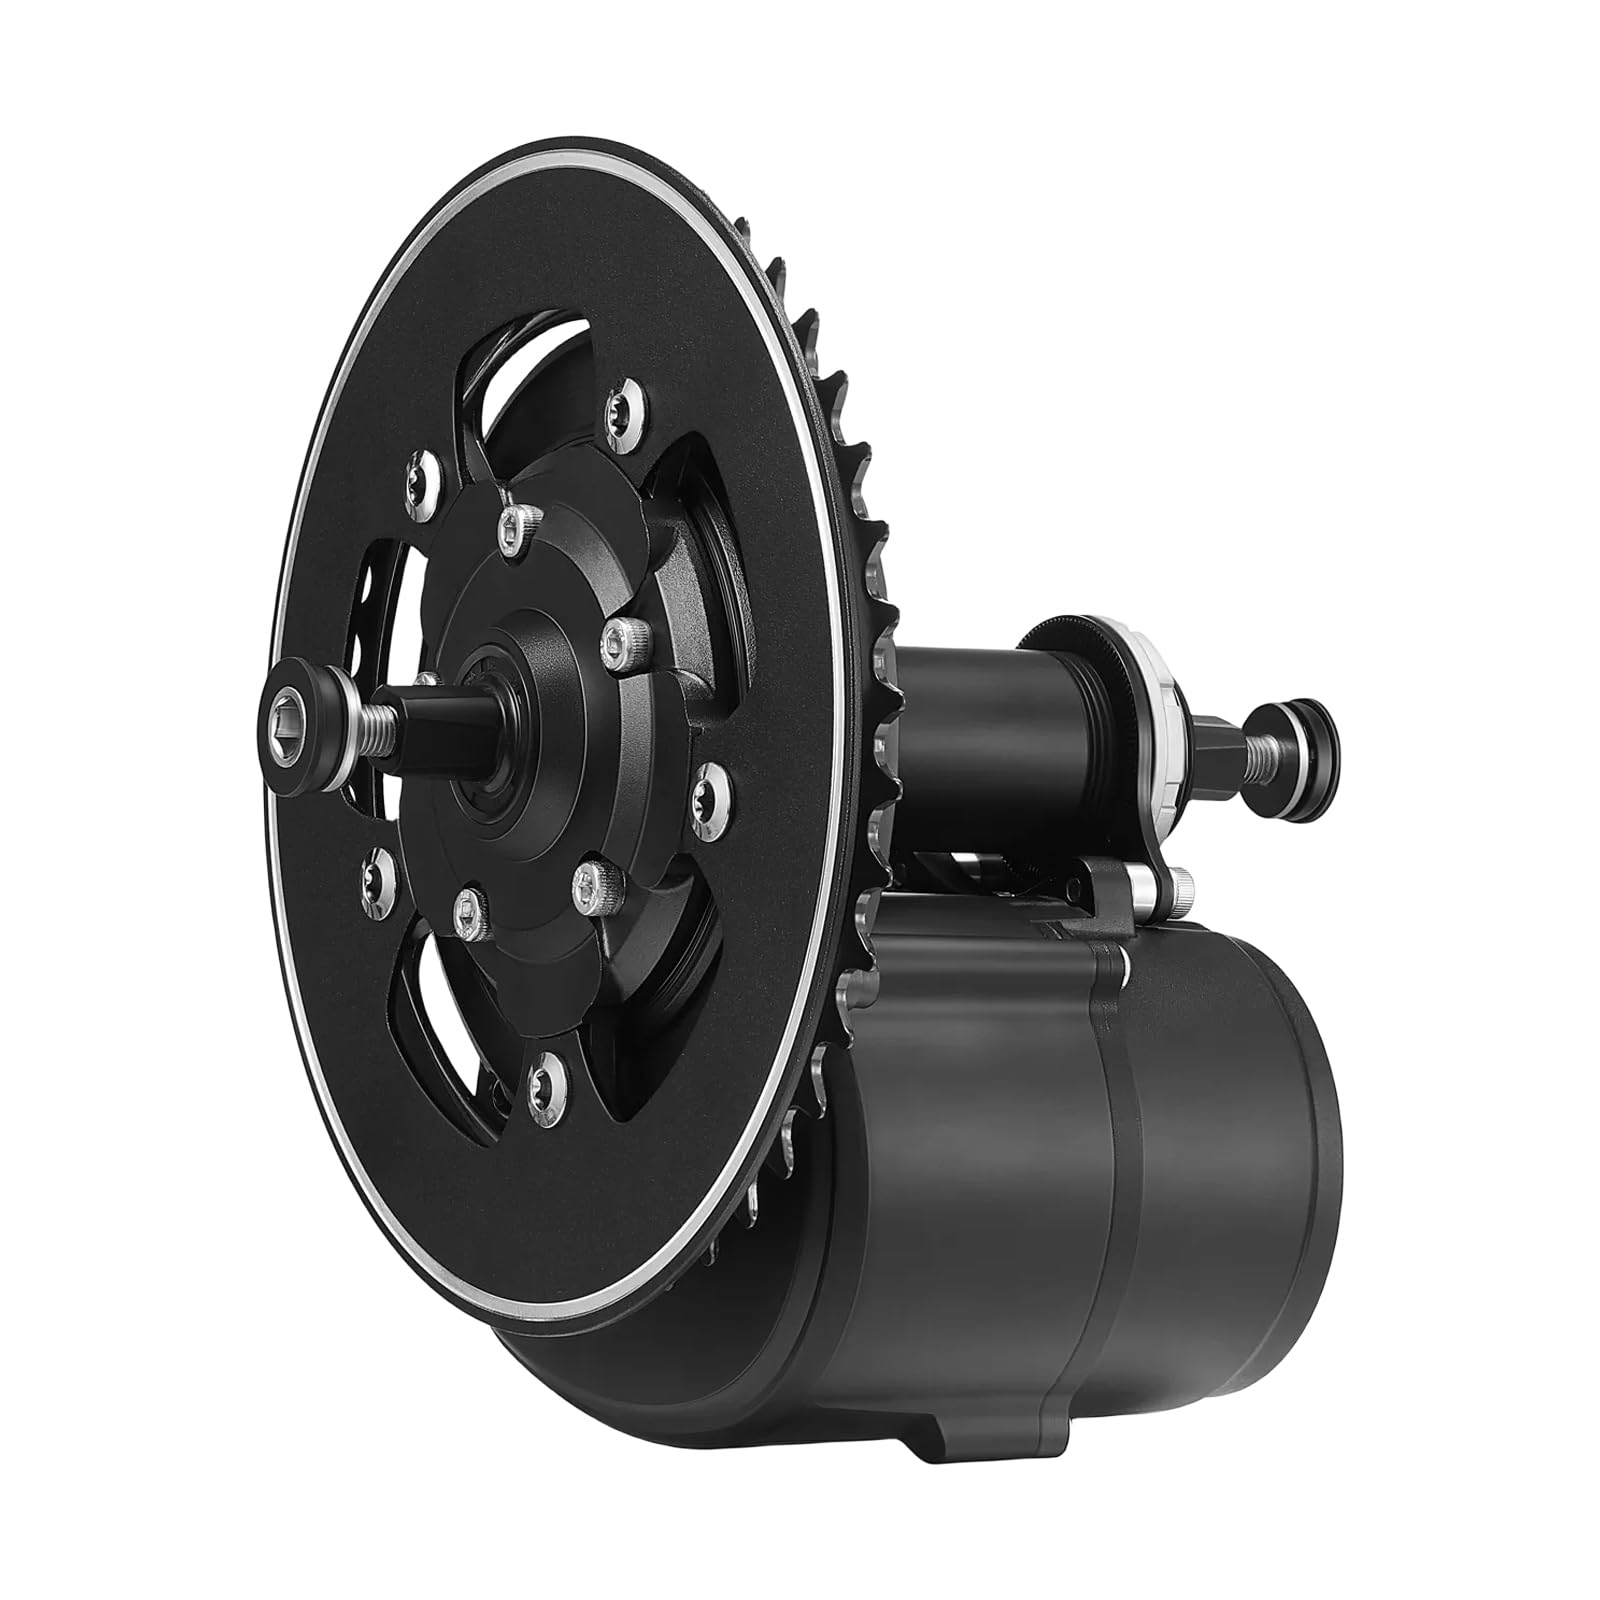
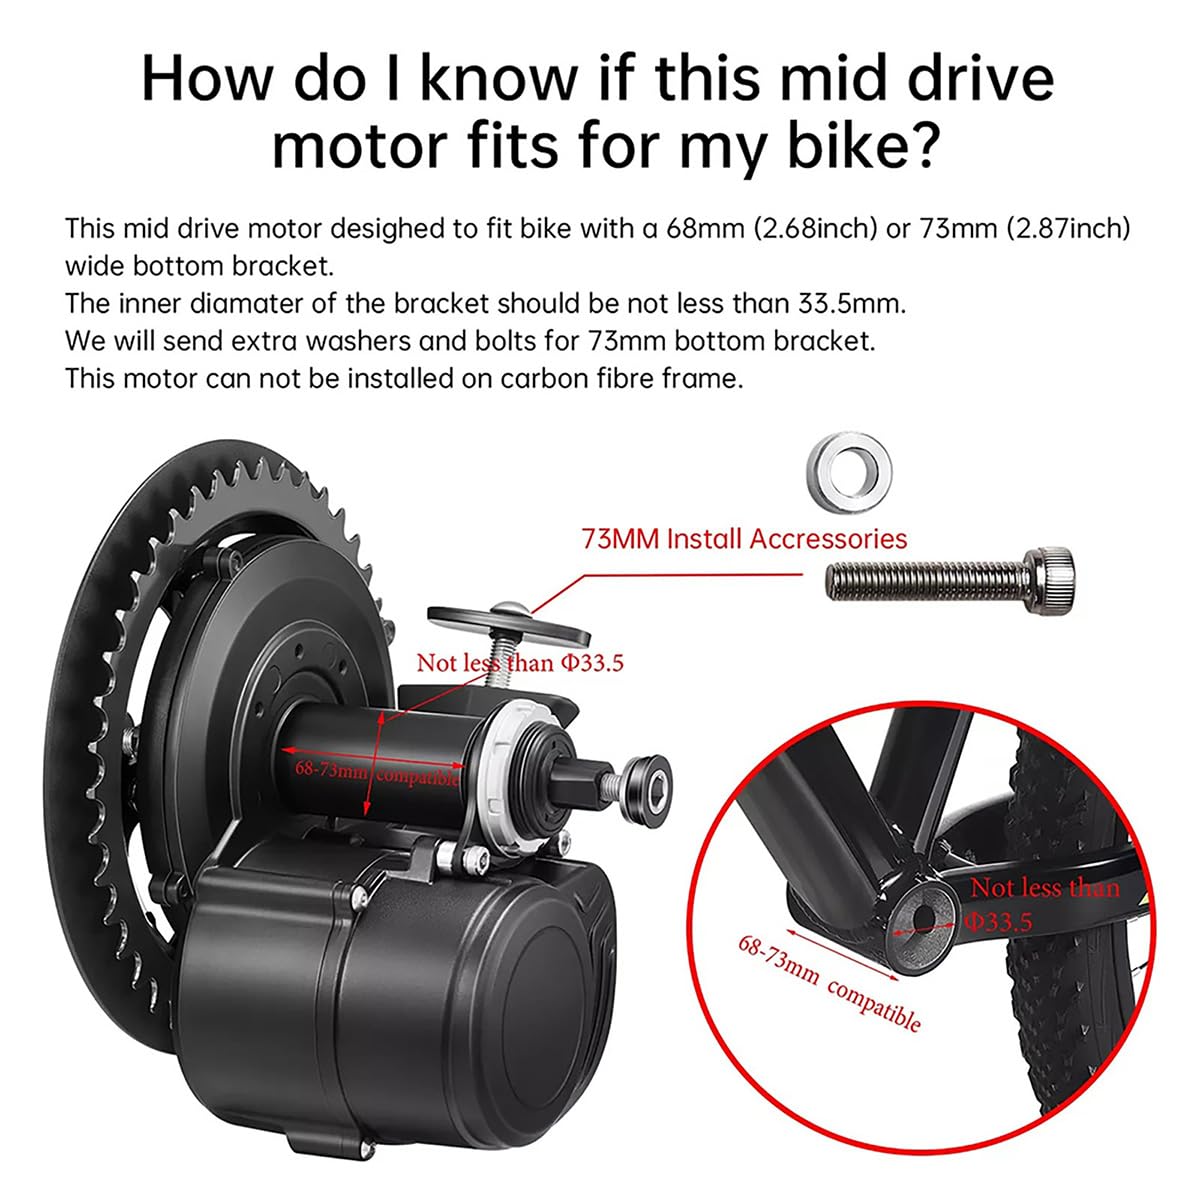
The TSDZ2B 48V 500W Mid Drive Motor Kit is a cutting-edge electric bike conversion system featuring a smart torque sensor, Bluetooth LCD display, and dual clutch design for enhanced durability. Lightweight at 3.6kg, it fits most standard bikes with 68-73mm bottom brackets and disc brakes, delivering balanced weight distribution and safe, intuitive power assistance for an elevated riding experience.


| Bike Type | Mountain Bike (MTB), City Bike, Road Bike, Three Wheels Bike |
| Age Range (Description) | Adult |
| Brand | TSDZ2 |
| Number of Speeds | 7 |
| Color | B02N (No Battery) |
| Wheel Size | 29 Inches |
| Frame Material | Aluminum |
| Suspension Type | Dual |
| Special Feature | Lightweight |
| Included Components | 48V 500W motor, display, speed sensor, throttle, tool, cranks, chainring |
| Size | 48V 500W |
| Brake Style | Disc |
| Item Weight | 3.6 Kilograms |
| Theme | Sport |
| Model Name | TSDZ2B 48V 500W Bluetooth B02N(EKD01) Kit |
| Power Source | Electric Battery |
| Wattage | 500 watts |
| Wheel Material | Aluminum |
| Warranty Type | Limited |
| Assembly Required | Yes |
| Bicycle Gear Shifter Type | Trigger |
| Bicycle Drivetrain Type | Chain |
| Electric Assist Type | Pedelec |
| Manufacturer | Tongsheng |
| Item Package Dimensions L x W x H | 10.24 x 10.24 x 9.45 inches |
| Package Weight | 5.1 Kilograms |
| Brand Name | TSDZ2 |
| Warranty Description | 7 days return, 1 year quality warranty |
| Material | Aluminum |
| Part Number | TSDZ2B-48V500W |
D**R
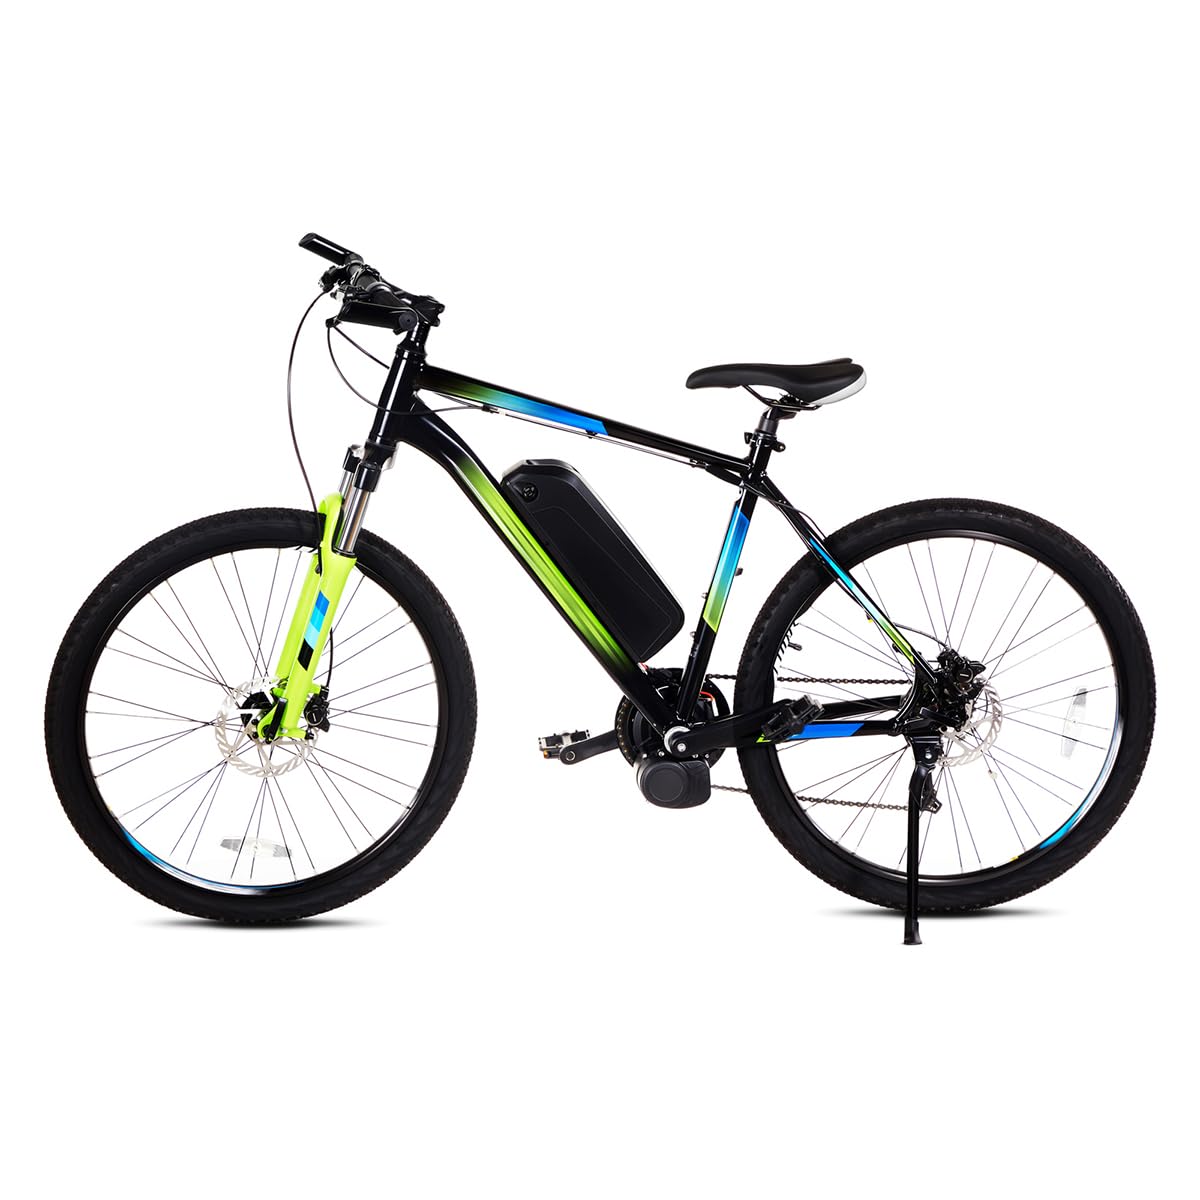
You can build and maintain your own electric bike (from most any bike you already own)!
The Tongsheng Bike TSDZ2B Electric Mid-motor came last week (so this is an early, multi-part Review.) I got the TSDZ2B 48V 500W Mid Drive Motor Kit, w/ Torque Sensor and B02N Bluetooth LCD Display (fits 68/73MM Bottom Bracket.) I put it on my Diamondback Sport Response 26Inch, buying the compatible, 48V, 14aH battery separately, which I mounted on the Down Tube, supported by water bottle cage bolts. I used the battery plate, to mark the screw locations on the my aluminum frame, to drill holes using an drill adapter, and then install either rivets and/or rivetnuts. My complete methods and tools for the battery and its tray is on my Battery Review.Why I chose to put the Tongsheng Motor on a bike, instead of buying a complete electric bike or electric scooter:As it fits most bikes, if I have a major BIKE part failure, I can always transfer the system to a different bike. Adding an electric motor (and battery) to your bicycle, can be a great solution over other options like an electric scooter, motorcycle, or prebuilt electric bicycle. Because:1. If you already have a bicycle, it's likely already customized how you like it, maybe w/ a favorite light, lock, seat, color, pedal type, handlebars, grips, and basket and/or rack to carry stuff. So, you already know how it fits, the way it goes over obstacles, and any upgrades or repairs you've done can likely still be used.2. IF that bike isn't working well for you, or has a major part failure, you can transfer many parts, the motor and battery to another bike - new or used. The batteries can last up to a 1,000 charges. And many bicycle parts are universal, widely available and at affordable prices. Not so with electric scooters or motorcycles, which have many proprietary parts and often only available from the manufacturer.3. The Tongsheng Kit are mostly simple installs w/ videos showing you exactly how to do them.4. A bicycle, especially a entry level mountain bike Hardtail - which start at about $400 new, usually have 26, 27.5 to 29 inch wheels that can go over obstacles, much better than a $400 scooter w/ 10 inch wheels. And a bicycle sits higher than many electric scooters, as do its rear lights - visibility is key to staying alive.5. Bicycles are familiar to car drivers, and thus more predictable than e-scooters you stand on.6. Most electrical powered bicycles can keep going by pedaling, after the battery dies, unlike an e-scooter.7. A bike you electrify like much like an ordinary bike, and be less likely to attract attention and get stolen, than an expensive electric motorcycle, or an expensive e-scooter - which can be difficult to lock.8. A bicycle you electrify usually has a battery you can bring inside to store, charge, and keep from the cold. Many electric bikes, and scooters especially, have batteries that are attached, so the entire ride has to be brought into the house, apt., or garage.9. A bicycle you electrify, (has a motor, battery, and simple wiring), - everything else is an ordinary bicycle you or any bicycle shop can maintain or fix. Finding a shop to fix an expensive, specific, (proprietary) electric bike or scooter will be harder and more expensive. In some cases, you may even have to mail it somewhere for warranty work? But if you can install the Tongsheng Kit, you can likely do your own bike repairs and maintenance.MOTOR INSTALL - Feb '25:1. Prep: Got bike and tools clean, in warm area inside, on a tarp or cardboard. (Dirt and grease cover screws, #'s, derailleur, chain, etc.). Wore gloves. Measured w/ digital caliper. Penetrating oil on threads.2. As things may break when removing, slowly removed old parts and those in install area, -pedals, cranks, 73mm bottom bracket (BB), water bottle and bags on frame. Worked slow to avoid injury and part damage, and researched thread directions as bike was sometimes upright and other times upside down.3. Carefully ordered compatible parts, w/ no presumptions. Looked over Orders, double checked dimensions and w/ free shipping for forgotten items, ordered more supplies, incl. grease gun. and grease.4. Emailed question to merchant about battery connection part. Removed old zip ties w/ scissors.5. Motor here, carefully cut box open, looking for damage, photographed and separated, unwrapped and guessed parts and positions. Again reviewed online and paper Instructions. Notes taken on new, minor problems. Cleaned Styrofoam packing material from threads. Took break, reviewed options, next steps.6. No brake levers (or its 2 wires), but these 'unneeded'. Ordered lights and battery elsewhere, not here yet. No XT60 electrical plugs came w/ motor. Not enough zip ties.7. Took 3 pics of motor, removed the bolts, 'fixed block' and rear wheel (more room). Slowly installed motor into bottom bracket (BB) from drive side. Tight fit, rotated motor to get it in. Greased all threads except square taper cranks. LOOSELY INSTALLED all bolts around motor, before tightening. Used medium threadlocker on most. No way to torque M33.5 'screw' using supplied special tool, so I got it as tight as possible.8. Considered if motor would be better on other 2 bikes. No, as this one will carry stuff in storage bags, and need the pedal help. Researched if my chain (KMC 8-speed) is directional (no, unlike others).9. Installed left (L) and right (R) cranks and pedals, first by hand after greasing and confirming thread directions. Got pedals tight w/ pedal wrench.10. Found unknown, metal fragment like 1/2 staple. Took picture, kept and considered source?11. Helped by ad pictures, matched wiring connection plugs and pins by color, arrows, size, and shape and put wiring in approx. locations w/ loose zip ties. Plenty of length, so it was apparent I'd have some wire to organize. Based on my frame shape and desire to protect wiring from water and road debris, decided to put excess wire above battery and below Top Tube.12. Mounted throttle on L, display on R (it's not the middle position, older type), loosely putting brake levers and grips back on, watching for items that needed to be tightened first, due to bolt locations.13. Re-installed front derailleur (minus cable and lever) to act as a Chain Guide, and connected chain w/ master link pliers. Used a NEW CHAIN, as existing one was in great shape, but not the correct size when chain was on biggest rear sprocket. Watched Park Tool chain sizing video.14. Firmly zip tied (2) Torque Sensor in position and confirmed it was clear of rear wheel movement.15. Re-installed rear wheel, checked wire clearances and pedaled by hand. Chain a bit tight, not sure if that's normal, as I thought I could easily pedal the bike without motor on, should battery be down or I prefer more exercise. (Haven't yet tested motor.)16. Confirmed chain routed correctly in rear derailleur.17. Motor Kit didn't include front and rear lights - got them in a separate order on AliExpress, which took about 2 weeks. Installed headlight on front of basket, so items in basket wouldn't block headlight. Mounted taillight above rear deflector for maximum visibility.18. My battery has 2 keys. Locked it and removed keys, so they won't be damaged if bike falls on that side, and to avoid forgetting them.19. Using my best bike lock to protect this electric bike on my first ride to the store. Bringing more tools than I normally will, to have them for road-side repair / adjustment. Will check tightness of all bolts on first ride return. Will put bike upside down, to check wire routing, especially near moving parts like the front chainring and tape / add zip ties as necessary. Plan to avoid all water and consider wrapping big wire bundle in shrink wrap too, so a surprise rain won't damage components.20. Motor Kit didn't come with brake levers to disengage motor power when brakes put on. Instead, Motor Kit FAQ (see ad) states the torque motor is safe as it only propels you when you're pedaling using torque sensor. A bit confused on whether throttle has to be on too? Watched Youtube videos on shifting w/ mid-motors - not when the throttle is engaged or under heavy pedaling. Youtube channel on e-bikes JohnnyNerdOut has great advice on parts, installation, service and use. He advises bikers to use their gears - DON'T just keep the motor in a high gear all the time, as that will stress the motor and wear it out. Instead, if I recall, you should shift down as you're reducing speed / coming to a stop and use lower gears to climb hills.21. RIDE TEST and final thoughts / rating will be in edited Review after some careful use. For now, the E-bike motor Kit seems like a quality, helpful way to go longer distances (and carry goods), without wearing out. I'll watch and graph my distances to learn the common charge to miles ratio.
Trustpilot
4 days ago
2 months ago