Desert Online General Trading LLC
Dubai, United Arab Emirates
Desert Online General Trading LLC
Dubai, United Arab Emirates


✨ Breathe smarter, live cleaner with Bio Shield’s UV-C power! 💨
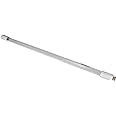
The Bio Shield 17-inch OEM Replacement UV-C Lamp delivers 25 watts of powerful ultraviolet light to sanitize air by eliminating bacteria, germs, mold, and allergens. Engineered exclusively for the Bio-Shield UV-C Air Sanitizer System, it features a durable Teflon coating for safety and offers an impressive 12,000-hour lifespan. This ozone-free, eco-conscious lamp enhances HVAC airflow efficiency while ensuring a healthier indoor environment.


| Brand | Bio Shield Antimicrobial Protection |
| Light Type | UV-C |
| Special Feature | UV-C Light |
| Wattage | 25 watts |
| Bulb Shape Size | T7 |
| Bulb Base | Prong |
| Incandescent Equivalent Wattage | 150 Watts |
| Specific Uses For Product | Sanatizing |
| Light Color | UV |
| Voltage | 120 Volts |
| Unit Count | 1.0 Count |
| Number of Items | 1 |
| Shape | Tubular(T) |
| Material | Glass |
| Model Name | UV-C Air |
| Power Source | AC |
| Item Package Quantity | 1 |
| Light Source Type | Ultraviolet |
| Item Weight | 0.5 Pounds |
| Light Source Wattage | 25 Watts |
| Product Dimensions | 0.39"W x 17"H |
| Accepted voltage frequency | 100 to 120 Volts and 60 Hertz |
| Control Method | App |
| Average Life | 12000 Hours |
| Style | 1 Count (Pack of 1) |
| Global Trade Identification Number | 00707534133258 |
| Manufacturer | Bio-Shield |
| Color | Blue |
| UPC | 707534133258 843324102759 |
| Part Number | 51-BUVAS-RL-1 |
| Item Weight | 8 ounces |
| Item model number | 51-BUVAS-RL-1 |
| Is Discontinued By Manufacturer | No |
| Size | 17-Inch Replacement Lamp |
| Finish | White |
| Number Of Pieces | 1 |
| Special Features | UV-C Light |
| Included Components | Product Information Guide |
| Batteries Included? | No |
| Batteries Required? | No |
| Warranty Description | 1-year limited manufacturer warranty. |
Trustpilot
2 weeks ago
1 month ago