🛡️ Lock down your peace of mind with the strongest door brace on the planet!
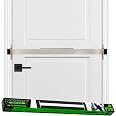
The OnGARD Security Door Brace is a patented, space-age polymer barricade designed to reinforce inward swinging doors against forced entry. Laboratory certified to withstand up to 3,100 pounds of violent force, it offers superior durability without rust or corrosion. Easy to install in 15 minutes on most floor types, this award-winning device is trusted by security professionals and law enforcement to prevent home invasions by physically blocking intruders from inside.


| Brand | OnGARD |
| Mounting Type | Floor Mount |
| Material | Polymer |
| Color | Black |
| Style | Modern |
| Product Dimensions | 10"L x 2.5"W x 3.1"Th |
| Finish Type | Polymer |
| Number of Pieces | 2 |
| Manufacturer | ShatterGARD Inc. Global Security Experts |
| UPC | 793573150400 |
| Part Number | OnGARD SDBB2 |
| Item Weight | 2.24 pounds |
| Item model number | OnGARD SDBB2 |
| Is Discontinued By Manufacturer | No |
| Finish | Polymer |
| Item Package Quantity | 1 |
| Batteries Included? | No |
| Batteries Required? | No |
B**V
Strong and easy to install
Good quality, simple solution, easy installation, just ordered another one for the back door.
F**L
Great Security Measure
Excellent additional security for an entry door.
V**E
DO NOT Use the drill bit included!
This Security Door Brace looks and works like advertised. The 10 minute install time they advertise is wishful thinking. If this brace is being mounted on a wood floor then MAYBE 10 minutes is plausible, but NOT with their drill bit provided. the screw bit included to drill in the screws is top shelf but the Drill Bit is something you would purchase at the $.99 Store and it would be part of a set. I purchase 2 of these Braces so I had to go through the tedious job of installing these things TWICE! The screws used are about a size 14 and approx 3 inches long, so they are Heavy Duty and show that these Braces are meant to hold back some serious force and each Brace uses 4 screws. The Drill Bit is only 1.5 inches, so I believe they figured the Drill bit would make the hole and the Screws would do the rest of the work until they would fit flush into the brace holes. Once again, that MIGHT work if you are dealing with wood floors, But homes come with a variety of floor types and even Wood planks over a cement base this WILL NOT WORK!! The two doors I was placing these security braces in back of were next to a Stone Tile flooring over cement which would have broken the included drill with the first hole. Luckily for me, being the Weekend Warrior Contractor/ Mechanic I actually own an Impact Drill and Drill bits. I tried using the 3/16 bit first, but the hole wasn't big enough and the screws were not tough enough to drill through the smaller hole opening, Plus the Drill Bit broke inside the cement base after the 3rd hole was made. I went to the 1/4 drill Bit which made the job much easier, but the hole was now too Big plus if I drilled too fast it would start cracking my stone tiles. After making the 8 holes (4 per door) I swept up the Tile and cement dust left behind, mopped the areas free from dirt, dust and leftover chipped tile and then I placed heavy duty large anchors into each hole. I then placed the floor part of the brace over the holes made and drilled the 3 inch screws into the holes/Anchors (Using their Drill bit). These Security Braces are ROCK SOLID!!! and it only took an hour, lol.
T**D
Can recommend
Works great for the indoor section of our house.
M**.
The illusion of security will not save you.
Very easy to install. Comes with a drill bit and a screw bit for installation. You will need a power drill. I have 3/4 hardwood floors on a plywood base. No issues with drilling with the provided bits. I did pull the quarter round trim from the base of the door. This allowed me to center the base plate and push it as close to the door as possible. By doing this this the door doesn't have to travel the extra 1/2 inch before making contact with the brace. My thoughts are if installed up against the base molding the door has to travel past the 1/2 thick molding before it makes contact with the brace. If this happens your door locks have already broken and the door frame and wood around the deadbolt and strike plate have been broken as well. Now, the brace will still work but now you have to basically replace your entire door and frame. I have French Doors so that is an expensive 1/2 inch of play. By cutting the quarter round trim at the base of the door and sliding the brace all the way up to the doors base the On Gard door brace is connecting with door while the deadbolt and door latch are still engaged with the door frame. Making this system stronger and possibly saving your wallet from more damage or complete door replacement if the worst happens. From a security standpoint French doors are the worst as there is no solid frame between the doors. They are extremely susceptible to forced entry. This system solves the frame strength issues but doesn't fix everything. Reinforce your strikeplates and install 3 inch screws in your hinges and strikeplates that go into the 2x4s behind your door frames. If you have glass in doors use security glass film that stops the glass from breaking out. None of these things will stop a determined attacker. They will give you those vital 15-30 seconds to get to your gun. Protect your family. Stop living with the illusion of security.If you are attaching the base to ceramic tile or concrete you will need a masonry bit and concrete anchors. The bits and screws that come with this kit are not meant for that installation but it can be done.
J**X
Tile and Concrete need special tools AND screws
Read and use this method for tile and concrete foundations. I found these instructions here on Amazons Q/A. I just had a few things to add even with the Cement Screws after breaking 2 screws in to my foundations, that was by following the customers instructions. I was able to shift the base over so you cant see pilot holes or screws, i had to shave the screw shafts down with my dermal cutter.FROM THE OTHER CUSTOMER, I FOLLOWED THESE STEPS:The combination that finally worked was using a Bosch 1/4 Tile/Glass Bit with a Hammer Drill to cut the initial tile holes. I then switched to a 1/4 TapCon Concrete Bit and together with the Hammer Drill, cut through the foundation about 2-1/4. I then came back with a larger 5/16 Bosch Tile/Glass Bit with Hammer Drill to make the holes in just the upper tile portion a bit larger (just to be on the safe side in case the 1/4 holes did not perfectly line up since there were four of them along the length). Then used a Hammer Drill with a #2 Phillips Bit to drive in the (4) 2-3/4 long 1/4 TapCon Screws.Be sure to get a lot of the concrete dust out by just going in and out with the drill bit and vacuuming. Once you get to the point of screwing the cement screws, be sure to have your hammer drill function on AND on a lower setting. Dont spin it all crazy.
A**S
Nobody's Kicking Your door in!
This thing is solid! Throw away the original screws and get your self some Tapcon concrete anchor screws if you have concrete that is. You'll need a concrete drill bits to get down in there preferably using a hammer drill to make yoir job easy. Once installed right, no one's kicking your door in. They'd have to drive car thru your door to get in!
Trustpilot
1 week ago
3 weeks ago