🔧 Upgrade Your Ride with Confidence!
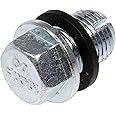
The Dorman 65217 Oil Drain Plug is a high-quality, direct replacement designed to fit specified vehicles perfectly. Made from durable metal, this universal fit plug ensures a secure seal, making it an ideal solution for replacing missing or damaged plugs. Backed by over a century of automotive experience and expert support, this product guarantees reliable performance and peace of mind.


| Material | Metal |
| Brand | Dorman |
| Item Weight | 0.01 Ounces |
| UPC | 037495652179 |
| Global Trade Identification Number | 00037495652179 |
| Number of Items | 1 |
| Manufacturer | Dorman Products |
| Item Weight | 0.01 ounces |
| Product Dimensions | 4 x 1.5 x 1 inches |
| Country of Origin | China |
| Item model number | 65217 |
| Is Discontinued By Manufacturer | No |
| Exterior | Ready To Paint If Needed |
| Manufacturer Part Number | 65217 |
| OEM Part Number | 65217; ODP-65217B; ODP-65217C |
T**2
Solved the problem, relatively easy to install
After having an oil change on my old 2005 Saturn Vue at a popular national chain oil-change location, my vehicle started leaking oil. Upon inspection, I found it was coming from the oil drain plug. While I could tighten the plug to a point, eventually it would just spin around again, indicating that the threads were stripped. Tightening the original plug just to the point of failure still resulted in a very minor leak, perhaps no more than two-to-three drips of oil per day. Unfortunately, since the vehicle isn't used very often, it was enough to stain the concrete driveway.This oversized plug solved the problem. After removing the original plug and draining the oil, I started the thread on this by hand, but I was only able to turn it a couple of times before a wrench was required. For the most part, it went in relatively easily. But by the time it got to the required last three-or-four turns, it was difficult to seat. It required a lot of patience and strength to get it fully-seated.The plug comes with a plastic crush washer.After replacing the oil, the plug remained bone-dry. After 24 hours, there was no sign of the leak. Running the engine and using the vehicle for a short trip did not change the outcome. This is basically tight enough that it solved my problem.I haven't tried to remove it, only because I don't want to tempt fate. I only change the oil in this vehicle annually or so, so as long as it isn't dripping on my driveway for now, I'm not concerned about removing it.If I had taken this back to the oil change facility, it would have cost me more in time, money, and stress than this replacement plug and an hour of my time was worth. If you have a minor oil-drain leak, give one of these a try first.
T**A
Oil drain plug for stripped Honda CR-V 2008
Honda CR-V 2008; last mechanic stripped oil drain plug. Had sealed it with some gunk and when I removed the original bolt for an oil change, a spring like stripped metal waste came out with the plug. Thought I will try this Dorman bolt first before buying a new oil pan. Awesome choice!Never done anything like this other than changing regular oil few times a year; but I knew from watching endless youtube videos that when making new threads, millimeters is the key word.At first, comparing the length of the Dorman bolt to the original honda bolt, I thought I had messed up. Original bolt was just about half the length of the Dorman bolt. Another review here about another honda had a picture of it fitting all the way through, so I gambled on it and tried it.I took care to align the bolt initially and slowly threaded it until I had moderate to high resistance, then I screwed it back out a few rotations. I repeated this process of screwing it in slowly until considerable resistance and screwing it back out again and again and again.. It took forever, like hours. I had never done with before and I didnt want to crack the oil pan. Slowly but surely, the bolt would enter deeper and deeper; millimeter at a time with each back and forth. My arms got sore; took breaks; ate snacks; but I didnt want to rush it. The original hole slowly dilated to the new larger thread size and half a day, the bolt entered completely. Occasionally, I would remove the whole bolt to flush out the metal filings on it and try to wipe the hole clean.When finally done, I ran a couple of quarts of oil down the engine to flush out metal filings through the hole. I will change the oil and filter in a month to flush out any more metal filings just to be safe.Super happy to have saved me from buying a new oil pan! Bolt has no leaks and works well with Honda crush washers!Def worth a try!TLDR: Works for 2008 Honda CRV, Align properly, insert slowly until considerable resistance and screw it back out; repeat process for hours getting deeper millimeter at a time. Dont freak out since this bolt is longer than original drain bolt. Use with Honda crush washers.
J**S
Helped us avoid a new oil pan
My fiance had a stripped aluminum oil pan in her 2002 Honda Accord. We bought this and it worked perfectly the first time around. We were able to re-cut new threads and I even was able to buy extra washers for future oil changes. Unfortunately when we changed the oil the second time around this thing started leaking. I believe we ended up re-cutting threads on the previously cut threads which led to a bad overall seal. I'd recommend this before buying a new oil pan... just be careful putting it in the second time around
E**L
Excellent Solution for Stripped Threads
A garage told me they replaced my original drain plug with the universal toggle replacement shown in one photo. It lasted for awhile until it jammed and became distorted after tightening. I opted for this one due to Dorman's reputation. It performed beautifully, cutting threads slightly larger than the original, stripped ones! I saved the old oil and poured it through the engine and out the drain hole to flush out the thread-cutting metal shavings. I have greater confidence in this replacement than the toggle type and consider the latter a temporary fix. It takes a larger crush washer than original. Use the transmission drain plug sized washer. And spray off the new plug with brake cleaner before final installation.Just take it slow and easy with the tightening-and-reversing sequence and you should have great results too!
Trustpilot
4 days ago
2 weeks ago